|
the CEO! Creative Eternal Optimist! Blog
|  |
Monday, February 02 2015

February, sharing the love! The DCC blog hop connection, we are sharing the products and techniques we love! My favourite product to design with is felt, I love Kunin felt especially the new premium 8 oz. weight used in my house. One of my favourite techniques has been needle felting. I live in Eastern Canada where it is a white winterland at least 5 months of the year. This inspires my design work, snowflakes, snowbabies, soft pastels and sparkle, these are a few of my favourite things!
I created this snow scene for a magazine campaign about four years ago, a needle felt technique is used. Handwork is both relaxing and rewarding. Full instructions.
So now that I have shared my favourite crafty things, find out what my other designer friends love! Hop along on the DCC button in the sidebar!
Happy crafting!
Debra
Monday, January 05 2015
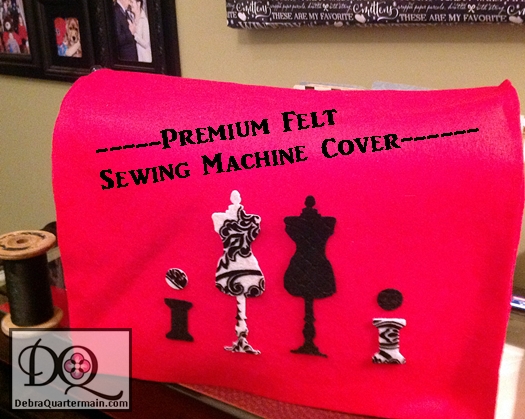
The first Monday of the month we hop with the DCC, Designer Crafts Connection. This month's theme, favourite new product in 2014. I work regularly with the Kunin Group who manufacture felt from chipped up water bottles, millions of bottles every year! This past year they released their new premium felt, Eco-fi Plus, a heavy 8oz weight not only for crafting but for home decor and fashion. The felt is weather resistant, fade and mildew proof, it becomes softer when washed.
I have been creating all kinds of projects for my home from this new Eco-fi Plus felt. In the photograph above my new sewing machine cover. Because of the weight of the felt it stands on its own.
Such a quick easy project, here's how!
I measured the height, length and width of my machine using these measurements I cut two curved ends. I also cut one piece double the machine measurements. Using fabric glue I glued the ends to the straight piece on ether end. For embellishments I added Tim Holtz sewing die cut.
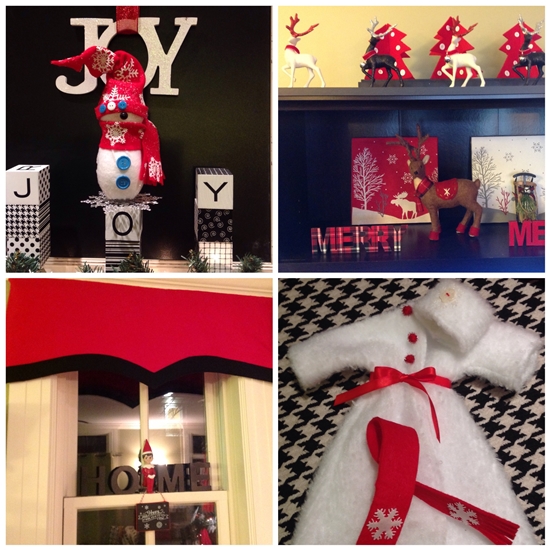
Below are some photos from the kitchen over the holidays, the window valance, mini Christmas trees
So now you know my favourite product of the year, check out my other designer frineds to find out theirs, just hop with the button in the sidebar!
Next week we are off the CHA Craft and Hobby Show in North America, Kunin Booth #401!
Happy crafting! Debra
Tuesday, December 02 2014
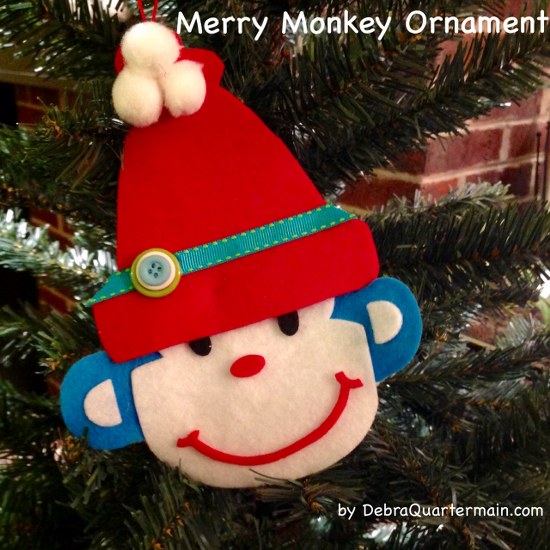
Here we go again, another fun blog hop with Laura Kelly and some other very cool bloggers! I love Laura's Hat die which will be released in January by Ellison/Sizzix. Her hat fits another Sizzix die, the Monkey. Kids love monkeys and this is Christmas crafting with kids so how about a Monkey ornament for the tree! Using Kunin's Presto felt die cut several monkey faces and hats in the different bright colors. Have a selection of buttons, trim and ribbon scraps for the kids to choose from.
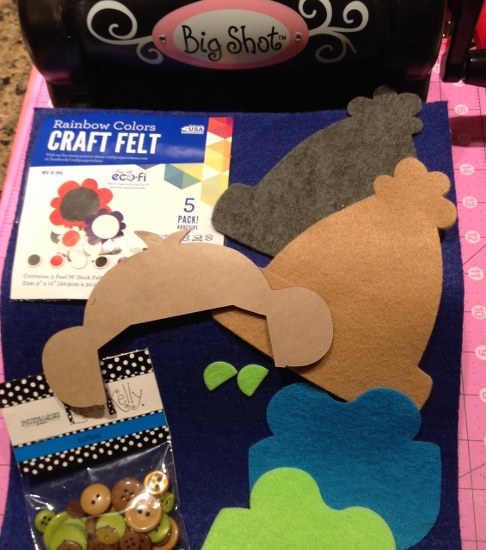
Now let the fun begin, with the Presto felt the kids just have to peel off the back and stick down the felt. They get to choose the colors for the face and features, placement and discover how funny a monkey can be if his eyes are crooked, far apart or close together. Use a fabric marker to add their name to the hat brim. Easy peasy Christmas crafting! Keep a little bin for extra parts not used and for future crafting adventures!

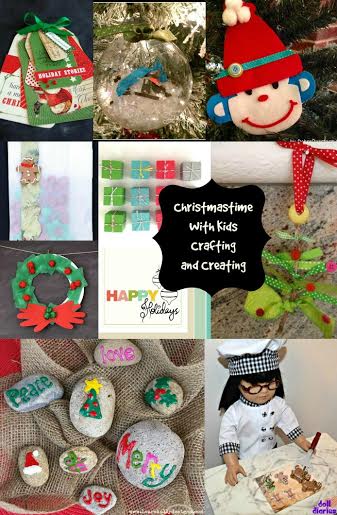
Check out the rest of the Christmas Kid Crafting adventures! Linky in the sidebar! A cool contest too, Rafflecopter posted on Twitter, www.twitter.com/DebraQCEO.
Thanks for stopping by!
Happy holiday crafting!
Debra
Sunday, November 30 2014
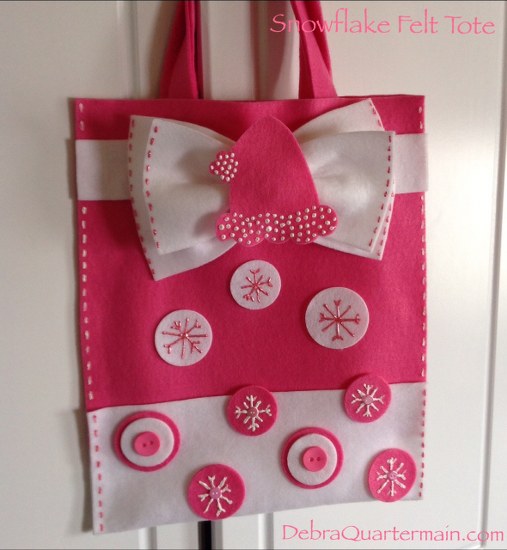
When talented designer friend Laura Kelly asked me to be part of a blog hop introducing her adorable hats, a 2015 Ellison Release Die-Cut Hats, I was so excited! She sent me a few to have fun with along with her buttons from Buttons Galore and products from iLoveToCreate. The hats I received were all cut from Kunin’s Eco-fi Plus Premium Felt. How could I resist the one in Candy Pink to create a snowflake tote to pop all those little extras in when taking baby Anna on a winter outing. The premium weight of felt makes a sweet yet sturdy tote. This is a two hour project or less using fabric glue. Sweet and simple!
You will need:
2/3 yard Kunin Eco-fi Plus Premium Felt, Candy Pink
1/3 yard Kunin Eco-fi Plus Premium Felt, White
Laura Kelly pink buttons by Buttons Galore
Scribbles Fabric Paint, Pink, White by iLoveToCreate
Quick Dry Fabric Fusion by iLoveToCreate
Circle Die & Big Shot by Sizzix
Scissors, pins, cutting mat, rotary cutter
How to:
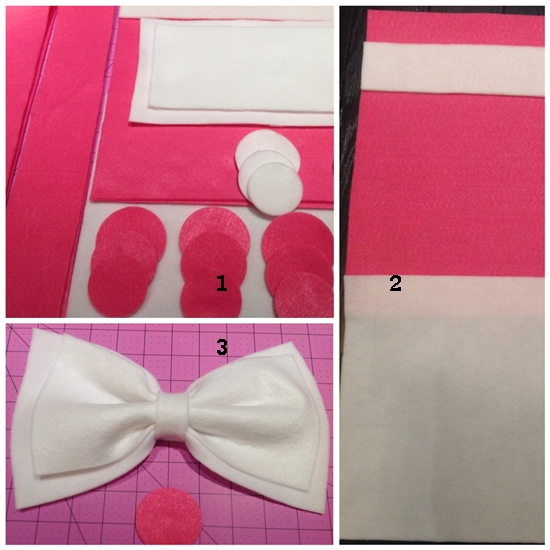
1. From pink felt cut: two 13” by 14” for back and front, two 3” by 23” for straps, fourteen pink circles in total, 2”, 2 ¼” sizes. From white felt cut one 10” bottom piece, one 2” by 14” band, 5” by 9”, 6” by 10”, 1” by 3” pieces for bow, four circles.
2. Glue white band 1 ½” down from top end of pink front piece. Glue white bottom piece to bottom end of pink front piece. Glue back pink piece opposite end of white bottom piece. Fold piece in half matching side seams. Glue side seams with a thin line of glue close to the edge.
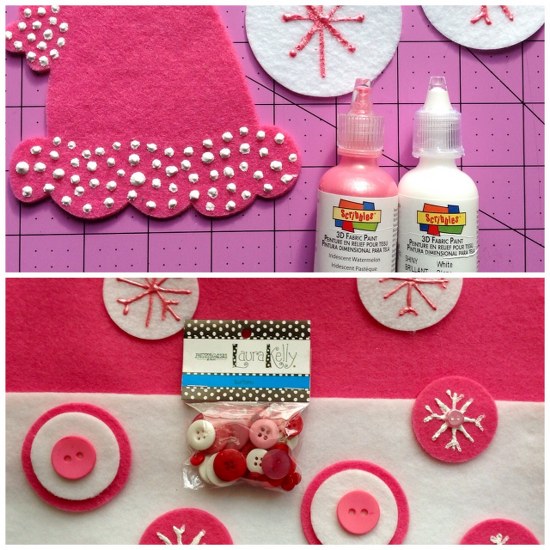
3. Refer to photo to paint snowflakes, stitch lines on bag and bow pieces, dots on hat. Let dry. Place bow pieces on top of each other centering the smaller piece. Pleat center and wrap the small white strip around the center overlapping and gluing. Set bow aside.
4. Fold pink strap pieces in half lengthwise and glue edges. Measure in 3” from each end of tote and glue strap end to the front, repeat for second strap and glue to back.
5. Glue polka dots to bottom of bag using photo as a guide. Glue bow in place on band. Glue on hat.
This tote can also be easily sewn, wherever the instructions call for gluing, topstitch instead. Make a grown up version with a black and pink color combination. For a wee boy, make a single bow for a bowtie in blue and white and add a blue hat. Have fun making this so cute tote!
Check out all the other super cute and fun designs using Laura's new dies! Enter to win an awesome prize!
RAFFLECOPTER LINK and LINKY in Sidebar!
Laura's Winter Hat Die-Cuts from Ellison Education and Sizzix will be available in January 2015!!!
Thanks for stopping by!

Monday, November 03 2014
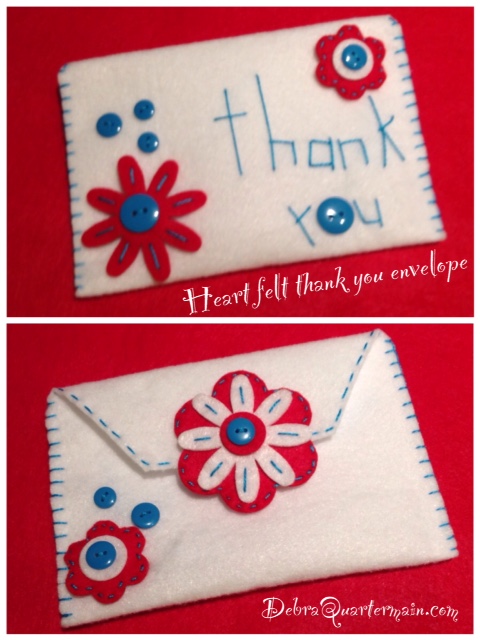
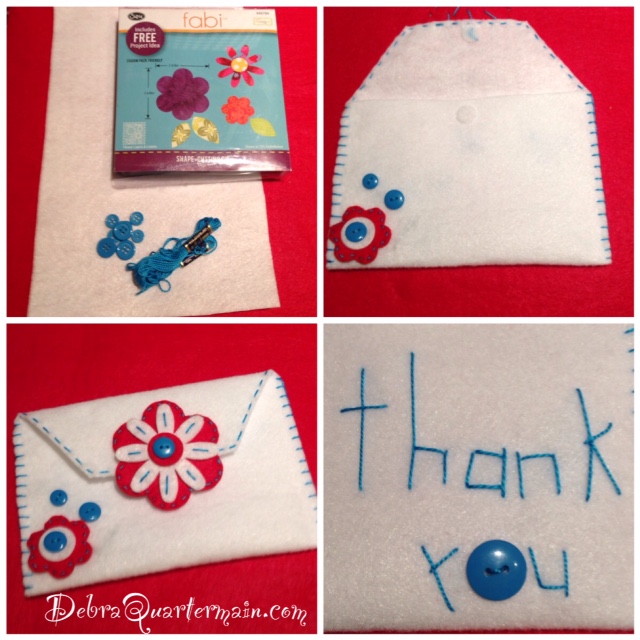
1st Monday of the month we hop with the Designer Crafts Connection (DCC). This month's theme Gratitude, thank you cards and gifts. As felt is my favourite material to work with, I designed a felt envelope to hold a thank you note or card. I wanted a playful, whimsical feel to the project with bright colours and a simple embroidery. The reversed "y" was unplanned but I actually like how it looks, simple sincerity straight from the heart.
You will need:
9" x 12" craftcuts of Kunin Classicfelt TM, 1 White, 1 Red
Sizzix Fabi Flower Layers and Leaves Die
Sizzix Big Shot
Teal Craft Thread
Teal buttons
Hook and Loop Circle fastener
Aleene's Fast Grab Fabric Fusion
Scissors, pencil, ruler, pins, embroidery needle
How to:
1. Cut a piece of white felt 7" by 12". Diecut both red and white flowers and leaves.
2. Refer to photos and layer flowers, buttons. Stitch buttons to centers and use a straight stitch to outline petals.
3. Fold felt envelope 5" from bottom. Finger press. Use pencil to draw "thank you" on front of envelope. Straight stitch.
4. Add buttons to front and back. Fold envelope and blanket stitch sides. Straight stitch around top flap.
5. Glue on flowers Glue top flower to back. Add hook and loop circle to close.
6. Write a card to someone special to slip inside and deliver!
Enjoy other great projects from our talented designers! Our button is in the sidebar.
Thanks for stopping by! Keep creating!
Debra
Monday, October 06 2014

It is the first Monday of the month and we hop with the Designer Crafts Connection, this month Halloween inspired crafting! Living in a 175 year old house with several fireplaces and mantel I enjoy coming up with different decor for each one. The brick fireplace off the kitchen has a more vintage look inspired by my pumpkin kitty. The tree I sprayed with Krylon black paint. I added ribbon to some of my existing vases to tie in with the Halloween sign and black mantel. Using everyday items by adding floral or ribbon touches expands your decorating options. With five mantels to decorate I reuse vases, containers, boxes a lot!
I wasn't sure though what to add to the tree. Then I thought of trick or treating. Candy of course, the classic candy corn! Felt candy corn with black ribbon scraps I had been collecting.
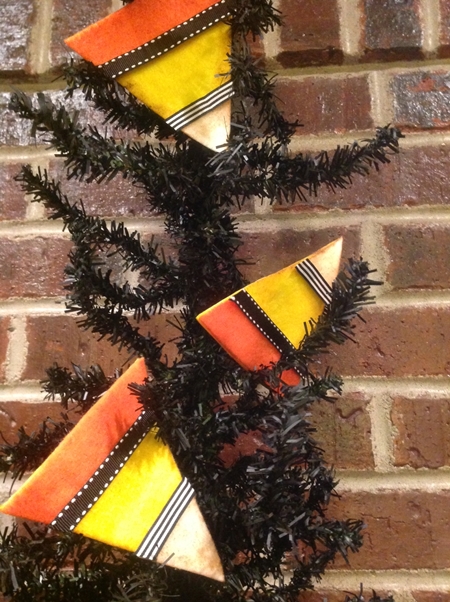
Check out my easy peasy instructions for the felt candy corn on the Kunin Blog tomorrow. Meanwhile hop along on the DCC button in the sidebar for some great Halloween ideas!
Happy Haunting!
Debra
Sunday, September 07 2014

Creative home decor, Kunin Felt is co-sponsoring a Blog Hop with Beacon (www.beaconadhesives.com) and Buttons Galore (www.buttonsgaloreandmore.com) Professional CHA Designers from the Designer Crafts Connection are sharing great designs all week! There is also a great giveaway with over $150 worth of goodies from the three sponsors!
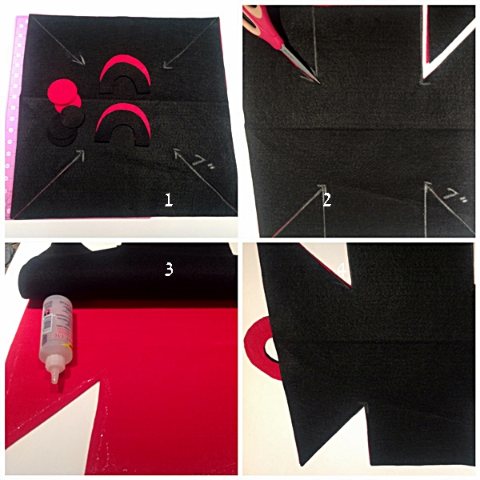
Home Décor storage solutions are always needed, this stylish container is both super easy and sturdy. Make several in different colors, they can be stacked flat and then assembled when needed in about a minute. Made from Eco-fi Plus™. “Eco-fi Plus is an 8-ounce premium felt that uses natural silver and copper cleansing ions to resist mold, mildew, and odor and is made from recycled plastic bottles.” This luxury weight of felt is ideal for both stylish wearables and sturdy functional home décor accents. Available in ten rich colors, match any room décor!
You will need:
½ yard of each color, cut by the yard Kunin Eco-fi Plus™, Red, Black
BigZ Circle die by Sizzix (www.sizzix.com)
Fabri-tac™ by Beacon Adhesives (www.beaconadhesives.com)
Hook and Loop circles, 4 pairs
Big Shot diecut machine, scissors, ruler, pins, pencil, paper, chalk, rotary cutter, cutting mat
How to:
-
Cut two 18” square pieces for the container. Die cut 3 sets of circles in each color of felt. Cut two 3” by 4 ½” pieces from each color for handles. Draw a 3” by 4 ½” rectangle on the paper and cut out. Draw a half oval on the piece of paper piece making it 1” in width. Cut out to use as pattern. Pin to felt handle pieces and cut out.
-
From each corner draw a diagonal line 7” in length. Draw a second line vertically across all four corners intersecting the ends of the diagonal lines. Cut out along both lines.
-
Glue handle pieces in pairs, smoke with pink and black with red. Place cut squares in pairs on top of each other, red with black.. Glue along all edges.
-
Insert handles into center of both long sides and press felt pieces together.
-
Fold up one short end and overlap the long points over it. Insert a hook and loop in between points. Repeat for opposite side.
-
Glue circles together in a contrasting stack of three. Center and glue to front point or to center point under handles.

Make several, experiment with different sizes and colors. Now get ready set go fill! And check out all of the great designs included by hopping along on the DCC button in the sidebar. Like the Designer Crafts Connection on Facebook and enter our great giveaway!
https://www.facebook.com/DesignerCraftsConnection/app_228910107186452
Debra
Wednesday, September 03 2014
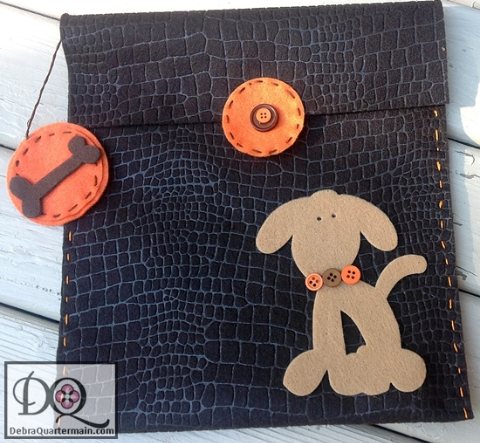
Back to school means early mornings, lunches to pack and then the scramble out the door to the bus. With seven grandchildren and two just starting preschool, kindergarden, cute little lunch bags are required. Laura Kelly's new Pet Shop Collection of dies with Sizzix/Ellison, can't get any cuter than that!
You will need:
9" x 12" Craft cuts of Kunin Embossedfelt™ , 2 Alligator Cocoa Brown
9" x 12" Craft cuts Kunin Classicfelt™, 1 Orange, 1 Walnut, 1 Cashmere Tan
Laura Kelly Buttons with Buttons Galore
Aleene's Quick Dry Fabric Fusion
Puppy Diecut from Laura Kelly Pet Shop Colection for Sizzix
Circle Diecut or circle templates, 2", 2 1/4", 2 1/2".
Sizzix Big Shot
Orange, brown embroidery floss
Velcro dot
Scissors, pencil, pins, needle, ruler
1. Overlap two pieces of brown felt by 2", glue. Fold right sides out with back piece extending 3" beyond front piece. Align sides and straight stitch with orange floss.
2. Die cut puppy from tan, bone from brown and cut three orange circles. Glue two circles together and straight stitch in brown around edges. Repeat for second circle, sew brown button in center of the second circle.
3. Glue dog to front of bag. Glue three buttons to dog's neck for collar. Glue bone to center of two circles. Glue top half of second circle to center of bag flap.
4. Open bag up and sew bone circles to corner with a 3" length of floss. Add Velcro dot to bottom half of inside of center circle. Press to main bag to mark and adhere opposite side of dot.
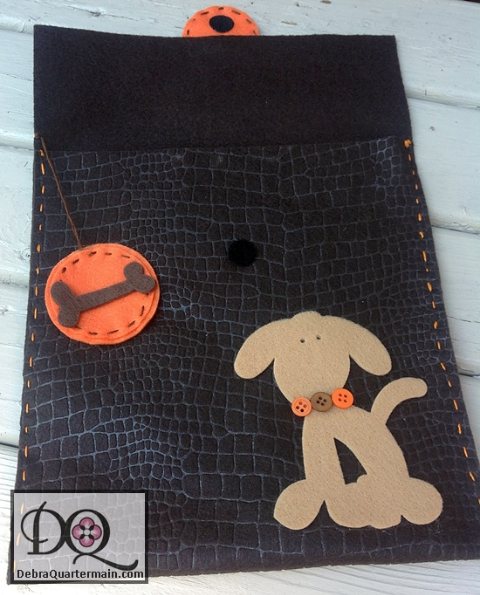
There you have it, a darn cute Doggie Bag, super quick, super easy and super fun! Laura's Pet Shop Collection is a reflection of her bubbly, creative personality, her fun outlook and her dedication as a Mom and Room Mother bringing fun and creativity into the school, home and everywhere!
Thanks Laura!
Debra
Wednesday, September 03 2014

The beginning of each month we hop with the Designer Craft Connection blog hop.
The theme of this month, Vacation Memories. Now that I operate a Bed & Breakfast
along with my design work, my vacation time away is very limited..
Instead Guests come to me creating their vacation memories, This past weekend we
had a wedding in the back garden. Celebrating, weddings, anniversaries, birthdays,
there are many occasions we celebrate with a bottle of wine or champagne.
I created this heart wine bottle charm to make
any occasion even more special!
You will need:
1-2 ½” Heart of Smoothfoam
Key Pearl Accent Cluster by Cousin
Trinkettes Chain by Cousin
¾” Heart Silver Charm
Shimmering Silver Metallic paint by DecoArt
2-1” Cotter Pins
1” paint brush
Jewelry adhesive
- Paint the heart with two coats of silver paint. Let dry in between coats.
- Insert key cluster accent ring onto cotter pin. Repeat for trinket chain on
second cotter pin.
- Insert cotter pin with key cluster into the end point of heart. Push in carefully.
- Insert chain on second cotter pin into center top of heart.
- Glue silver heart to center of Smoothfoam heart.
This is a super quick and easy project. It would make the next bottle of wine you
take as a hostess gift
extra special or make several to give as gifts at the holidays. Each time I
put it out for a guest or occasion
I am reminded it becomes part of the special memories. Follow the DCC button in the
sidebar to catch
some awesome memory ideas!
Happy Celebrating!
Debra
Monday, August 04 2014
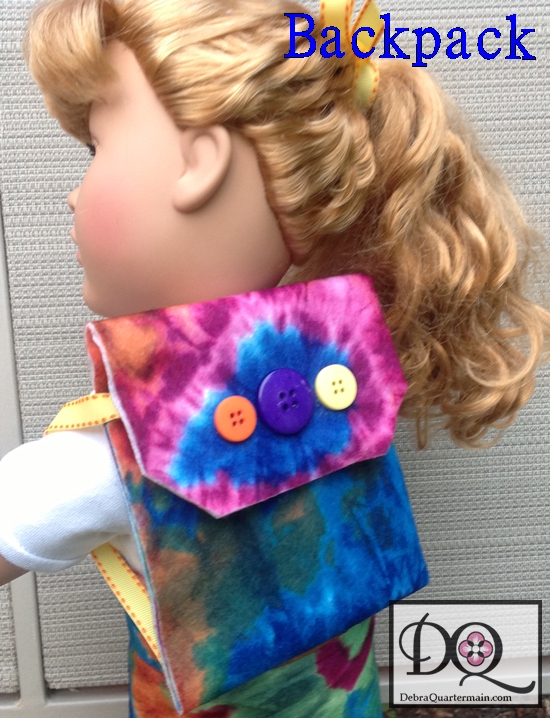
Every month a group of very talented professional CHA craft designers host a blog hop, the DCC Designer Crafts Connection. This month's theme is Crafting with School Supplies. I love and design with felt all the time which is a definite school supply staple!
My other fun design work is with Doll Diaries as Kunin Felt is one of the major sponsors of Camp Doll Diaries this summer. I have been creating a wardrobe of fun, fast& fab fashions for my 18" doll McKayla. With back to school not far off I decided to design a cute backpack for McKayla from the tyedye Printzfelt. Super simple!
You will need:
9" x 12" craft cut Kunin Printzfelt, 1 60's TyeDye.
1/2 yd ribbon
Fabri-tac adhesive by Beacon Adhesives
3 buttons by Buttons Galore
1 Hook and loop round fastener by Velcro
Ruler, marker, scissors
1. Mark wrong side of felt at center lengthwise. Mark lines at 4" from bottom and 2 1/2" from top. Angle ruler and mark top corners.
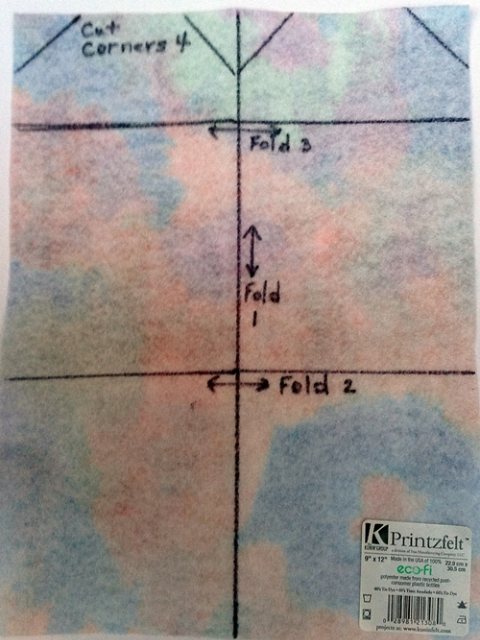
2. Fold wrong side out on center fold, finger press. Cut off top corners on lines.
3. Fold up bottom on second line and finger press. Fold top down on line and finger press.
4. Unfold piece and refold center with tyedye pattern out. Glue open edges shut.
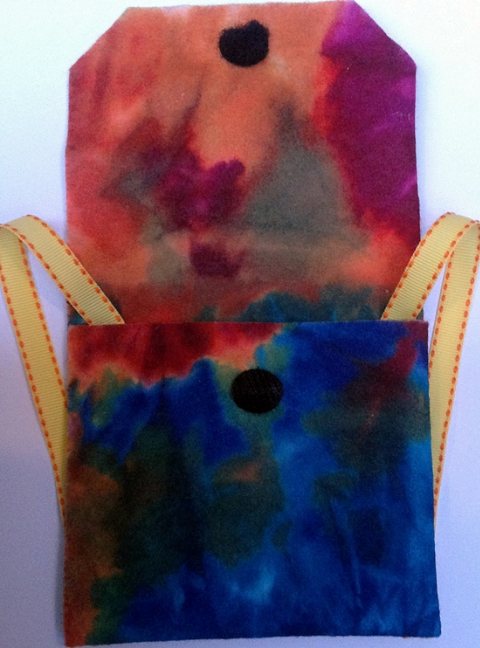
5. Cut two 7" pieces of ribbon.
5. Fold bottom up along pressed line. Glue sides shut, inserting ribbon ends into top of either side before gluing shut.
6. Fold top down along finger pressed line. With hook and loop pieces fastened together adhere to center of upper edge of bottom inside and corresponding top inside.
7. Glue buttons to center of front as shown. Flip backpack over and glue ribbon ends to bottom corners.
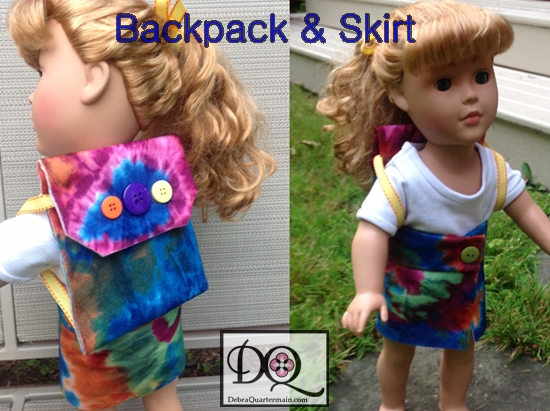
Since the backpack turned out so cute I decided to fold another piece of tyedye felt and make McKayla a cute skirt. The felt is a perfect size to fit around the 18" doll, less measuring or cutting! Catch that tutorial coming up on the Doll Diaries blog!
Hop on the DCC button to discover great DIY crafty school supply inspired designs!
Thanks for stopping by! Happy creating!
|


