#
Debra Quartermain Design
Latest Posts
Categories

 the CEO! Creative Eternal Optimist! Blog 
Tuesday, April 09 2013


As a Designer I have the opportunity to review new products, this week it is Cousin's exciting new very cool Slide-Bracelet program available at Jo-Ann stores. The program consists of high quality leather bracelets and stylish components to "slide" on. Once the bracelet is cut to size, the clasp pieces are glued to either end.

Cousins sent a package with several pieces to work with, I loved the flower slide with the center gem sparkle. What goes well with sparkle for this girl is a ruffle or two. I had dyed Organza ribbon with Rit Tan Dye and used this to create a ruffly center for my Slide-Bracelet.

You will need:
Bicast Leather Strap 34740058
Metal Slide 34740012
Metal Clasp 3470005
E-6000 Adhesive
12" Organza ribbon (I used Rit Tan Dye or use ribbon color of choice)
Needle and thread, Jewelry Cutters, Scissors

1. Sew a running stitch along one end of ribbon. Pull tight and tie ends leaving a small opening in center.
2. Insert over back end of Flower Slide.

3. Following the excellent Cousin video to assemble the Slide-Bracelet, measure and cut to desired length. YouTube how-to video

4. Insert slides on bracelet and stoppers. Glue clasps to either end, let dry. Wear!

I do not make jewelry, so my skill set going into this is minimum compared to the other designers involved in the DCC Blog Hop for Cousin, click on the button in the sidebar to see what they created. I found the Slide-Bracelet components high quality and very user friendly. The Slide icons are designed beautifully in metals. The clasps co-ordinate and in just a few minutes you can create a lovely bracelet to enjoy and wear! Well done Cousin! Like their products, like them on FaceBook!
https://www.facebook.com/CousinCorp/app_137541772984354

Posted by: Debra Quartermain AT 08:08 pm   |  Permalink   |  1 Comment  |  Email
Monday, March 18 2013

Celebrating National Craft month continues, as part of the Smoothfoam Design Team, we have a crafty new project for every day this month on the Smoothfoam blog!

Several months ago I moved into a beautiful heritage home along the river in picturesque Fredericton, NB. After months of renovation we are now open as Quartermain House B&B! In the spacious attic I was able to add another bedroom for visiting family and a fun studio. The view of the river from both rooms is beautiful!

While taping Quilting Arts this summer, I mentioned about my new place and Pokey Bolton the sweet host of the show passed it on to the sister publication Studios.

The current issue is on the newstand now and here is my studio! Being a Scorpio, our color is violet and I am really embracing it these days! A paintable wallpaper hides all of the wall imperfections, my darling fiancee applied it all and built a storage work counter along one entire side. I love the peacefulness of it, my sewing machine table and work counter look out over the river. A comfy leather chair to relax in and a supply of my favorite movies by the fireplace, it makes for a cozy inspiring space! The chandelier, the mirror my two favorite pieces. The chair covers were dyed with Rit Dye, love how they came out!

The space is divided into zones, with a comfy chair and books, a large table to spread out projects on, a sewing and ironing area along with a higher work counter to finish small projects on. Trims, fabric and buttons are in one area of the storage counter by the sewing area and paper related items together at the lower end.

Having a place to create in, to be surrounded by color, bins of trims and fabrics is wonderful. Being creative needs space, solitude where ideas and imagination can flow. I feel very grateful to have such a beautiful studio to do that in. Where do you create?


Posted by: Debra Quartermain AT 12:06 pm   |  Permalink   |  2 Comments  |  Email
Monday, February 04 2013


It is the first Monday of the month and we are hopping with the Designer Crafts Connection Blog Hop. It is all about Valentine's, love is in the air! To catch all the love just hop along with the button in the sidebar!

This Valentine cutie I designed for Rit Dye , featured on their blog and is in the current issue of Crafts 'n Things.  Wool felt dyes beautifully, I demonstrated the techniques for an upcoming segment of PBS Quilting Arts with host Pokey Bolton.

This owl is made from a piece of ombre dyed felt with each segment of the felt strip held in the dye bath for a shorter period of time. I cut the pattern pieces for the owl so the heart wing halves were from the lighter end of the felt strip for contrast.

Enjoy the Valentine hop and make something special for the sweeties in your life!
Debra


Posted by: Debra Quartermain AT 01:00 am   |  Permalink   |  3 Comments  |  Email
Monday, December 10 2012

This time of year the music, the carols are so beautiful! For the library tree I wanted to include some antique music ornaments. Using Taupe Rit Dye I immersed sheets of Christmas music bought on sale at a local music store into a shallow dye bath. Removing them quickly, I popped the sheets in the microwave for a few seconds.

Each sheet was cut in half and rolled into a cylinder, glued. The edges were spread with glue and sprinkled with tinsel glitter for a continued antique feel. A ribbon hanger, a piece of music ribbon was tied around and a jingle bell added.

The results a pretty ornament, quick and easy to make. I am adding them to my gift packages tied from the bows.

Happy Holiday trimming!

Posted by: Debra Quartermain AT 06:20 am   |  Permalink   |  0 Comments  |  Email
Monday, October 01 2012


Create your own Prim Pumpkin Patch, easy peasy fall decor
using Rit Dyes and STYROFOAM Brand foam balls.
Using two colors of Rit Dye, Tangerine and Dark Brown
I dyed sections of unbleached cotton,
Blumenthal Lansing nylon buttons and twine.

Follow the stove top dye technique
http://www.ritdye.com/dyeing-techniques/stovetop 
and dye a 12" x 36" strip of unbleached cotton
with 1 cup Tangerine, 8 cups of hot water. Remove strip from dye,
add 2 T of Dark Brown to pot with Tangerine, stir well.
Dye two more strips of unbleached cotton along with buttons and twine. 
Remove one strip along with twine and buttons.
Add anotherTbs of Dark Brown and stir with third strip in dye.
A mottled effect and darker shade will result. Wash and dry fabrics.

Use any size ball you wish to, I used several sizes from 3" to 5".
With a stick carve out a small middle hole for stem.
Glue stem in  place. Rip fabric strips into 2" widths.
Begin gluing end of strip by hole. Wrap NSEW going around stick.
Trim off excess and contiinue with next piece.

Add third color of strip filling in all gaps.

Embellish with bows and buttons.

Sew crow and don't turn right side out. Stuff and sew or glue opening

Paint crow with black craft paint. Let dry. Insert and glue into Pumpkin.

Glue some felt leaves in among burlap bow. 
Glue and insert bird! To follow along on the hop 
just click on the Designer Crafts Connection Blog Hop Button!

12 of our DCC designers will be taking part in another blog hop
 beginning Saturday October 13th featuring Makin's Clay. 

They will be giving out for the blog hop....
a prize package worth just over $100 retail cost.
In order to enter go to the Makin's Clay Blog
and leave a comment. Here is the link!
http://makinsclayblog.blogspot.com/2012/09/makins-clay-blog-hop-contest.html
Get inspired with some great clay ideas and enter for the pirze!
Happy creating!

Posted by: Debra Quartermain AT 04:31 am   |  Permalink   |  5 Comments  |  Email
Monday, July 30 2012

In between packing I had the pleasure of working with Rit Dye. The colors are gorgeous and the liquid beautifully shaped bottles are so easy to use. I transformed a white T-shirt into a fun vibrant beach cover up with a fun cut up design using my very favorite scissors from Westcott Brand! Full tutorial on the Rit Dye blog along with several other beachy designs from talented designer friends!


(photo courtesy of Rit Dye)

Here's to summer, certainly been one to spend at the beach for sure!
Hope you are all staying cool!

Posted by: AT 07:40 pm   |  Permalink   |  0 Comments  |  Email
Monday, July 16 2012


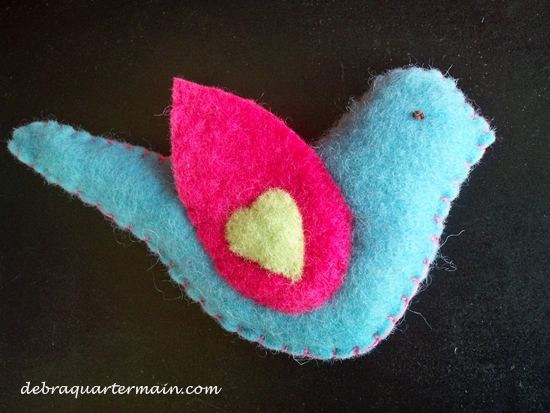
I have been having such fun lately with Rit Dyes and my favorite wool felt from National Nonwovens plus I love to needle felt so my pen tool from Clover came in handy to add dimenssion to the dove.


What you will need.


Rit Liquid Dye Aquamarine, Fuchsia, Lemon Yellow
2-9" x 18" pieces of Natural Wool Felt by National Nonwovens

2 ounces polyester stuffing

4 yards of white craft thread

1 yard black craft thread

Measuring Cup & Spoons
Spoon for stirring dye
2-Gallon Container
Large Pot for heating water
Rubber Gloves
Plastic Table Cover

Westcott Brand Scissors

Cutting Mat

Clover Pen Needle Tool

Ruler

Embroidery needle
Pencil

Cardstock

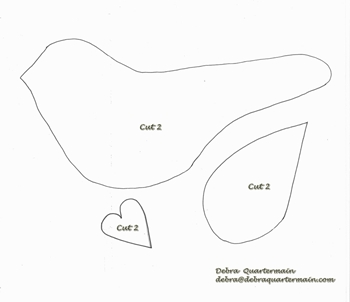
Pattern (enlarge 50%)

Step 1:

Prewash felt pieces to remove any finishes that may interfere with dye absorption.

Cut  ¼ piece of felt off one 9" by 18" piece.

Step 2:

Cover work surface with a plastic table cover. Wear plastic gloves.

In a large pot, heat 4 cups of water on the stove until very hot, at least 140° F.

Dye Preparation: Wearing rubber gloves shake dye bottle and measure 1/2 cup of Aquamarine with 1 cup hot water. Stir well to mix dye and water.

Carefully transfer 4 cups heated hot water into large dye container. Pour dye solution into hot water and stir well.

Immerse a piece of wool felt in the dye bath and stir continuously for 10 minutes. Add 2 yards of craft thread to dye bath. Stir felt. Allow the felt to remain in the dye bath until the desired shade is achieved. Color will appear lighter when dry.

Remove the felt from the dye bath and squeeze out excess dye. Rinse in cold water running water until the water runs clear.


Repeat dyeing process with Fuchsia dye.


Repeat dyeing process with 2 cups of hot water measuring 2 1/2 Tablespoons plus 1/2 teaspoon of  Lemon Yellow with ½ Tablespoon plus 1/2 teaspoon of Aquamarine with 1 cup hot water to make Lemon Lime. Immerse ¼ piece of wool felt.
 

Step 3:

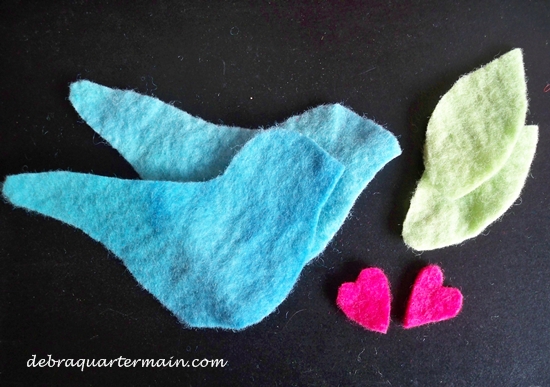
Transfer pattern to cardstock. Cut out two of each piece for one love bird.

Choose a matching or contrasting color of craft thread and blanket stitch around edge of bird, leave opening of 2", stuff and finish sewing shut. Repeat for second love bird. Make a french knot for eye taking thread between a seam stitch.
 

Step 4:

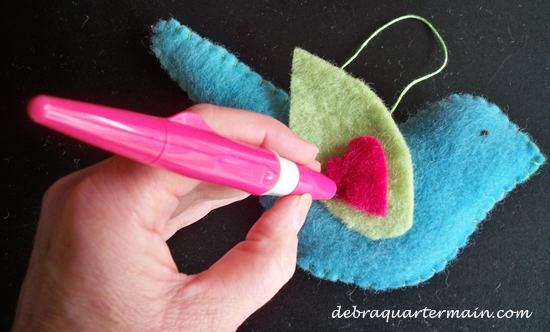
Place wing on bird. Needle felt around edges adhering it to the bird. Repeat for second wing. Place heart in center of wing. Needle felt. This will give dimension to the bird.

These are fun to hang from a branch in a vase for a centerpiece or in a baby's room. Dye up some beautitful holiday shades for your tree! Sew Inspired!

Posted by: Debra Quartermain AT 07:28 am   |  Permalink   |  0 Comments  |  Email
Wednesday, May 30 2012


I have been "immersed" (excuse a very bad pun) in Rit Dye this week. The photo shows the after of ivory wool and white Xotic (Bamboo blend) felt from National Nonwovens and buttons from Blumenthal Lansing being dyed in three vibrant dye shades from Rit Dye's Spring color forecast.

I am creating a couple of projects using Rit Dye colors. It is really fun to watch whites become rainbows! From this to the above photo!

With the premixed liquid dyes and a website packed with tips, color formulas and inspiration, I am hooked on dye projects! Have you tried dyeing?


Posted by: Debra Quartermain AT 10:53 pm   |  Permalink   |  0 Comments  |  Email
Monday, May 07 2012

The Designer Craft Connection Blog Hop is all about jewelry this month! I wasn't sure what I was going to come up with as jewelry is not my area of expertise. I had a couple wood bracelets in my craft stash and I have been wanting to make a few dyed projects. I decided on a vintage kind of feel for my bracelet, gathered some other supplies and chose a color from the ColorRit Color Formula.

Materials:
Rit Liquid Dye Petal Pink and Taupe
9" x 12" Pina Colada  XoticFelt by National Nonwovens
Favorite Findings Buttons by Blumenthal Lansing
Wood Bracelet by Diy Bangles
Sizzix Big Shot
Flower Die, 3-D Wrapped
by Eileen Hull for Sizzix
KaiserCraft Paper Blooms
Pearls
1/2 yd Lace, 2 yd Ribbon, Aleene's Tacky Glue, Westcott Brand scissors, paper towel, plastic drop cloth, gloves, measuring utensils and container.

I wanted to create a tone on tone, an ombre effect by dyeing different materials in the same color family of whites and creams. The pearls did not dye  so I substituted some colored ones I had on hand. I followed the directions and dyed all of my materials. I did not read my color formula directions carefully and added equal amounts of the Petal Pink and Taupe dyes instead of double the Pink to Taupe. However I like the color I created.

Use the Big Shot and Flower Dye to cut out several flowers from the lace and felt.


Begin assembling the flowers mixing the lace and felt. Insert a paper flower through the center of each flower.


Cut a thin strip of lace and wrap bracelet gluing ends. Glue three larger flowers side by side to bracelet. Fill in with remaining paper flowers. Tie ribbon into half dozen bows, glue in between flowers. Glue on pearls and buttons. Wear and Enjoy!

Happy Hopping, be inspired to create! Upcoming this Saturday the 12th twenty of us hop again with designs created from the fabulous ImpressArts metal stamps!


Posted by: Debra Quartermain AT 12:01 am   |  Permalink   |  11 Comments  |  Email
Facebook
LinkedIn
Add to favorites
Twitter
Debra Quartermain Design

 Magical Mimi to Grandlittles, I love to create, decorate & celebrate. Sharing  joy and inspiration from our 200 year old home, Quartermain House B&B on the east coast of Canada.

" "
Facebook
LinkedIn
Add to favorites
Twitter
    Sign Guest Book  View Guest Book 

    Debra Quartermain Design
    Fredericton, NB
    Canada
    Web Design Debra Quartermain
    Illustration Deborah Peyton
    Content copyright Debra Quartermain
    Email: debraq53@gmail.com

    Design Your Own Website, Today!
    iBuilt Design Software
    Give it a try for Free