#
Debra Quartermain Design
Latest Posts
Categories

 the CEO! Creative Eternal Optimist! Blog 
Sunday, September 07 2014


Creative home decor, Kunin Felt is co-sponsoring a Blog Hop with Beacon (www.beaconadhesives.com) and Buttons Galore (www.buttonsgaloreandmore.com) Professional CHA Designers from the Designer Crafts Connection are sharing great designs all week! There is also a great giveaway with over $150 worth of goodies from the three sponsors!


Home Décor storage solutions are always needed, this stylish container is both super easy and sturdy. Make several in different colors, they can be stacked flat and then assembled when needed in about a minute. Made from Eco-fi Plus™. “Eco-fi Plus is an 8-ounce premium felt that uses natural silver and copper cleansing ions to resist mold, mildew, and odor and is made from recycled plastic bottles.” This luxury weight of felt is ideal for both stylish wearables and sturdy functional home décor accents. Available in ten rich colors, match any room décor!


You will need:
½ yard of each color, cut by the yard Kunin Eco-fi Plus™, Red, Black
BigZ Circle die by Sizzix (www.sizzix.com)

Fabri-tac™ by Beacon Adhesives (www.beaconadhesives.com)
Hook and Loop circles, 4 pairs

Big Shot diecut machine, scissors, ruler, pins, pencil, paper, chalk, rotary cutter, cutting mat


How to:


  1. Cut two 18” square pieces for the container. Die cut 3 sets of circles in each color of felt. Cut two 3” by 4 ½” pieces from each color for handles. Draw a 3” by 4 ½” rectangle on the paper and cut out. Draw a half oval on the piece of paper piece making it 1” in width. Cut out to use as pattern. Pin to felt handle pieces and cut out.
  2. From each corner draw a diagonal line 7” in length. Draw a second line vertically across all four corners intersecting the ends of the diagonal lines. Cut out along both lines.
  3. Glue handle pieces in pairs, smoke with pink and black with red. Place cut squares in pairs on top of each other, red with black.. Glue along all edges.
  4. Insert handles into center of both long sides and press felt pieces together.
  5. Fold up one short end and overlap the long points over it. Insert a hook and loop in between points. Repeat for opposite side.
  6. Glue circles together in a contrasting stack of three. Center and glue to front point or to center point under handles.


Make several, experiment with different sizes and colors. Now get ready set go fill! And check out all of the great designs included by hopping along on the DCC button in the sidebar. Like the Designer Crafts Connection on Facebook and enter our great giveaway!
https://www.facebook.com/DesignerCraftsConnection/app_228910107186452


Debra

Posted by: Debra Quartermain AT 01:00 am   |  Permalink   |  0 Comments  |  Email
Wednesday, September 03 2014

Back to school means early mornings, lunches to pack and then the scramble out the door to the bus. With seven grandchildren and two just starting preschool, kindergarden, cute little lunch bags are required. Laura Kelly's new Pet Shop Collection of dies with Sizzix/Ellison, can't get any cuter than that!

You will need:
9" x 12" Craft cuts of Kunin Embossedfelt™ , 2 Alligator Cocoa Brown
9" x 12" Craft cuts Kunin Classicfelt™, 1 Orange, 1 Walnut, 1 Cashmere Tan
Laura Kelly Buttons with Buttons Galore
Aleene's Quick Dry Fabric Fusion
Puppy Diecut from Laura Kelly Pet Shop Colection for Sizzix
Circle Diecut or circle templates, 2", 2 1/4", 2 1/2".
Sizzix Big Shot
Orange, brown embroidery floss
Velcro dot
Scissors, pencil, pins, needle, ruler

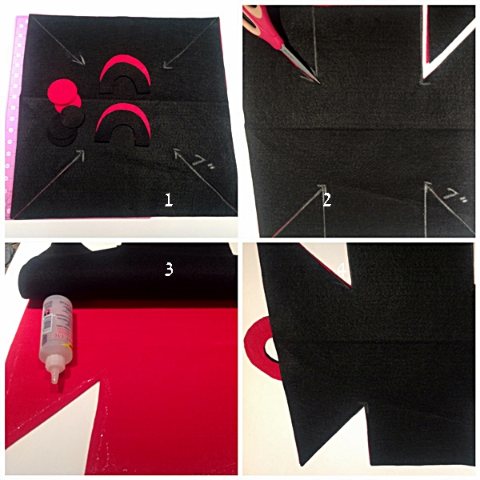
1. Overlap two pieces of brown felt by 2", glue. Fold right sides out with back piece extending 3" beyond front piece. Align sides and straight stitch with orange floss.

2. Die cut puppy from tan, bone from brown and cut three orange circles. Glue two circles together and straight stitch in brown around edges. Repeat for second circle, sew brown button in center of the second circle.

3. Glue dog to front of bag. Glue three buttons to dog's neck for collar. Glue bone to center of two circles. Glue top half of second circle to center of bag flap.

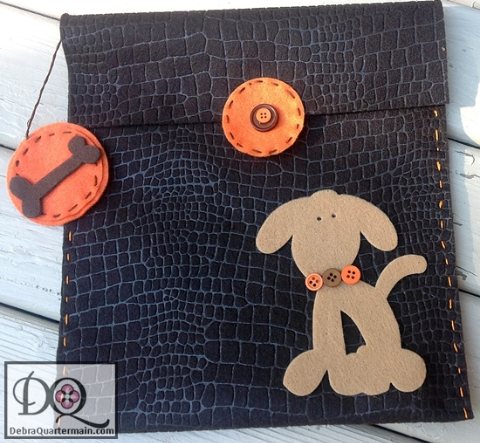
4. Open bag up and sew bone circles to corner with a 3" length of floss. Add Velcro dot to bottom half of inside of center circle. Press to main bag to mark and adhere opposite side of dot.

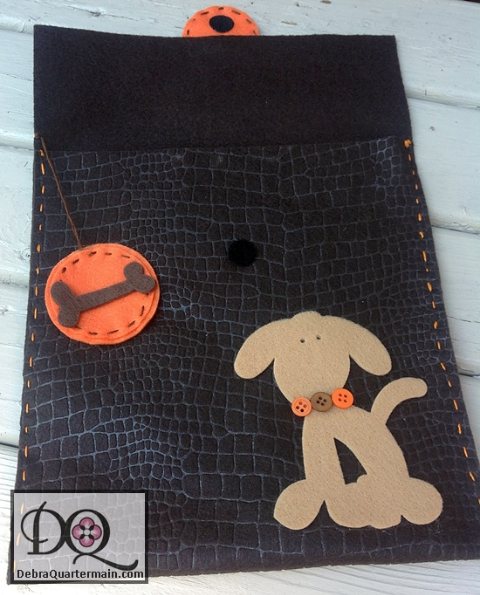
There you have it, a darn cute Doggie Bag, super quick, super easy and super fun! Laura's Pet Shop Collection is a reflection of her bubbly, creative personality, her fun outlook and her dedication as a Mom and Room Mother bringing fun and creativity into the school, home and everywhere!

Thanks Laura!
Debra


Posted by: Debra Quartermain AT 07:36 pm   |  Permalink   |  0 Comments  |  Email
Wednesday, September 03 2014


The beginning of each month we hop with the Designer Craft Connection blog hop.
The theme of this month, Vacation Memories. Now that I operate a Bed & Breakfast
along with my design work, my vacation time away is very
limited..                                                                         
Instead Guests come to me creating their vacation memories, This past weekend we
had a wedding in the back garden.  Celebrating, weddings, anniversaries, birthdays,
there are many occasions we celebrate with a bottle of wine or champagne.
I created this heart wine bottle charm to make
any occasion even more special!

You will need:
1-2 ½” Heart of Smoothfoam
Key Pearl Accent Cluster by Cousin
Trinkettes Chain by Cousin
¾” Heart
Silver Charm
Shimmering Silver Metallic paint by DecoArt
2-1” Cotter Pins
1” paint brush
Jewelry adhesive


  1. Paint the heart with two coats of silver paint. Let dry in between coats.
  2. Insert key cluster accent ring onto cotter pin. Repeat for trinket chain on
    second cotter pin.
  3. Insert cotter pin with key cluster into the end point of heart. Push in carefully.
  4. Insert chain on second cotter pin into center top of heart.
  5. Glue silver heart to center of Smoothfoam heart.
     

This is a super quick and easy project. It would make the next bottle of wine you
take as a hostess gift
extra special or make several to give as gifts at the holidays. Each time I
put it out for a guest or occasion
I am reminded it becomes part of the special memories. Follow the DCC button in the
sidebar to catch
some awesome memory ideas!

Happy Celebrating!
Debra

Posted by: Debra Quartermain AT 10:12 am   |  Permalink   |  0 Comments  |  Email
Facebook
LinkedIn
Add to favorites
Twitter
Debra Quartermain Design

 Magical Mimi to Grandlittles, I love to create, decorate & celebrate. Sharing  joy and inspiration from our 200 year old home, Quartermain House B&B on the east coast of Canada.

" "
Facebook
LinkedIn
Add to favorites
Twitter
    Sign Guest Book  View Guest Book 

    Debra Quartermain Design
    Fredericton, NB
    Canada
    Web Design Debra Quartermain
    Illustration Deborah Peyton
    Content copyright Debra Quartermain
    Email: debraq53@gmail.com

    Design Your Own Website, Today!
    iBuilt Design Software
    Give it a try for Free