#
Debra Quartermain Design
Latest Posts
Categories

 the CEO! Creative Eternal Optimist! Blog 
Monday, July 16 2012


I have been having such fun lately with Rit Dyes and my favorite wool felt from National Nonwovens plus I love to needle felt so my pen tool from Clover came in handy to add dimenssion to the dove.


What you will need.


Rit Liquid Dye Aquamarine, Fuchsia, Lemon Yellow
2-9" x 18" pieces of Natural Wool Felt by National Nonwovens

2 ounces polyester stuffing

4 yards of white craft thread

1 yard black craft thread

Measuring Cup & Spoons
Spoon for stirring dye
2-Gallon Container
Large Pot for heating water
Rubber Gloves
Plastic Table Cover

Westcott Brand Scissors

Cutting Mat

Clover Pen Needle Tool

Ruler

Embroidery needle
Pencil

Cardstock

Pattern (enlarge 50%)


Step 1:

Prewash felt pieces to remove any finishes that may interfere with dye absorption.

Cut  ¼ piece of felt off one 9" by 18" piece.

Step 2:

Cover work surface with a plastic table cover. Wear plastic gloves.

In a large pot, heat 4 cups of water on the stove until very hot, at least 140° F.

Dye Preparation: Wearing rubber gloves shake dye bottle and measure 1/2 cup of Aquamarine with 1 cup hot water. Stir well to mix dye and water.

Carefully transfer 4 cups heated hot water into large dye container. Pour dye solution into hot water and stir well.

Immerse a piece of wool felt in the dye bath and stir continuously for 10 minutes. Add 2 yards of craft thread to dye bath. Stir felt. Allow the felt to remain in the dye bath until the desired shade is achieved. Color will appear lighter when dry.

Remove the felt from the dye bath and squeeze out excess dye. Rinse in cold water running water until the water runs clear.


Repeat dyeing process with Fuchsia dye.


Repeat dyeing process with 2 cups of hot water measuring 2 1/2 Tablespoons plus 1/2 teaspoon of  Lemon Yellow with ½ Tablespoon plus 1/2 teaspoon of Aquamarine with 1 cup hot water to make Lemon Lime. Immerse ¼ piece of wool felt.


Step 3:

Transfer pattern to cardstock. Cut out two of each piece for one love bird.

Choose a matching or contrasting color of craft thread and blanket stitch around edge of bird, leave opening of 2", stuff and finish sewing shut. Repeat for second love bird. Make a french knot for eye taking thread between a seam stitch.


Step 4:

Place wing on bird. Needle felt around edges adhering it to the bird. Repeat for second wing. Place heart in center of wing. Needle felt. This will give dimension to the bird.

These are fun to hang from a branch in a vase for a centerpiece or in a baby's room. Dye up some beautitful holiday shades for your tree! Sew Inspired!

Posted by: Debra Quartermain AT 07:28 am   |  Permalink   |  0 Comments  |  Email
Friday, June 08 2012

The birds are singing about a great giveaway for the DCC Designer's Blog Hop. Hop on over to Julie McGuffee's blog to get the details and have some fun! Happy Friday!

Happy Spring! The birds do sing from the treetops with JOY! This one of my favorite pieces, the technique needle felting is fun, easy and relaxing.

Delicious vibrant wools from National Nonwovens, pen needle tool from Clover, a sheet of STYROFOAM Brand foamWrights ricrac and buttons from Blumenthal Lansing.

Creating with JOY, never forget to just create for the sheer pleasure, the relaxation of hand, heart and mind engaged in creating! Follow the JOY always!

Posted by: Debra Quartermain AT 06:15 am   |  Permalink   |  0 Comments  |  Email
Sunday, April 08 2012
Happy Easter! Happy Spring although we are getting snow here!

Over at cool2craft it is "All About Shoes" for this week's Creative Muse Linky Party. My entry is a lace paper slipper a little while ago with a wee mousy sleeping inside which in my fuzzy world is the perfect shoe! Check out all the fabulous shoe projects with the button in the sidebar and vote for your favorite! Enjoy!
 

Vintage Slipper with Wee Mousekin
I was inspired by some lace I found in my stash and a bag of broken pearl necklaces I picked up at the flea market. The pearls are a range of gorgeous vintage hues. Not being a jewelry designer Katiedid components were ideal to use as I could glue broken pieces of pearl necklace into the doughnut components.

The Tools The Materials
Wrapped Flower Die by Eileen Hull for Sizzix Ivory Lace, Pearls, Ribbon, Buttons
Sizzix Big Shot National NonWovens Ivory Felt, Nat Wool
Katiedid Doughnut Components STYROFOAM TM Egg
Westcott Brand Non Stick Scissors Ivory, Tan Cardstock & Paper


Making the slipper, tan cardstock covered with lace.
Create the flower as shown in die instructions. Add pearl filled Katiedid doughnut to center of flower. Flower is glued to show front.
Finish decorating slipper with ribbons, buttons, pearls and second component. Add a rolled note as second option to give as a gift. Create mouse by following Needle Felting techniques here. Layer flower lace and felt flower pieces to make hat and dress. Add pearls and ribbon.
Posted by: Debra Quartermain AT 02:11 pm   |  Permalink   |  5 Comments  |  Email
Monday, April 02 2012

It is the first Monday of the month and the Designer Crafts Connection Blog Hop is on! With Easter just a week away I wanted to design something to add to my Easter decor. I was also teaching a kid's needle felting workshop and they wanted to make a character inspired by Alice in Wonderland.

I decided on creating the White Rabbit with a dash of steam punk, (a departure from my usual cute bunnies !) The White Rabbit is a mixed media project incorporating needle felting, wool, foam, papers and embellishments.
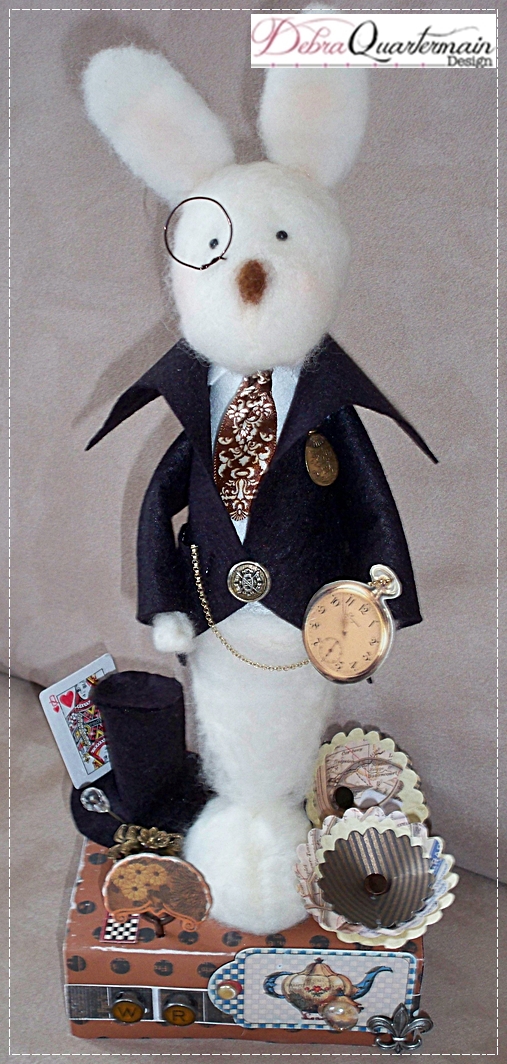
You will need:
2 eggs, 1-7/8" x 2-1/2", 2 cones, 4", 12" sheet of STYROFOAM TM Brand Foam
.2 oz. Natural, Brown scrap of Wool Wisps by National Nonwovens
9" x 12" pieces of black and white felt by National Nonwovens
Playtimes Past Paper Collection by Graphic45
Flower, 3-D wrapped die by Eileen Hull for Sizzix, Big Shot by Sizzix
Antique Bronze Decorative Wall Hardware by Canvas Corp
Flip-Pal TM Mobile Scanner
Westcott Brand Titanium Scissors, Paper Cutter
Needle Pen Tool by Clover
Paper Adhesive, Mono Aqua, Glue Stick by Tombow
Fabric Fusion by Aleene TM, Ilovetocreate
Hot glue and gun
5" print Ribbon
6" Wire
2 black head Quilt Pins
1 white Chenille Stem
2 Wood Skewers, 3 Toothpicks
Cardstock
Ephemera
Glaze
Wire Cutters, Ruler, Pencil, Chalk, Foam base for needle felting.

1. Cut one foam egg in half for feet, cut two pieces 9" by 6" from sheet, stack and glue together for base.
2. Insert toothpick, glue two cones together for body. Cover lower cone with natural wool and begin needle felting.
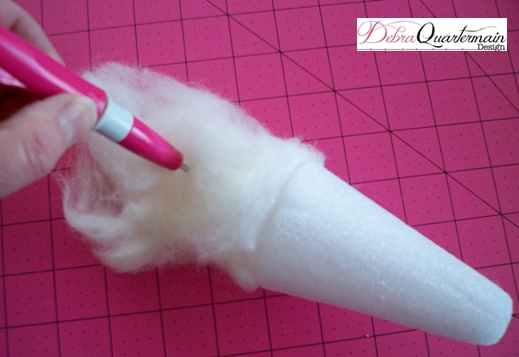
3. Cover egg for head with natural, needle felt. On foam base needle felt natural into two ovals 5" by 1 1/2" for ears, trim to desired shape. Needle felt to head. Insert pin eyes. Needle felt small nose as shown with brown scrap of wool.
4. Cover half egg for feet with natural wool, needle felt.
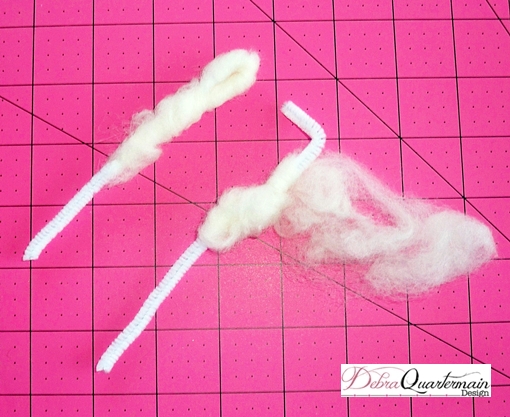
5. Pull two thin strands of wool for hands. Cut chenille stem in half. Begin wrapping wool at center of stem and wrap to end. Bend end of stem and continue wrapping back up stem. Glue ends in place.
6. Insert a toothpick into head, glue to body (bare cone is top of body) pressing pieces firmly together.
7. Cut a piece of white felt 6" by 5". Fold in center and cut notch along top edge. Fold over for collar. Wrap and glue around top of cone.
8. Cut two sleeves from black felt 2 1/2" by 3". Cut a jacket 7" square. Fold the square in half. Measure 1 1/2" on open ends, cut in on diagonal 1" to make collar. Cut from this point on diagonal 3" back to edge. Cut back in on diagonal from this point to end. Fold collar, wrap jacket for fit around rabbit body. Decide on tails of jacket from back. Remove jacket and cut tails on diagonal.
9. Wrap jacket around rabbit. Glue in place. Fold sleeves in half, glue edges. Insert chenille stems with paws extended. Glue to back of jacket. Bend.
10. Knot ribbon piece in half. Trim ends to desired shape. Glue to front of rabbit.
11. Insert skewer through feet and body leaving 3" extending.
12. Cover base with papers, insert rabbit.
13. Embellish as desired!
14. Pocket watch was scanned with Flip-Pal Mobile Scanner and printed out onto cardstock. Glued to another layer, cut out and glazed.
15. Top hat was made from a 3" felt circle for base, a 2" by 3" strip overlapped and glued. Piece of black glued to top of cylinder and then trimmed around top edge. 
16. Flowers were die cut and assembled inserting nail through centers. Insert nail ends into foam base.
Enjoy!

Follow the DCC hop to see wonderful spring inspired designs and great giveaways! Happy Hopping!

Posted by: Debra Quartermain AT 12:42 am   |  Permalink   |  7 Comments  |  Email
Friday, March 09 2012

Finally we get to see a friendly face around here! Debra has been making mostly feliines lately and we were getting concerned. Freda has been watching her tail feathers so much she has a stiff neck and can only walk sideways!

This new friend began as a 12" sheet of Makeit:Fun STYROFOAM Brand foam and the Spring Blossoms Wool Wisps Collection by National Nonwovens. Debra began by drawing a design lighty on the sheet. With her Clover pen needle tool she just needle felted away creating our very cheery spring friend! Adding some stitches, buttons and trims and in a very short time he was singing spring!

 Obviously he hasn't looked out the window at the four foot high snowbanks yet! He still thinks he is in New Mexico, has a bit of an attitude as he was on the PBS show Creative Living with Sheryl Borden. Another Prima Donna, he and Freda will have to sort that out, ah should be a fun weekend! Follow the Fowl!

Posted by: Debra Quartermain AT 08:34 am   |  Permalink   |  2 Comments  |  Email
Wednesday, October 12 2011
We hop with the Sizzix Fresh Vintage Die Blog Hop featuring Dies designed by Eilleen Hull. Today's hop, the Wrapped Flower Die http://www.sizzix.com/product/657116/sizzix-bigz-die-flower-3-d-wrapped. Visit the Oh My Crafts Blog and leave a comment for a chance to win a die. Visit Sizzix.com today only (10/13/11) and receive 25% off all Eileen Hull dies. Promo Code: SZEH25. (This offer excludes Outlet items and can't be combined with any other discounts.) Follow the Fresh Vintage Blutton in the right side bar to view all of the wonderful projects created by talented designers.

Vintage Slipper with Wee Mousekin
 
Along with the Wrapped Flower Die Eileen sent me some doughnut Katiedid components  by the very talented Katie Hacker to use in my design. I wanted to incorporate also one of my very favorite techniques in the design as well, needle felting wee creatures.

I was inspired by some lace I found in my stash and a bag of broken pearl necklaces I picked up at the flea market this past weekend. The pearls are a range of gorgeous vintage hues. Not being a jewelry designer Katiedid components were great as I could glue broken pieces of pearl necklace into the doughnut components. The slipper is a version of the fun shoe I made at a Make and Take at Summer CHA at the Tombow booth with designer friend Marie Browning.

Eileen asked us to think outside the box with using the die in other ways, to show how versatile the die is. I used it to create a flower, layers of paper, lace and felt. I also used the pieces to make the double layer hat, collar and dress for my wee Mousekin. The scalloped pieces were perfect for the outfit.

The Tools                                           The Materials
Wrapped Flower Die                        Ivory Lace, Pearls, Ribbon, Buttons
Sizzix Big Shot                        National NonWovens Ivory Felt, Nat Wool
Katiedid Doughnut Components         STYROFOAM TM Egg                    
Westcott Brand Non Stick Scissors     Ivory, Tan Cardstock & Paper
Clover Pen Needle Tool                    Adhesive


Making the slipper, tan cardstock covered with lace.
 
 
Create the flower as shown in die instructions. Add pearl filled Katiedid doughnut to center of flower. Flower is glued to show front.
 
 
Finish decorating slipper with ribbons, buttons, pearls and second component. Add a rolled note as second option to give as a gift. Create mouse by following Needle Felting techniques here. Layer flower lace and felt flower pieces to make hat and dress. Add pearls and ribbon.
 
Posted by: Debra Quartermain, CEO! AT 11:45 pm   |  Permalink   |  12 Comments  |  Email
Saturday, September 17 2011

I am delighted to be taking part in the Blog County Fair, a fun brain child of Laura Bray & Vicki O'Dell. Just click on the button to hop along to see all the delightful entries in the County Fair!

I created an entry for the Quilting & Sewing Category. I posted earlier about my meeting Diane Gilleland at Clover's booth this summer. (See below) Since then I have been obsessed a little with creating Kanzashi flowers. With fall coming I have started creating the flowers in wool for brooches to wear on fall and winter coats. I have added extra petals in green for leaves and a stuffed yo yo for center!

"One of my favorite booths to visit at every trade show is Clover's to see what new tools and products they have. At the summer CHA show the most delightful young woman was demoing Clover's new Kanzashi flower templates. Diane Gilleland or Sister Diane as she is known online is the author of a beautiful book Kanzashi in Bloom and the popular online blog CraftyPod, "a blog and podcast about making stuff".

Clover developed the templates to create the flowers from Diane's book. The templates are easy to use. The folded petal flowers are an ideal embellishment and a great way to use up very small scraps. In her book Diane has twenty lovely projects from wearables to home decor. A stunning black and white check scarf is punctuated with vibrant red flowers."

Posted by: Debra Quartermain, CEO! AT 02:17 pm   |  Permalink   |  5 Comments  |  Email
Monday, August 22 2011

One of my favorite booths to visit at every trade show is Clover's to see what new tools and products they have. At the summer CHA show the most delightful young woman was demoing Clover's new Kanzashi flower templates. Diane Gilleland or Sister Diane as she is known online is the author of a beautiful book Kanzashi in Bloom and the popular online blog CraftyPod, "a blog and podcast about making stuff".

Clover developed the templates to create the flowers from Diane's book. The templates are easy to use. The folded petal flowers are an ideal embellishment and a great way to use up very small scraps. In her book Diane has twenty lovely projects from wearables to home decor. A stunning black and white check scarf is punctuated with vibrant red flowers.

I took some scraps of fabric with me and the templates on vacation, it makes for a very portable craft! While visiting my good friend Marie Browning in her studio and who was also preparing for her daughter's wedding kitchen shower I sewed up several flowers. A plain oven mitt became a designer original gift package with the addition of a Kanzashi flower and buttons in the wedding color scheme of bright orange and pink!

Thank you Diane and Clover for your inspiration! Create JOY always! Debra, CEO!

Posted by: Debra Quartermain, CEO! AT 01:00 am   |  Permalink   |  1 Comment  |  Email
Facebook
LinkedIn
Add to favorites
Twitter
Debra Quartermain Design

 Magical Mimi to Grandlittles, I love to create, decorate & celebrate. Sharing  joy and inspiration from our 200 year old home, Quartermain House B&B on the east coast of Canada.

" "
Facebook
LinkedIn
Add to favorites
Twitter
    Sign Guest Book  View Guest Book 

    Debra Quartermain Design
    Fredericton, NB
    Canada
    Web Design Debra Quartermain
    Illustration Deborah Peyton
    Content copyright Debra Quartermain
    Email: debraq53@gmail.com

    Design Your Own Website, Today!
    iBuilt Design Software
    Give it a try for Free