#
Debra Quartermain Design
Latest Posts
Categories

 the CEO! Creative Eternal Optimist! Blog 
Sunday, April 29 2012

This weekend I taught a kid's workshop. I have such a great group of creative and very entertaining kids. Each month I introduce them to different techniques through a project and let them loose! This month was a doll pillow using fabric markers and stencil paint technique which gave a watercolor look to the pillows. We used two types of fabric markers, Jacquard's TeeJuice Fabric Markers and ILovetoCreate Fabric Markers. The kids liked both and found for outlining the TeeJuice fine marker was easy.

I had the opportunity last week to tour the Jacquard Company in California, as soon as you enter the front door the lobby chairs are boldly painted in striking designs. Painted fabric artwork hangs everywhere along with artwork accessory pieces by the talented Melony Bradley. Annette who gave me the tour was so welcoming and showed me throughout the factory where product is shipped all over the world.

Back to the kids and their experience with the products. Natalie liked the bright ILovetoCreate pack of markers and used every color on her fish pillow. She drew a fish on one side and a teddy bear on the other. Emily created a bright cat stress pillow, Molly made a Vintage doll as she loves the era of the 1800's.

They first began by drawing their idea on paper. With this as a guide they drew with pencil on the fabric going over the details with the fabric marker. The stencil paint technique for the larger areas allowed the fabric marker to show through.

We used prewashed unbleached cotton. I sewed a simple oval shape which they stuffed once their design was painted and heat set.

Once stuffed the pillow could be embellished further.

While they craft I am entertained with stories of school happenings with two of the girls in a school play much was talk about the drama festival next week. Crafting with kids is such a pleasure!


Posted by: Debra Quartermain AT 07:49 pm   |  Permalink   |  0 Comments  |  Email
Monday, April 23 2012

I have been a little scissor happy of late, my Westcott Brand pink scissor collection hangs on the wall as anything pink in my studio is on display. Since the T-shirt Remix contest at CHA I have been trying different cutting techniques on a variety of fabrics.

Being spring, flowers are just starting here to bloom so I am inspired to create a blossom pillow using fleece. I cut two 10" fleece circles and then several 6" strips of fleece. Folding the strips and cutting even slits from the fold in to create the looped fringe. With fabric glue begin gluing the fleece fringe from the outside in to the center. A contrast color adds interest. Glue the two circles shut leaving an opening and stuff. Glue opening closed.


Posted by: Debra Quartermain AT 11:29 am   |  Permalink   |  2 Comments  |  Email
Wednesday, April 18 2012

Earth Day is coming up the end of this week and as part of the celebration Jen Goode is hosting a linky party! Jen Goode is a talented artist, designer and her interests are varied so her latest undertaking 100directions.com! Several designers will be taking part in the party featuring some great upcyled, recycled projects!

Find Your Direction 150x150I thought I would honor the day with a recycled craft I designed for my column "Make it Green" which I wrote for Creative Homearts for several years.

The vase centerpiece was upcycled from an old glass vase and aluminum soda cans. I used Earth Safe Finishes paints which are "green" paints and covered both the glass and soda can pieces easily. The metallics create a stunning effect when sponged on.

I carefully cut the cans open, removing bottom and top, laid them flat. A leaf pattern was traced on the aluminum and cut out. Once painted they can be scored with a stylus and bent. I used some garden branches to adhere the leaves to. The vase was painted and sponged as well with metallics. Enjoy!


Photo courtesy of Creative Homearts.

Posted by: Debra Quartermain AT 06:45 am   |  Permalink   |  2 Comments  |  Email
Friday, April 13 2012

It has been a full week and I have neglected my blog! My youngest daughter Kate the pastry chef was here for the week and my oldest Amanda was over for Easter celebrations. I so enjoy my girls, they are the love of my life!

The last couple of days I have been busy preparing for the first Fredericton Women's Show at the Fredericton Convention Center Saturday 10:30 to 6:00 and Sunday 11 to 5. There will be a wide variety of services and products showcased, door prizes, give-aways, demos and a fashion show. Free admission at the door, will be a great event!

Posted by: Debra Quartermain AT 01:54 am   |  Permalink   |  0 Comments  |  Email
Sunday, April 08 2012
Happy Easter! Happy Spring although we are getting snow here!

Over at cool2craft it is "All About Shoes" for this week's Creative Muse Linky Party. My entry is a lace paper slipper a little while ago with a wee mousy sleeping inside which in my fuzzy world is the perfect shoe! Check out all the fabulous shoe projects with the button in the sidebar and vote for your favorite! Enjoy!
 

Vintage Slipper with Wee Mousekin
I was inspired by some lace I found in my stash and a bag of broken pearl necklaces I picked up at the flea market. The pearls are a range of gorgeous vintage hues. Not being a jewelry designer Katiedid components were ideal to use as I could glue broken pieces of pearl necklace into the doughnut components.

The Tools The Materials
Wrapped Flower Die by Eileen Hull for Sizzix Ivory Lace, Pearls, Ribbon, Buttons
Sizzix Big Shot National NonWovens Ivory Felt, Nat Wool
Katiedid Doughnut Components STYROFOAM TM Egg
Westcott Brand Non Stick Scissors Ivory, Tan Cardstock & Paper


Making the slipper, tan cardstock covered with lace.
Create the flower as shown in die instructions. Add pearl filled Katiedid doughnut to center of flower. Flower is glued to show front.
Finish decorating slipper with ribbons, buttons, pearls and second component. Add a rolled note as second option to give as a gift. Create mouse by following Needle Felting techniques here. Layer flower lace and felt flower pieces to make hat and dress. Add pearls and ribbon.
Posted by: Debra Quartermain AT 02:11 pm   |  Permalink   |  5 Comments  |  Email
Friday, April 06 2012

Easter is a favorite holiday of mine, the pretty cotton candy colors, cute bunnies and chicks oh and of course the chocolate! Even though my girls are grown up we still have an Easter egg hunt although this year I was thinking of hiding Keurig cups as they both enjoy their coffees!

Over the years I have designed many bunnes which have been published in a variety of magazines. So in honor of the holiday, here is a roundup of some of my favorites. To go along with the bunnies, Crafts 'n Coffee  is having a week of Eggstravaganza projects! Enjoy!


Posted by: Debra Quartermain AT 12:36 am   |  Permalink   |  0 Comments  |  Email
Wednesday, April 04 2012

Sometimes things just keep popping up in our lives, when I wrote my second book Easy-to-Sew Playful Toys one of my favorite toys I designed was a monkey.

Appearance #2, the Sock Monkey is a classic toy which has been around for many years. It has enjoyed a resurgence in popularity in the last few years. The Fox River Mills Company  manufacturers the Fox River Red Heel Socks. Each pair includes the pattern and cutting diagram for making a Sock Monkey. A couple years ago I was asked to design a Sock Monkey using STYROFOAM TM Brand Foam. He appeared in Crafts n' Things magazine.  

Appearance #3, a few months ago the Designer Crafts Connection Blog Hop featured When Creativity Knocks Sock Monkey DVD. We were asked to create a Sock Monkey or some creative version. I opted for the classic even though I made him inside out! I took him off to have an adventure with some wood toys. The next thing I know I am discussing providing samples for the Toronto Gift Show, happening the same time as I was away for the CHA show in Anaheim! I had to redraw my own pattern from the Fox River Mills instructions, add string jointed arms using upholstery thread and embroidered eyes, facial features for safety, register my filling content. Monkey McSockers was now ready to venture across the country!

Here is part of the gang getting ready to leave the nest and venture off to stores across Canada!

Posted by: Debra Quartermain AT 12:02 am   |  Permalink   |  2 Comments  |  Email
Monday, April 02 2012

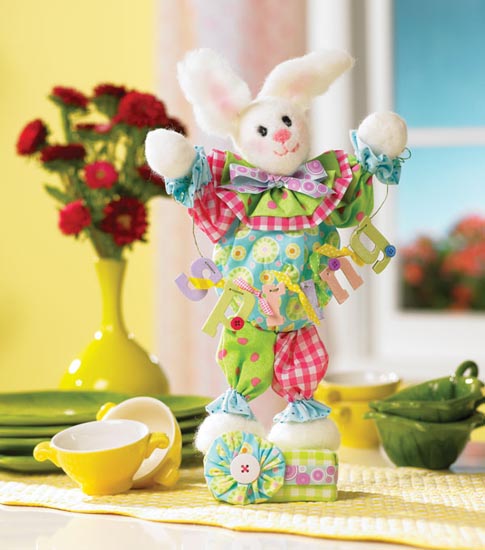
It is the first Monday of the month and the Designer Crafts Connection Blog Hop is on! With Easter just a week away I wanted to design something to add to my Easter decor. I was also teaching a kid's needle felting workshop and they wanted to make a character inspired by Alice in Wonderland.

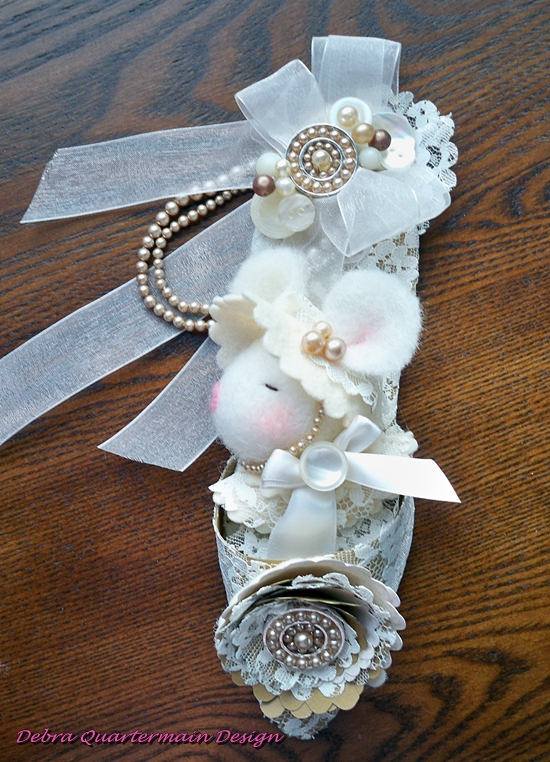
I decided on creating the White Rabbit with a dash of steam punk, (a departure from my usual cute bunnies !) The White Rabbit is a mixed media project incorporating needle felting, wool, foam, papers and embellishments.

You will need:
2 eggs, 1-7/8" x 2-1/2", 2 cones, 4", 12" sheet of STYROFOAM TM Brand Foam
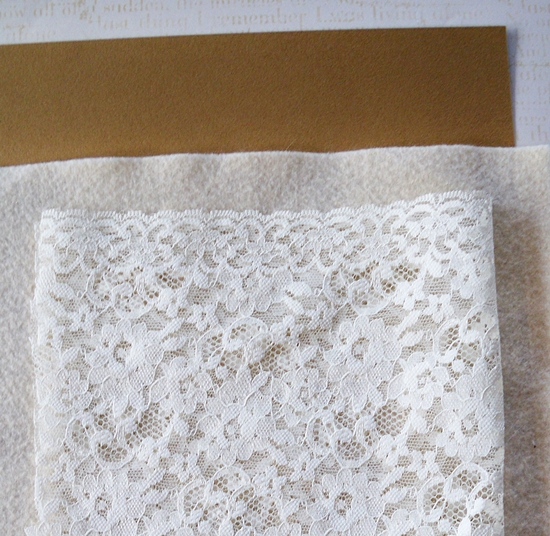
.2 oz. Natural, Brown scrap of Wool Wisps by National Nonwovens
9" x 12" pieces of black and white felt by National Nonwovens
Playtimes Past Paper Collection by Graphic45
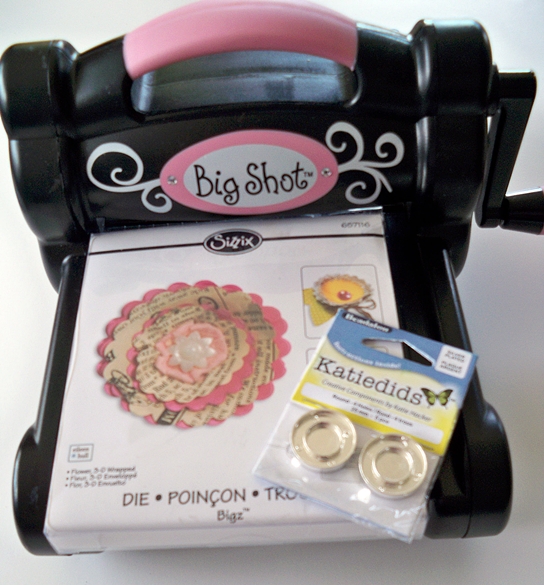
Flower, 3-D wrapped die by Eileen Hull for Sizzix, Big Shot by Sizzix
Antique Bronze Decorative Wall Hardware by Canvas Corp
Flip-Pal TM Mobile Scanner
Westcott Brand Titanium Scissors, Paper Cutter
Needle Pen Tool by Clover
Paper Adhesive, Mono Aqua, Glue Stick by Tombow
Fabric Fusion by Aleene TM, Ilovetocreate
Hot glue and gun
5" print Ribbon
6" Wire
2 black head Quilt Pins
1 white Chenille Stem
2 Wood Skewers, 3 Toothpicks
Cardstock
Ephemera
Glaze
Wire Cutters, Ruler, Pencil, Chalk, Foam base for needle felting.

1. Cut one foam egg in half for feet, cut two pieces 9" by 6" from sheet, stack and glue together for base.
2. Insert toothpick, glue two cones together for body. Cover lower cone with natural wool and begin needle felting.

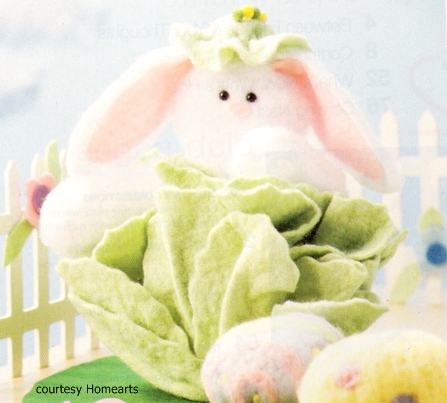
3. Cover egg for head with natural, needle felt. On foam base needle felt natural into two ovals 5" by 1 1/2" for ears, trim to desired shape. Needle felt to head. Insert pin eyes. Needle felt small nose as shown with brown scrap of wool.
4. Cover half egg for feet with natural wool, needle felt.
5. Pull two thin strands of wool for hands. Cut chenille stem in half. Begin wrapping wool at center of stem and wrap to end. Bend end of stem and continue wrapping back up stem. Glue ends in place.

6. Insert a toothpick into head, glue to body (bare cone is top of body) pressing pieces firmly together.
7. Cut a piece of white felt 6" by 5". Fold in center and cut notch along top edge. Fold over for collar. Wrap and glue around top of cone.
8. Cut two sleeves from black felt 2 1/2" by 3". Cut a jacket 7" square. Fold the square in half. Measure 1 1/2" on open ends, cut in on diagonal 1" to make collar. Cut from this point on diagonal 3" back to edge. Cut back in on diagonal from this point to end. Fold collar, wrap jacket for fit around rabbit body. Decide on tails of jacket from back. Remove jacket and cut tails on diagonal.
9. Wrap jacket around rabbit. Glue in place. Fold sleeves in half, glue edges. Insert chenille stems with paws extended. Glue to back of jacket. Bend.
10. Knot ribbon piece in half. Trim ends to desired shape. Glue to front of rabbit.
11. Insert skewer through feet and body leaving 3" extending.
12. Cover base with papers, insert rabbit.
13. Embellish as desired!
14. Pocket watch was scanned with Flip-Pal Mobile Scanner and printed out onto cardstock. Glued to another layer, cut out and glazed.
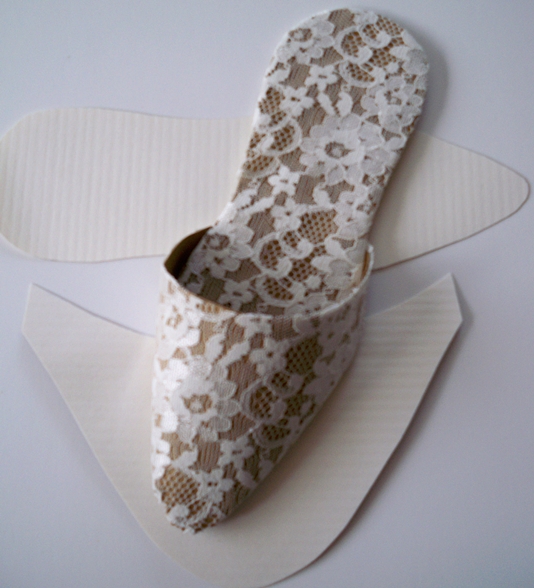
15. Top hat was made from a 3" felt circle for base, a 2" by 3" strip overlapped and glued. Piece of black glued to top of cylinder and then trimmed around top edge. 
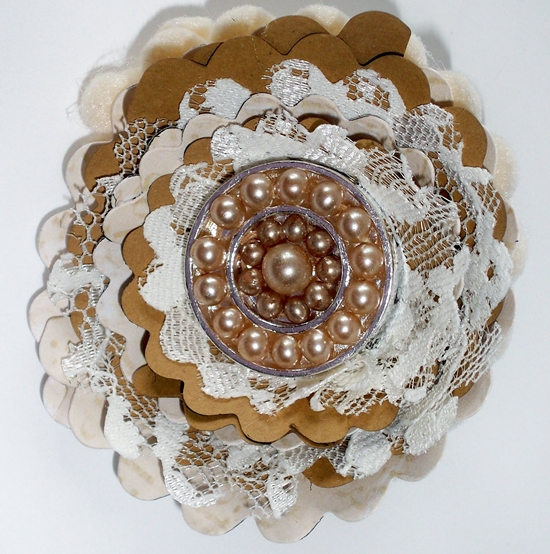
16. Flowers were die cut and assembled inserting nail through centers. Insert nail ends into foam base.
Enjoy!

Follow the DCC hop to see wonderful spring inspired designs and great giveaways! Happy Hopping!
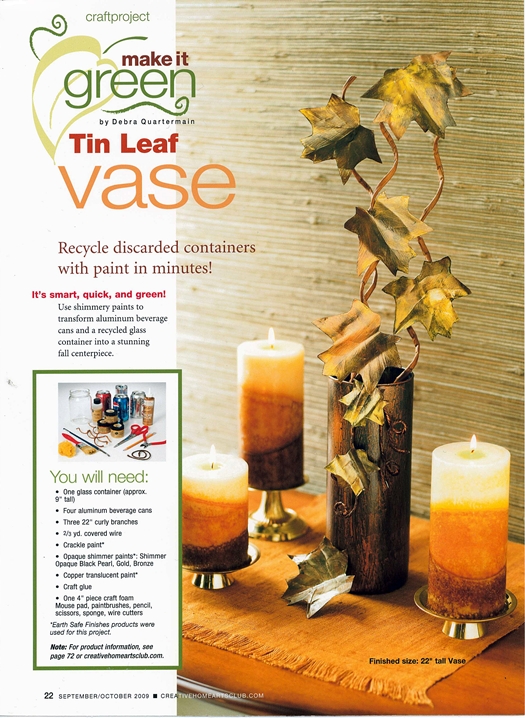
Posted by: Debra Quartermain AT 12:42 am   |  Permalink   |  7 Comments  |  Email
Facebook
LinkedIn
Add to favorites
Twitter
Debra Quartermain Design

 Magical Mimi to Grandlittles, I love to create, decorate & celebrate. Sharing  joy and inspiration from our 200 year old home, Quartermain House B&B on the east coast of Canada.

" "
Facebook
LinkedIn
Add to favorites
Twitter
    Sign Guest Book  View Guest Book 

    Debra Quartermain Design
    Fredericton, NB
    Canada
    Web Design Debra Quartermain
    Illustration Deborah Peyton
    Content copyright Debra Quartermain
    Email: debraq53@gmail.com

    Design Your Own Website, Today!
    iBuilt Design Software
    Give it a try for Free