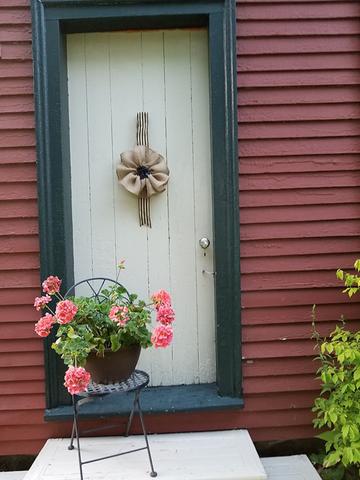
So excited to be part of another Craft Lightning monthly challenge!
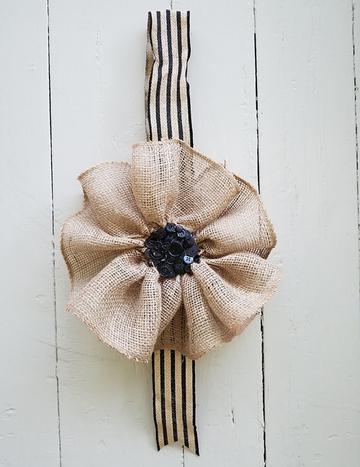
This month's craft material is burlap
and time allowed 15 minutes! I live in a historic and very old house, 175 years old
and it has a lot of doors to the outside. The back storage has two doors
and was needing a little decor. A large burlap flower banner would be perfect!
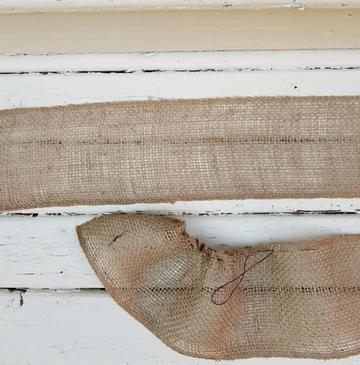
Materials: 2 yards of 6" wide burlap ribbon
1 yard of 3" wide burlap ribbon
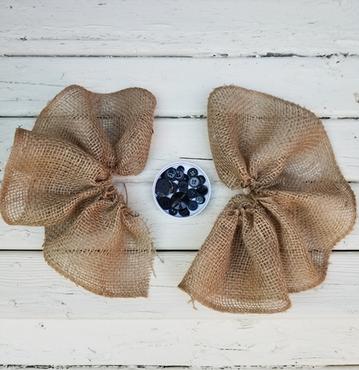
3" mason jar cover
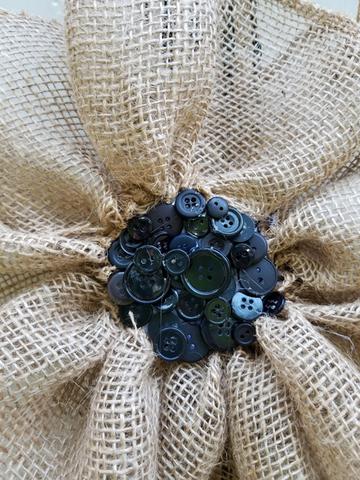
Assorted black buttons
Hot glue
Needle and heavy duty thread
1. Cut burlap in two 1 yard pieces.
2. Gather thread along one edge of each piece.
3. Pull gathers tight and secure thread.
4. Glue the gathered edges around the mason jar lid.
5. Glue the buttons to the top of the lid.
6. Glue the narrow burlap ribbon to the back of flower.
Hang and enjoy! Change it up with different color buttons.
Make larger using more layers or a wider burlap.
Follow along and enjoy the whole round of Craft Lightning
this month!
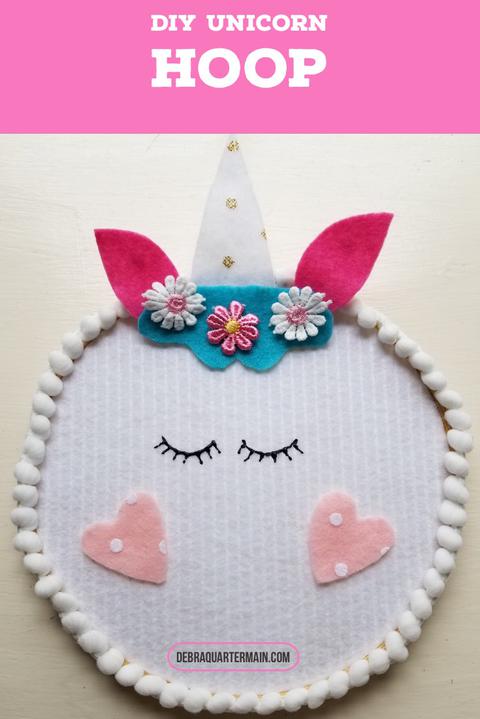
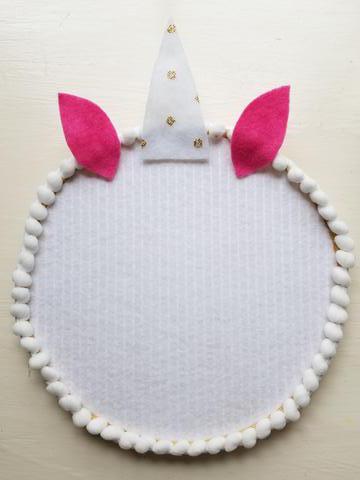
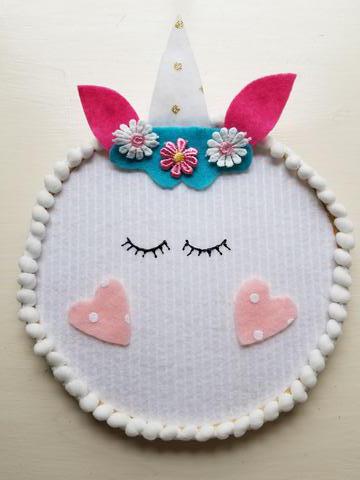
It is time again for a Craft Lightning challenge with wood! Time 15 minutes, medium wood. A group of talented crafty bloggers show their stuff, hop along to see it all, link in sidebar. My inspiration, a collection of wood hoops and birthday party season for five of our grandlittle girls! Requested themes unicorns and princesses with lots of pink! The 8” wood hoop Unicorn would make a cute craft for the girls to make and take home as a party favor.
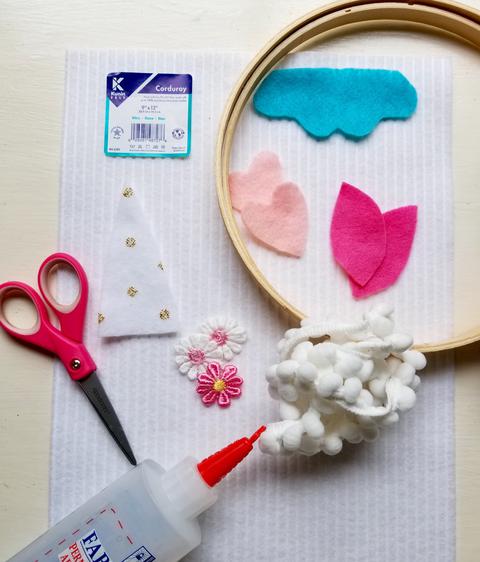
You will need: 8” wood hoop. 9” x 12” craft cuts of Kunin Felt Corduroy White, Coordinates Gold Dot. Felt scraps for ears, mane and cheeks. 1 yard Peapod pom pom trim White Expo International. Daisy or flower appliques. Fabri-tac Glue Beacon Adhesives. Scissors.
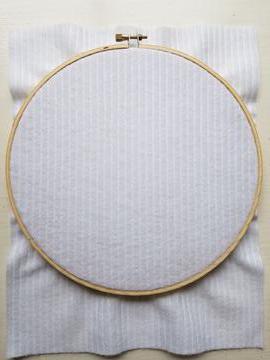
Insert corduroy felt into hoop. Tighten. Trim off excess. Glue pom pom trim around outside of hoop.
Cut a 2” by 4” triangle from gold dot for horn. Cut two 3” teardrops for ears from pink. Cut a 4” scallop piece for mane. Cut two 2” hearts for cheeks. Glue horn and ears at center top of hoop.
Glue on mane, cheeks and flowers. I give the little girls lots of extra flowers so they can personlize their own unicorn. Use a fabric marker or dimensional fabric paint to make eyes.
Crafting with little ones is so much fun, depending on their age a couple of helpful tips to make it the most fun and rewarding for everyone. With the younger ones I am preparing the hoop with the corduroy felt and pom pom trim glued on. They each get a little bag filled with all of the other pieces to glue on, suggesting where the horn might go but after that just encourage their own crafty style! Small bottles of glue are easier for little hands. Sharing markers and glue between each pair of children encourages working together. If one is having difficulty with the glue, help out by putting the glue on the pieces. The child can then place them. This is a quick and easy craft, make it into any animal by just changing the colors. Change the hoop size too. Crafty quick projects are the best! Hop along and Be inspired by the Craft Lighting wood challenge this month!
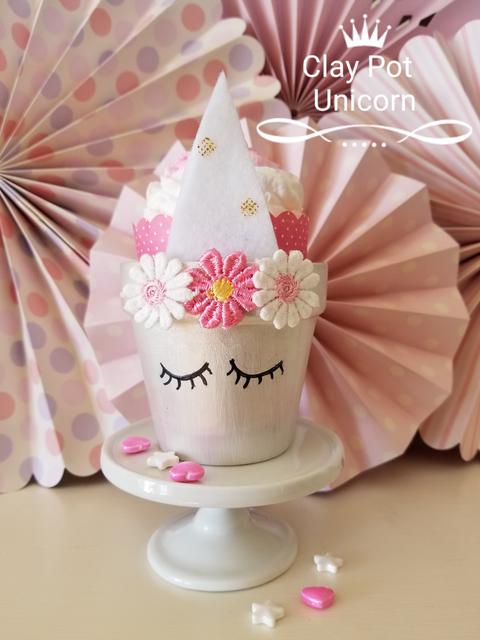
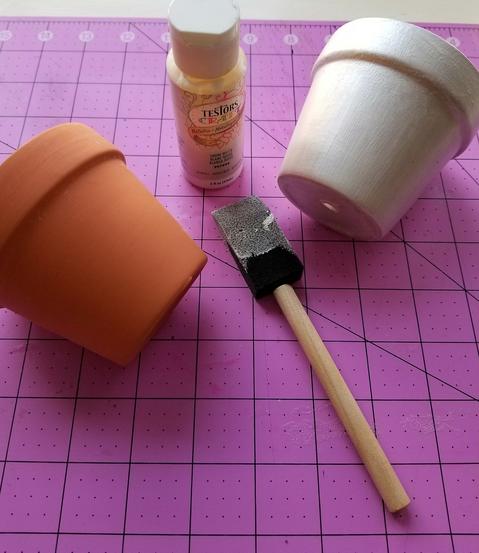
Easter is almost here and party time for the grandlittle girls! Of course we love bunnies but for this party I am making Unicorn Cupcake Holders from Clay Pots. The inspiration and the challenge being part of The Craft Lightning Blog Hop all week, a clay pot craft in 15 minutes!
All you need:
4” clay pot
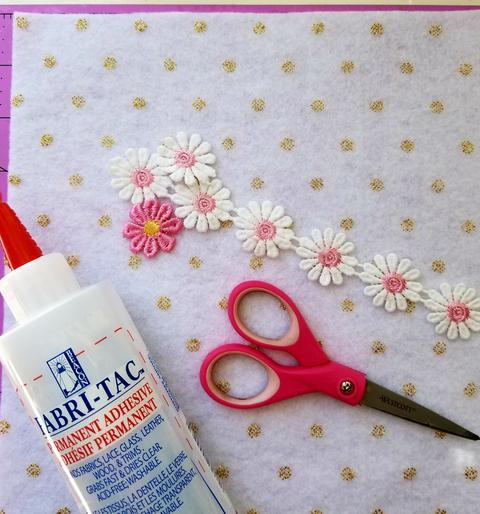
9” x 12” craft cut Kunin Felt Gold Dot Coordinate
6” Daisy Trim Expo International Inc.
White metallic craft paint Testors
Fabri-Tac Beacon Adhesives
Black marker Tombow
Scissors, pencil, foam brush
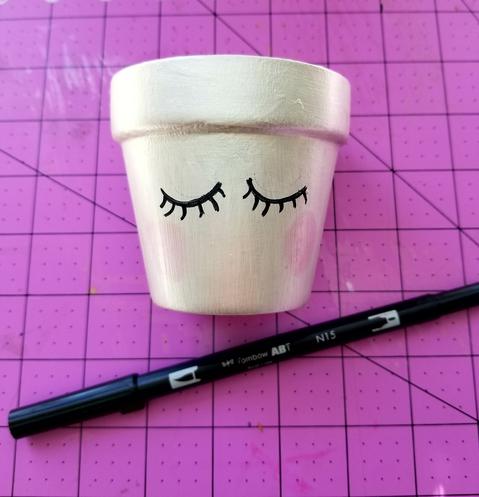
1. Paint Pot, 2-3 coats. Let dry.
2. Pencil in eyelashes. Trace with marker.
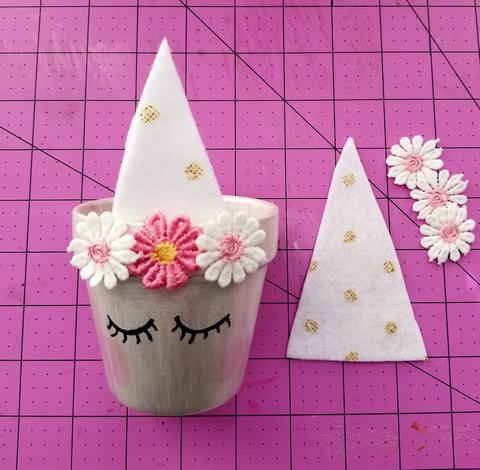
3. Cut out two horn triangles from felt. Triangle measures 4” x 2 3/4”.
4. Glue horn pieces together. Glue horn inside front of pot. Cut and glue daisies to front rim of pot.
Bake and decorate some yummy cupcakes, place cupcake paper holder into pot and serve. Of course even more fun let the little ones decorate their own cupcakes. This was so much fun and turned out super cute, the grandlittle girls will love them! Check out other Craft Lightning Clay Pot ideas, “hop” along with us all week!
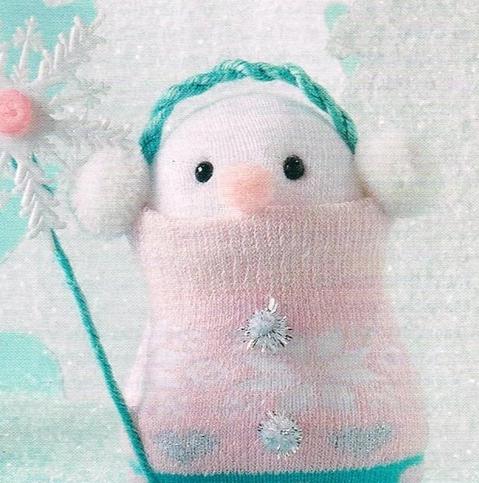
The firstSNOWFALL every year I still get that excited feeling I remember as a child. As the snowflakes fall they cover the ground in a sparkling white blanket, it is magical! Living in the season of winter I am inspired to design soft snowy characters. My favorite designs are my winter snowmen or often snowbabies like this little guy. You can find him in the Better Homes and Gardens Holiday Issue. A baby sock and foam makes for a quick and easy craft!
(Photo courtesy of Better Homes and Gardens Holiday Crafts)
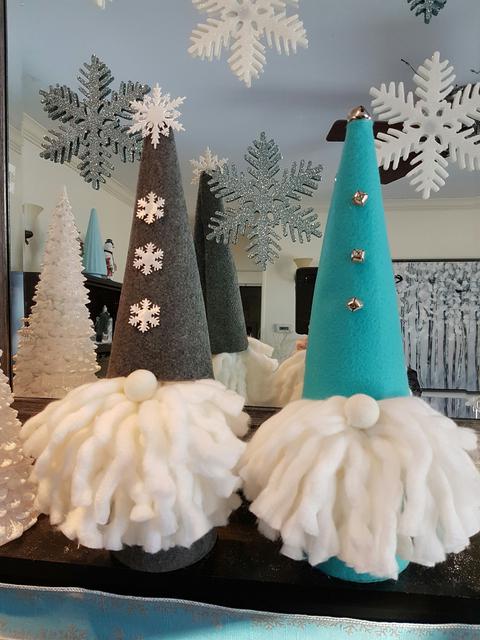
Along with the snowmen a couple of winter Gnomes appeared, this pair has lots of personality and are simply a foam cone wrapped with felt and some yarn! Make your own Snow Gnomes!
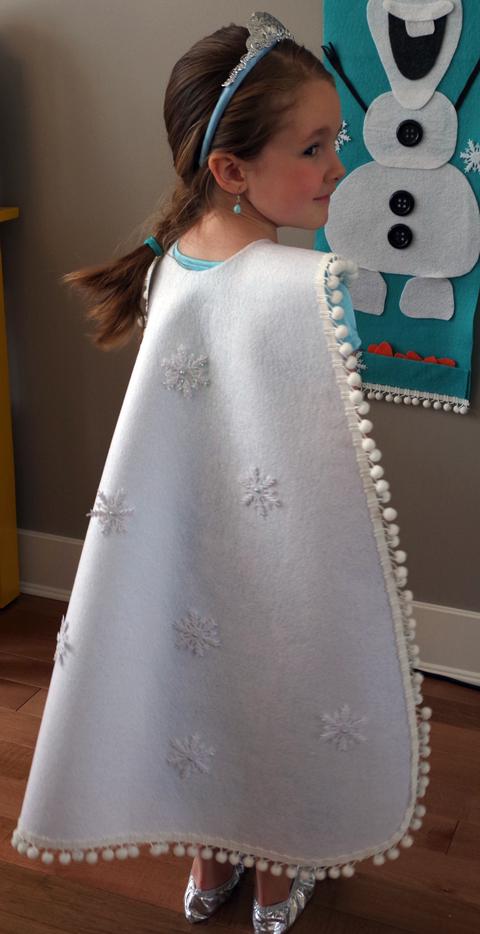
Then there are the sweet grandlittle girls and pretty winter things like this felt sparkly cape! A Frozen inspired birthday party and a birthday wish of snow in May!
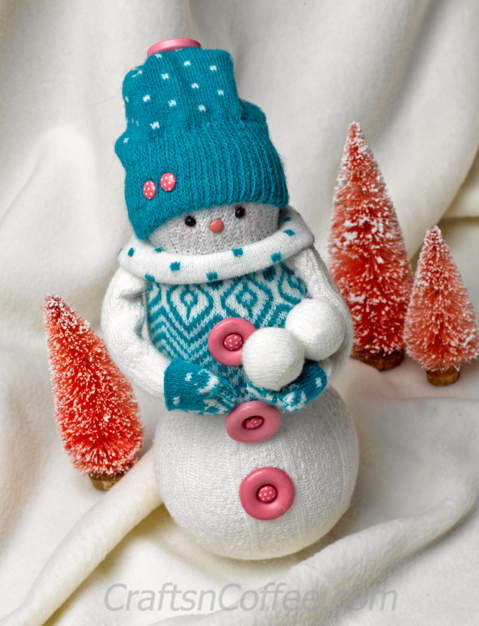
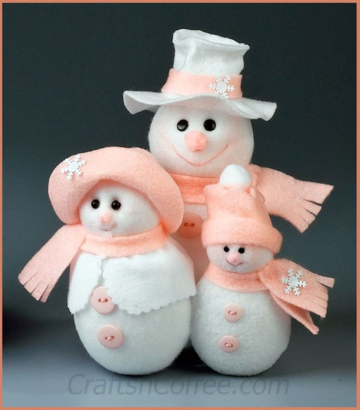
Another sweet sock snowman I designed for Crafts 'n Coffee. The socks just stretch over foam shapes to make the cutest snow peeps! Check out this cutie here!
(Photo courtesy of Crafts 'n Coffee)
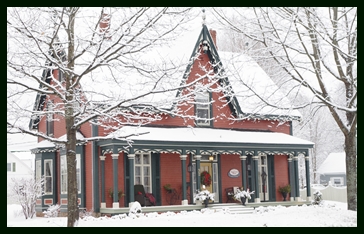
Here is the place where all of that inspiration does come from, our family home, where everyone gathers, where everyone comes home to.
Thank you for visiting, create a little of your own winter magic where ever you may live. Love to see what you create! Hands + Heart Create Magic!
Debra
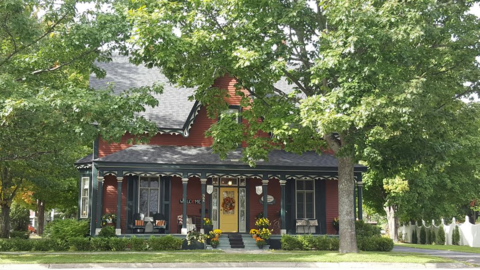
I love when creative friends come to visit me at Quartermain House Bed and Breakfast. Just last month Sharon from CraftsnCoffee stayed for a few days with her sister. You can read all about their visit here! Sightseeing, visiting and creativity of course! Sharon and I met twenty years ago and since then I have designed a lot of Snowmen! We also have a week full of surprises next week!
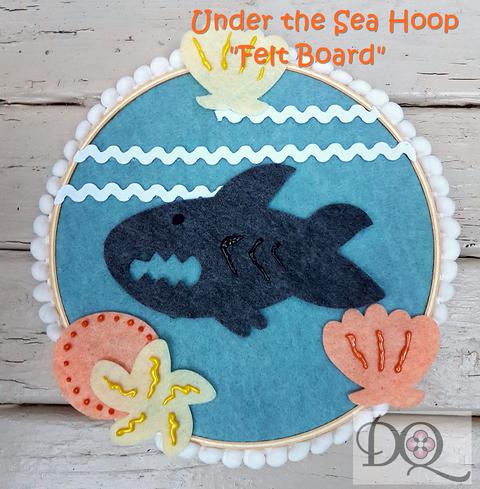
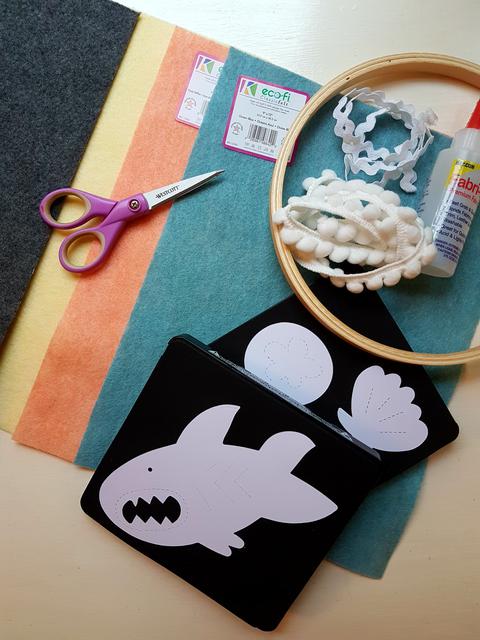
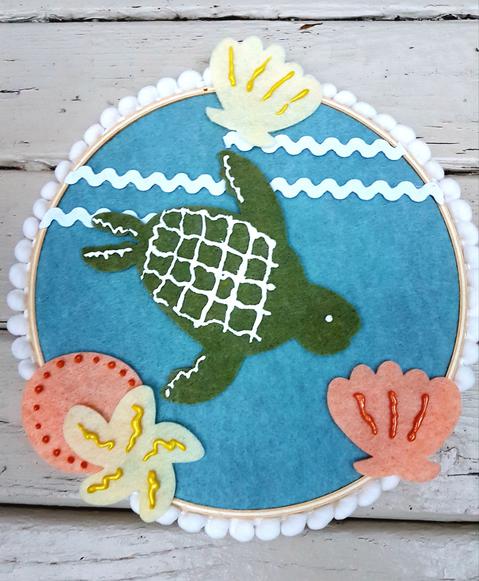
Not only do I get to work with my favorite fabric ever felt, Kunin Felt but I also get to work with some of my very favorite designers and friends. Laura Kelly has the cutest dies with Sizzix and her collection of sea creatures are so fun. Since Shark Week is so popular she is putting together a whole lot of projects celebrating Shark Week! Her Shark die is darn cute and as summer also means travel with the kids I decided to design a travel felt board using a hoop. The depth of the hoop is perfect for a back pocket and can hold some of the other sea creatures too!
You will need:
Laura Kelly Sea Creature Dies with Sizzix
9" x 12" craft cuts Kunin Classicfelt, 2 Ocean Blue, 1 Lemon Yellow, 1 Smoke, 1 Pumpkin
1 yard white rick rack Expo International Inc.
1 yard white Peapod pom pom trim Expo International Inc.
8" hoop
Beacon Fabri-tac Adhesive
Dimensional fabric paints
Scissors, Big Shot and cutting pads
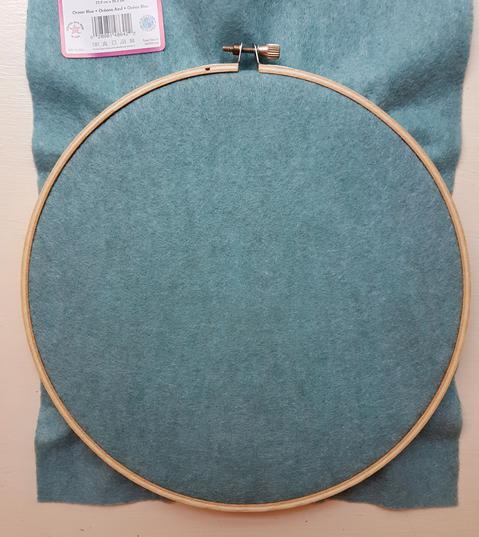
1. Insert one blue craft cut of felt between hoop pieces, tighten and trim off excess.
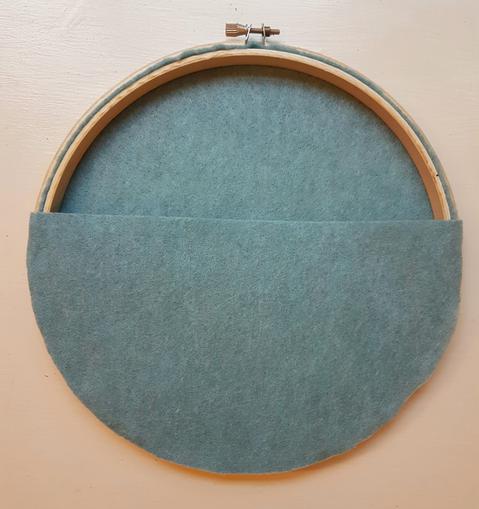
2. Glue second blue craft cut 1/3 of the way down from top of hoop along edge. Trim off excess creating a pocket.
3. Glue rick rack in pieces to front of hoop for waves as shown. Glue peapod trim around edge of hoop.
4. Die cut shark, shells and other sea creatures. Embellish with paint. Let dry.
Ta da! as Laura often says, the travelling felt board is done! Just store the extra sea creatures in the back and let the kids enjoy their own mini felt board.
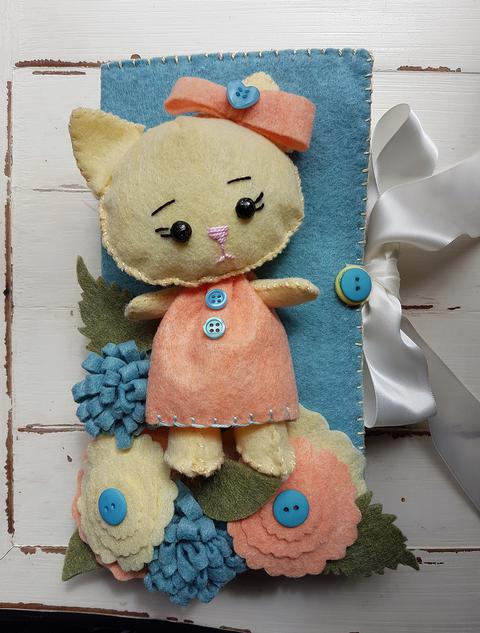
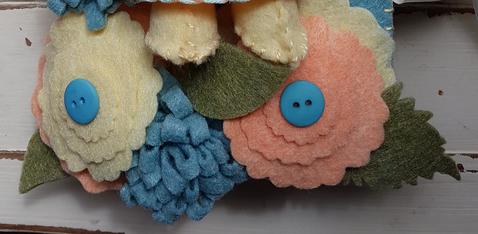
I love Eileen Hull's new die collection with Sizzix, Heartfelt. Her journal die is so versatile and works well with many mediums. Felt is my favorite material to work with.The journal die is a perfect size to hold a little stuffie or doll and wardrobe. Using felt and embellishments a wee kitty dances in a flower garden on the front cover. Open the journal and discover a sweet surprise of a tiny wardrobe inside.
I have loved the sweet felt dolls of Gingermelon and was delighted to see a pattern available through Mollie Makes. I wanted create a wee kitty as my grandlittle girls like kitties very much! I paired this up with Eileen's flower and leaf dies and Kunin Felt new spring colors.
You will need: Sizzix® ScoreBoards XL Die – Journal by Eileen Hull™
Sizzix® ScoreBoards XL Die – Leaves, Spring by Eileen Hull™ Sizzix® ScoreBoards XL Die – Flower Layers, #9 by Eileen Hull™ 9″ x 12” craft cuts Kunin Classicfelt™: 3 Ocean Blue, 2 Lemon Frost, 2 Peach Chiffon, 1 Pink, 1 Olive, 1 White
1 yard Ivory ribbon 2-5mm Black half eye beads 4 oz. Polyester fiberfill Embellishment scraps Craft floss skeins, 1 yellow, 1 blue, 1 black
Assorted buttons, yellow, blue
Hook and loop circles, 6 sets Fabri-tac® by Beacon
Sizzix Big Shot, cutting pads, scissors, ruler, pins.
Stuffie options. Choose a printable stuffie and clothing pattern from online. Print pattern and make according to instructions, make your own pattern or use a premade 6” stuffie or doll.
Die cut leaves from olive felt, die cut flowers from lemon and peach felt.
From blue felt cut four pieces 2” by 6” for looped flowers. Fold in half lengthwise. Cut slits in length of piece from fold to ¼” from outside edge of strip. Begin rolling strip to the end, glue. Repeat for remaining flowers.
Fold a blue piece of felt in half to create 9” by 6” piece. Blanket stitch around three sides with yellow craft floss leaving 9” side open. Repeat for second piece of blue.
Insert mat board journal covers into each blue pocket. Place pocket covers together. Stitch through binding holes to join cover pieces. Blanket stitch along center of joined covers.
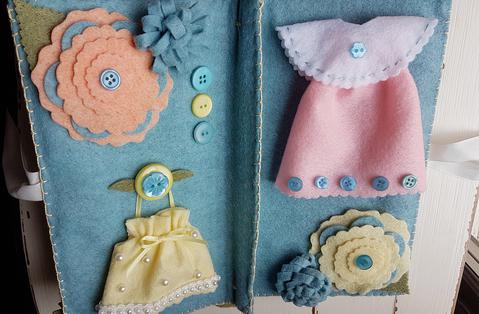
Arrange flowers, leaves and other elements on cover. Place stuffie in position. Adhere pieces down. Adhere hook and loop dots to back of stuffie and journal cover.
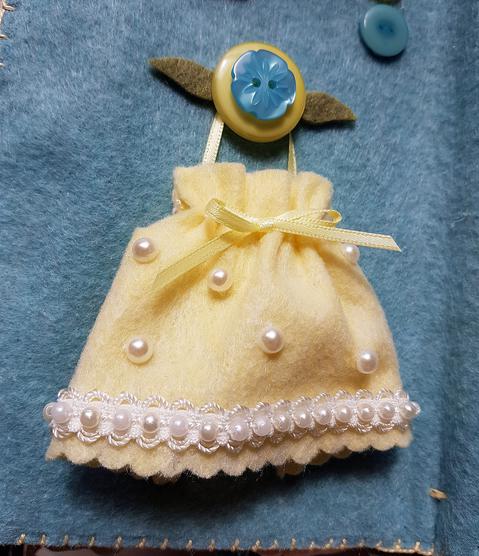
Lay journal open flat and arrange inside elements. Make simple clothes with rectangles of felt gathered across one end. Add embellishments. Adhere a hook and loop closure in place on back of each clothing piece. Adhere matching closure to journal.
Cut ribbon in half. Adhere one end of each ribbon piece to outside of the front and back covers. Adhere buttons on top of ribbon.
I so enjoyed making this journal and kitty, visit Eileen's blog for more journal instructions and to see the beautiful and very creative journals being made by talented designers and artists.
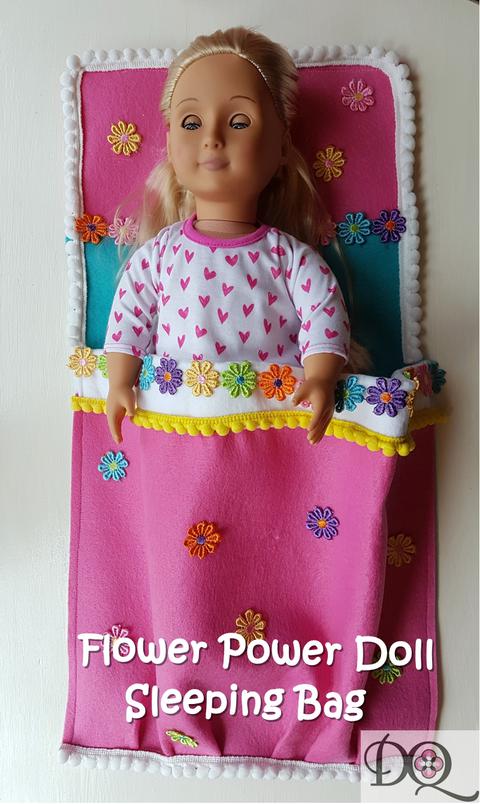
My granddaughters love playing with dolls at Mimi's house and I am always looking to add fun accessories. The dolls of course need beds and with limited storage and a few dolls to put to bed, I decided to make some sleeping bags for the dolls. Of course PINK and flowers had to be involved. Love this daisy chain trim from Expo International!
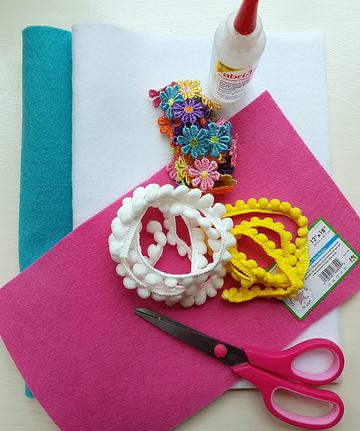
You will need: 12" x 18” craft cuts Kunin Premiumfelt™: 1 Lagoon, 1 White, 2 Candy Pink
1 1/2 yards Daisy Flower trim http://www.expointl.comPeapod ball pom trim, 1 yard Yellow, 2 yards White, http://www.expointl.comFabri-tac and or Felt Glue by Beacon www.beaconadhesives.com
Scissors, ruler, pins, sewing machine and matching thread (optional)
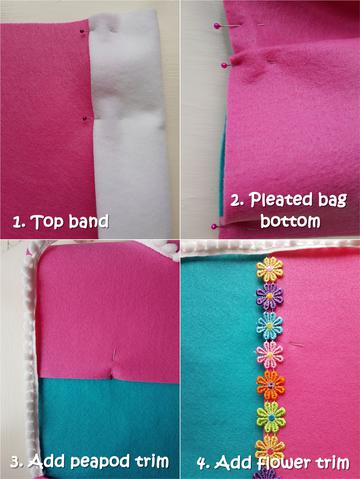
1. Cut a piece of white felt 4" by 18" and a piece of candy pink felt 12" by 12". Fold the white piece in half lengthwise and pin to top edge of the second candy pink piece. Sew or glue.
2. Pin 18" length piece of pink to bottom of lagoon piece, 12" width. Pleat to fit. Sew in place on all three sides.
3. Fold 12" square candy pink piece in half and sew on three sides. Pin this pink piece to top of lagoon piece. Sew in place.
4. Glue white peapod trim along bottom of bag. Glue white peapod trim around top of bag. Glue yellow peapod trim across white band of bag. Glue flower trim in place. Cut separate flowers from trim. Glue randomly on the top and bottom of sleeping bag.
This sleeping bag can be made in several colors. I am making each one in a color found in the daisy chain trim. The peapod trim is super cute and the perfect size for doll trims. Next on the wish list tutus for the dolls! Being a grandmother is such fun!
Thank you for coming by
Always remember HEART+HANDS CREATE MAGIC Debra
My parents were both very creative and instilled in me the love of being a Maker, a DIYer and Designer. My mother taught me how to sew when I was five and would cut out doll clothes for me to sew. She fostered my creatvity by making fun projects like big newsprint houses with empty rooms and with glue, scissors and the Sears catalogue, a mansion was born. I grew up crafting and with my daughters, my kindergarten classes I was always making projects with them.
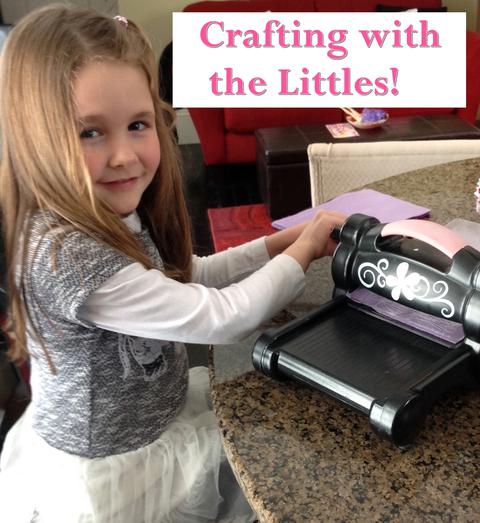
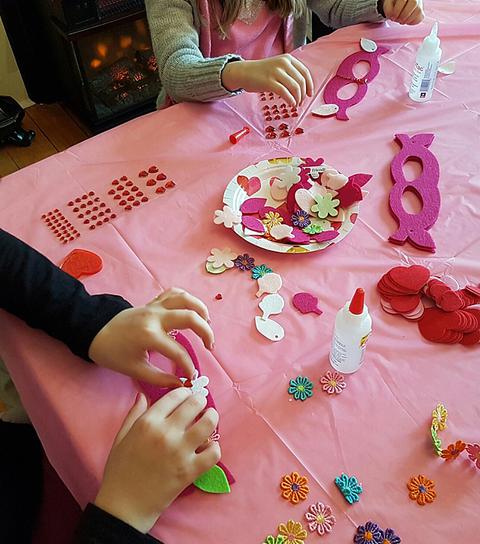
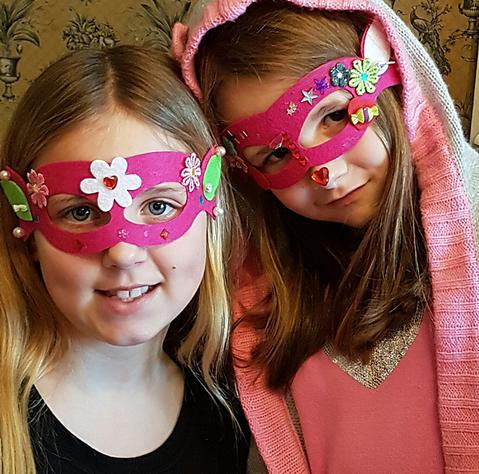
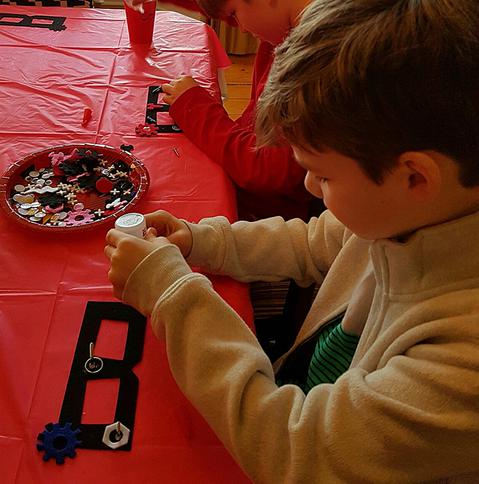
And here I am now a grandmother to eleven "grandlittles" and every party has to have a craft. Miss M above loves the Big Shot and is a pro at die cutting! The girls usually choose pink and glitter and the boys seem to have a thing about black and mustaches! Prestofelt has been a huge favorite and they can use the back paper to draw their shapes and then cut them out.
It certainly is all about the embellishments with the girls! It is also the fun, the conversation, the trying of new techniques and the confidence it builds with their creative accomplishments.
Yes these two, they love to craft together! The other little ones will be soon joining them!
It can also be very serious as they craft, everyone quiet and caught up in making their own special project.
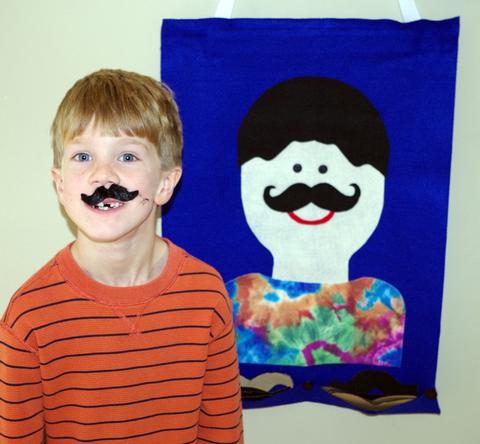
Yes it is all about the mustache with the boys, from "Pin the Mustache" to wearing the mustache!
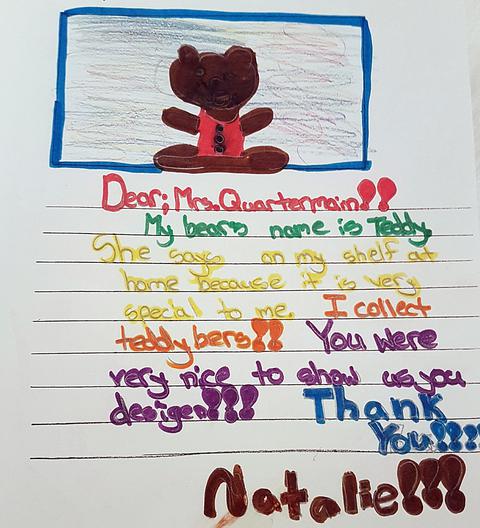
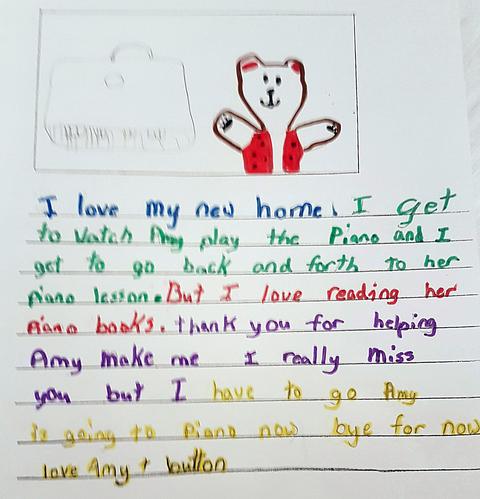
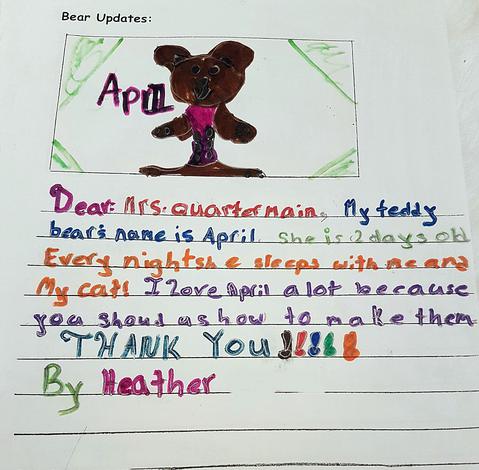
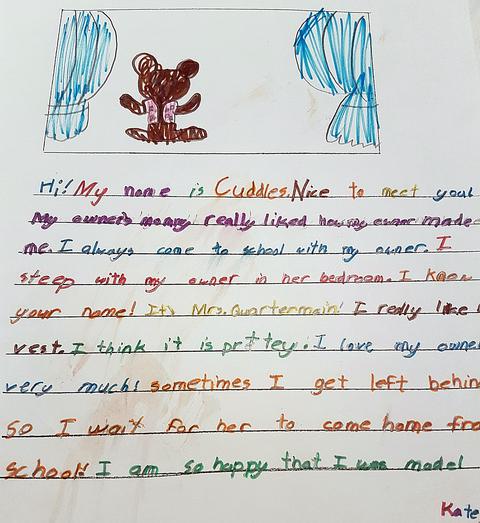
Creating with kids is not only fun for them but it is a wonderful experience to share the love of crafting, making projects with children. When my youngest daughter Kate was seven in 2000, I volunteered time and supplies to craft with the kids at school. At that time I was making bears and so I devised a simple bear pattern, sewed up all the pieces from plush felt for my daughter's class. They would learn how to stuff, do a simple joint, add features and a simple vest to make their very own bear.
It was an amazing afternoon with those children. The bears sported patches, some were pirates, others had earrings. One little boy said he had been so excited he could not sleep the night before, another was going to teach his entire family to sew. They had the best time and so did I. Unfortunately I could not locate any photos but I did find something I had forgotten about.
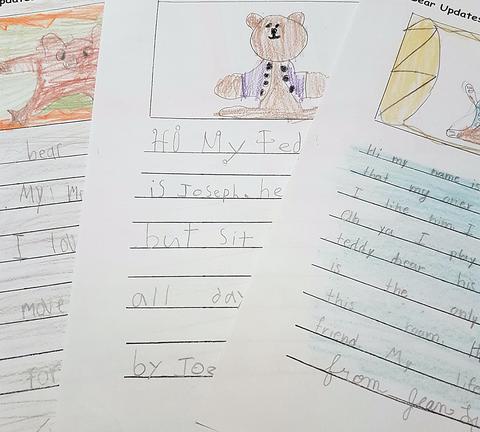
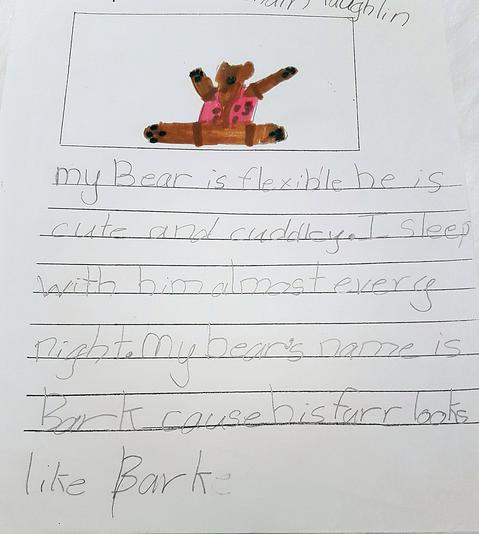
A couple days later my daughter arrived home with a folder and in it each of the children drew a picture of their bear and told the story from each bear's perspective of what his life was like. Below are some of those stories.
So during National Craft month I am reminded how powerful creativity is and the many gifts it brings to everyone and particularly to children. They approach crafting with a wonder and curiosity, they learn important skills and they are present in the act of creating. There is no better way to celebrate this month than creating with kids!
This post was sponsored by Udderly Smooth but all words and opinions are my own.
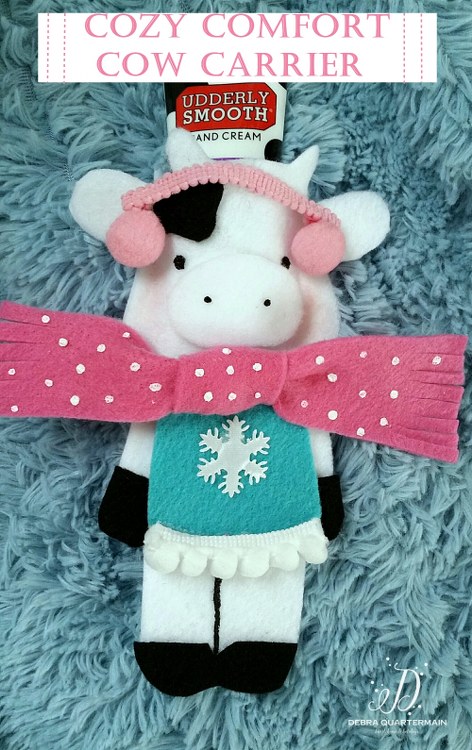
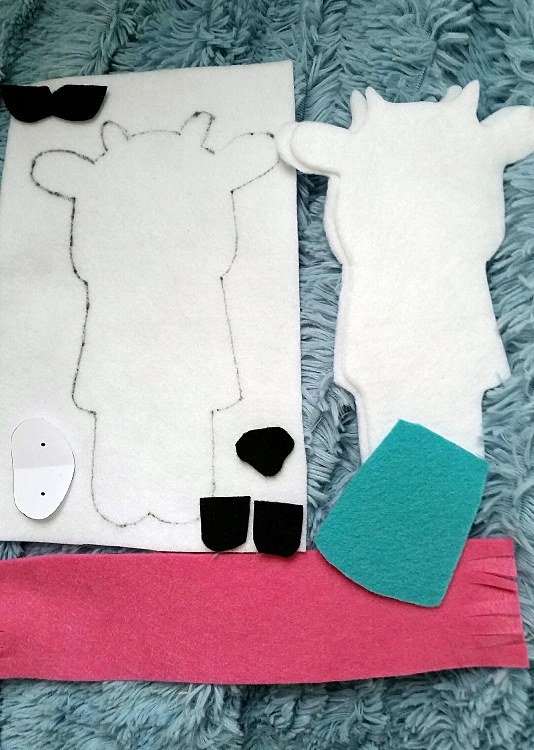
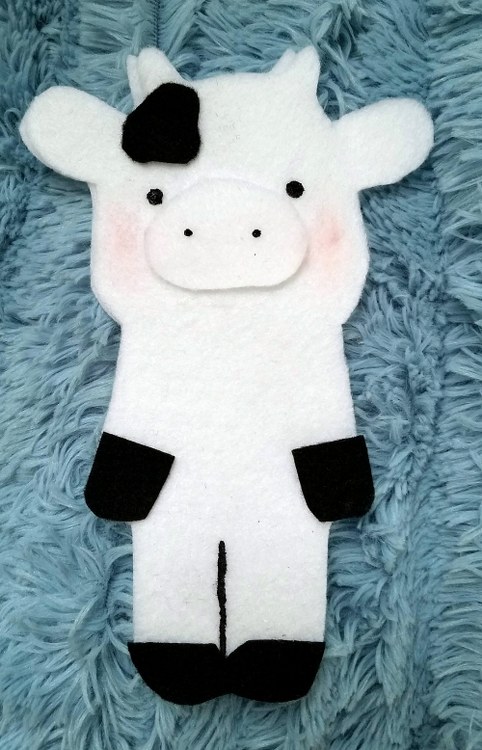
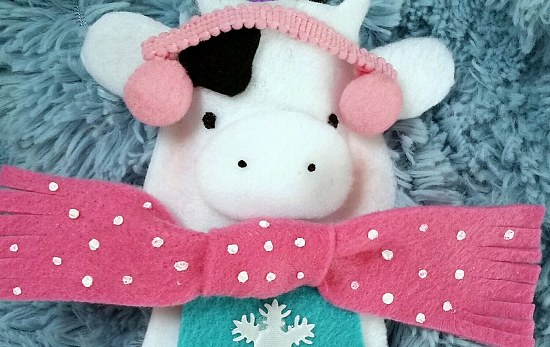
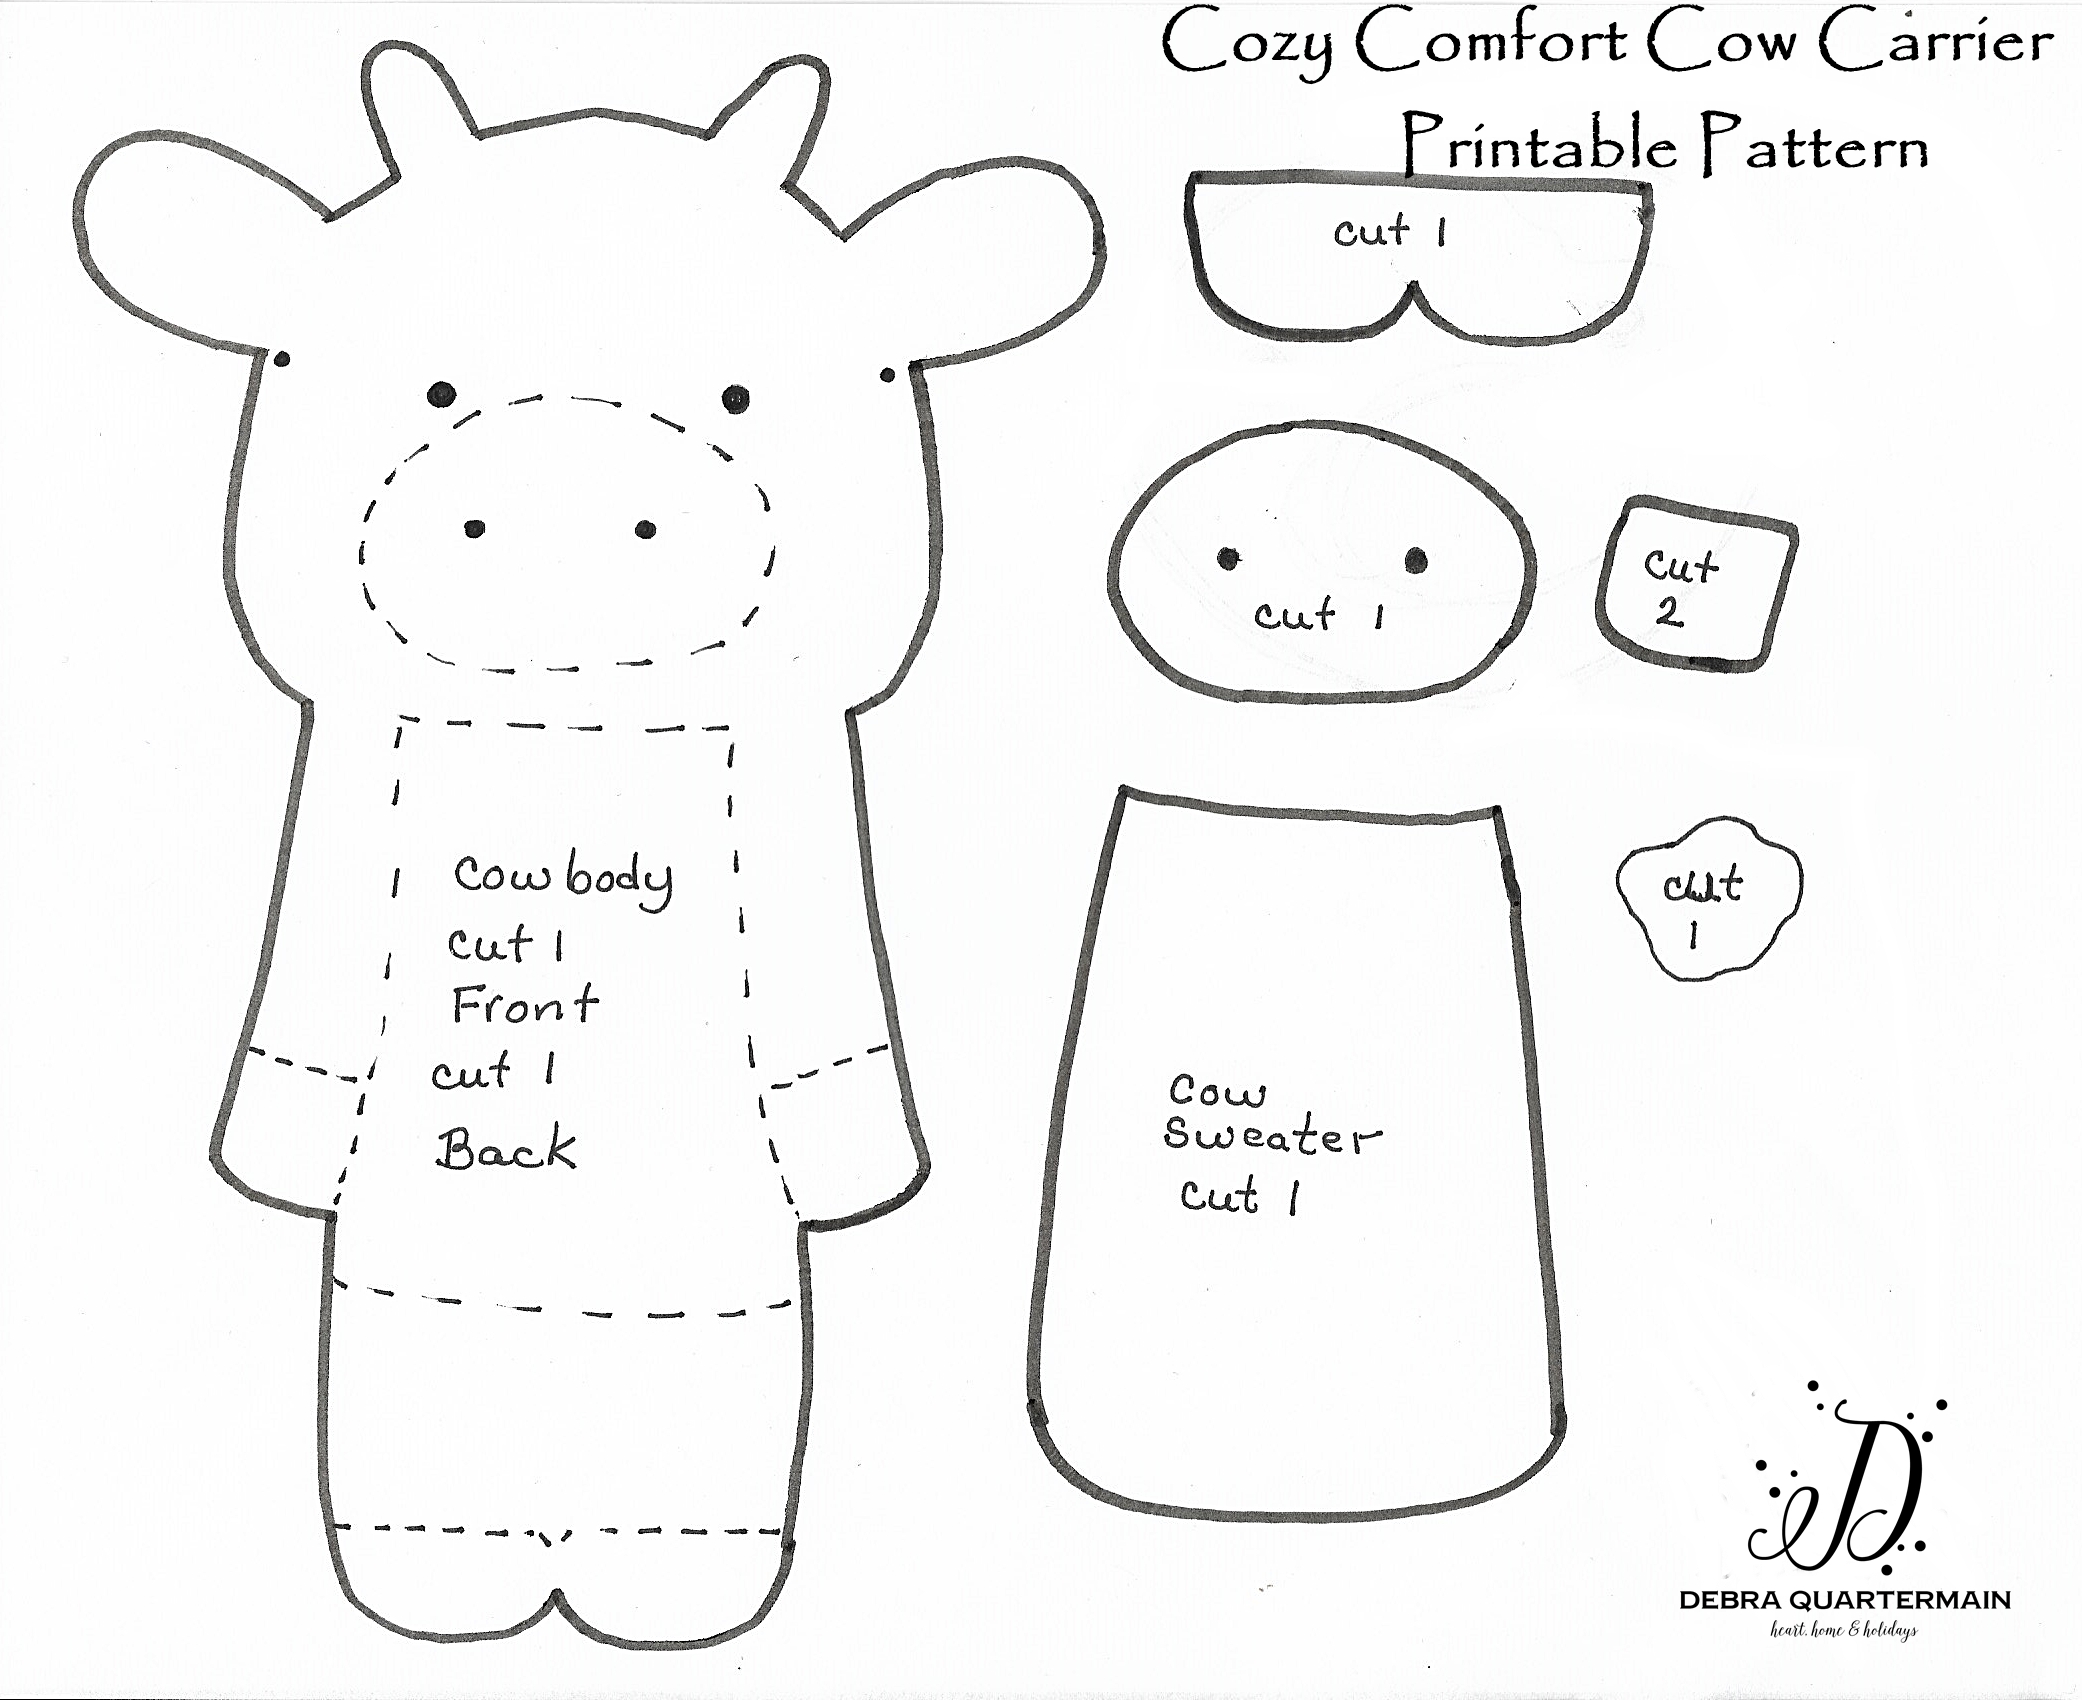
I love winter, the snow is swirling outside and I am cozy by the fire inside creating. Winter does bring drier skin and sometimes chapped hands. Since I work a lot with fabrics and felt I need a non greasy hand cream and Udderly Smooth is perfect. It absorbs quickly and I am ready to craft. I was so pleased to be asked to participate in the Udderly Smooth Wintertime Blog Hop especially when I could create something cute to carry my Udderly Smooth Hand Cream in! Ta da! introducing a Cozy Comfort Cow Carrier to pop in a tube of hand cream to carry in your bag or hang in your crafty space or share with a friend or two!
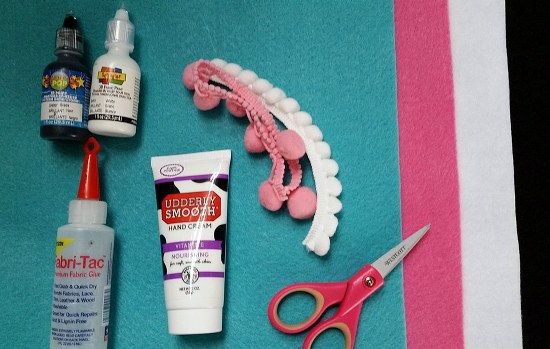
Print out pattern. Cut two body pieces, one snout from white, hooves and spot from black, sweater from lagoon and a 1 1/2" by 8" scarf from pink. Fringe scarf ends.
Align and glue body pieces together along edges, referring to pattern piece for opening at top marked by dots. Glue on spot, snout and hooves. Blush cheeks. Use black scribbles to make eye dots, nose dots, leg line. Blush cheeks. Use white scribbles to add white dots to scarf. Let dry.
Glue on sweater, embellish if desired. Glue white peapod to bottom of sweater, trim ends with scissors. Tie scarf in center. Glue to neck. Trim off three ball poms off center of trim piece. measure on head and trim with scissors. Turn under edges and glue on head from ear to ear. Slip in your favourite tube of Udderly Smooth hand cream!
Check out all of the great ways to use Udderly Smooth this winter, they are moovelous! Enter to win a $50 gift card and Udderly Smooth Prize Pack. Thank you to my talented and awesome artist friend Laura Kelly for including me!
Magical Mimi to Grandlittles, I love to create, decorate & celebrate. Sharing joy and inspiration from our 200 year old home, Quartermain House B&B on the east coast of Canada.


