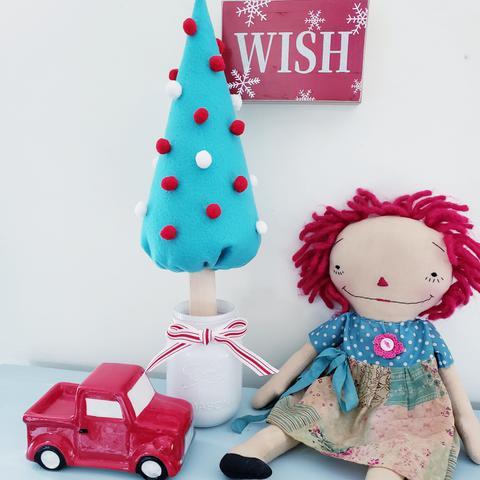
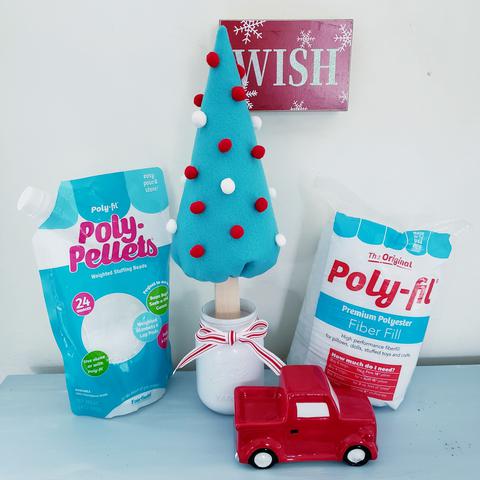
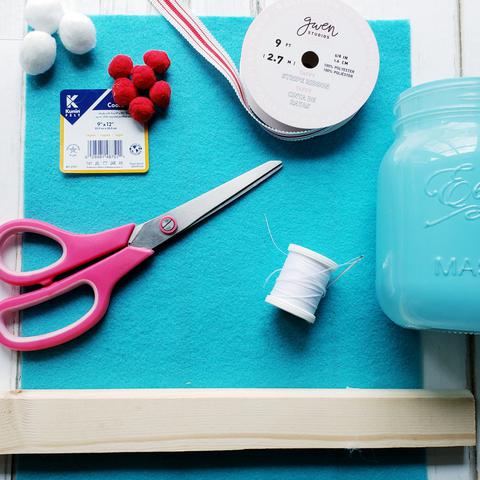
Have you been seeing those cute felt pom pom trees everywhere like I have? I was inspired by a couple I saw at Pottery Barn. The trees are so easy to make! Join me for How to make felt pom pom trees! My favorite kind of project, easy and can be a no sew project too! Perfect in any color to match an individual style or to give as a gift. Inside every successful project the best poly-fil by Fairfield World. (This project is sponsored by Fairfield World but all comments and opinions are my own.)
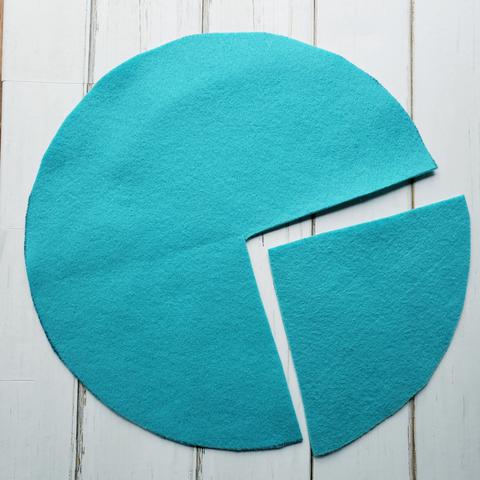
These trees can be made easily in any size. The finished Lagoon Blue tree is 10" tall excluding trunk. The tree pattern is simply a quarter circle. You can use a string and pin anchor to create a circle or use a template like a round table top, plate or charger. A 25" circle will make four 10" trees. The Candy Pink tree was created by using a Lagoon quarter as a pattern and adding 2" on all three sides making a 14" tree.
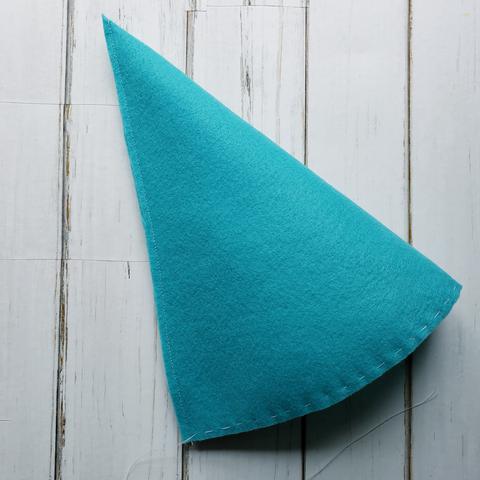
Match up the two striaght sides and sew. This can be machine, hand sewn or glued. If using an adhesive clamp and make sure it is dried thoroughly. Hand stitch a running stitch around bottom of tree. Turn tree leaving seam on inside. If adhered it does not need to be turned.
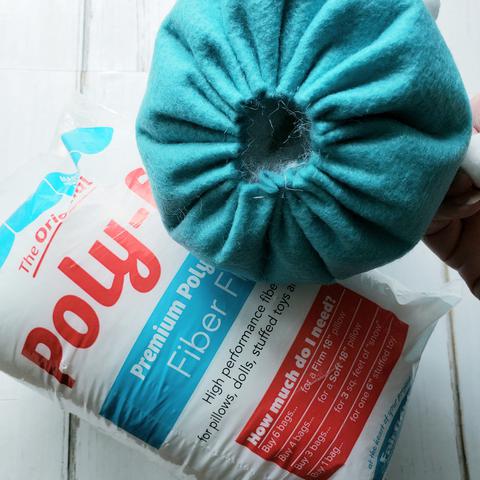
Make sure point is pushed out and stuff tree firmly keeping shape. Pull stitches tight leaving space for trunk.
Adhere pom poms. Insert trunk. ( I did not adhere trunk inside tree as it would make easier storage to remove tree top or change out tree color for year round decor. If adhering to a piece of board. Affix trunks to board first. A small nail through bottom or I tried a new to me adhesive Rapid Fuse. It worked quickly and a solid fuse.
For gift giving, fill a mason jar with poly pellets, add a festive bow and tag. Insert tree. Making these trees is so quick and easy, you can easily have a forest very quickly!
Hope you are inspired by How to Make Felt Pom Pom Trees! I love easy projects that can be used year round and also given as a handmade special gift.
Making creative Magic!
IG @debraquartermain
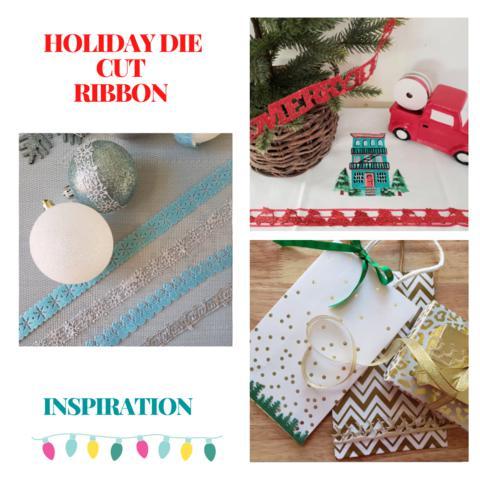
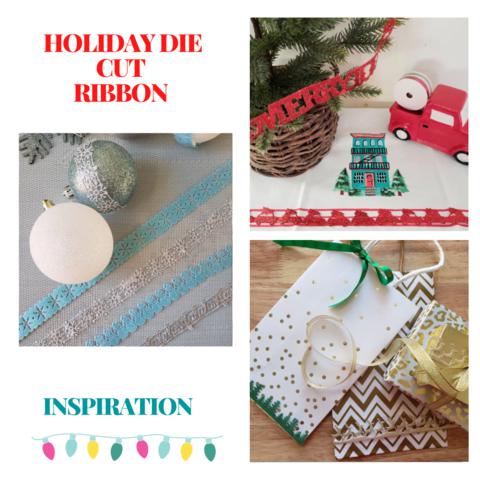
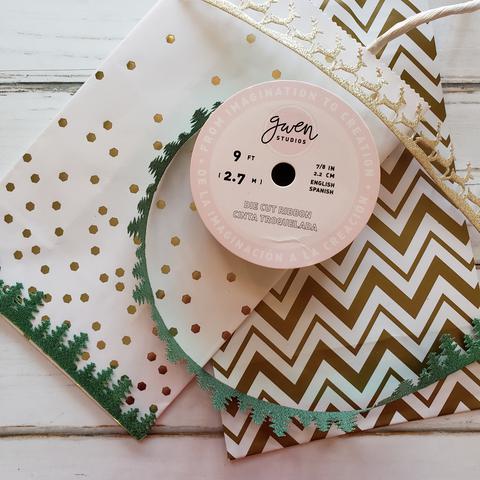
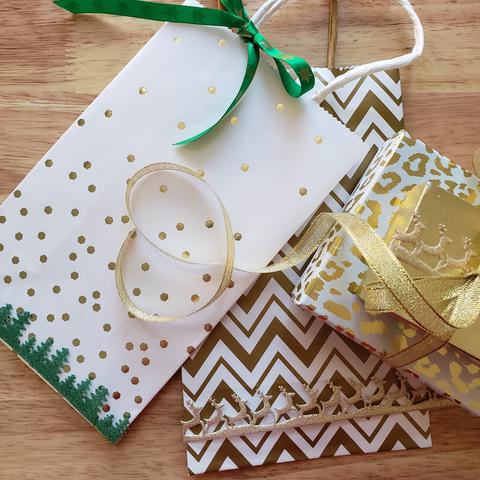
I love ribbons and these Holiday Die Cut Ribbons by Gwen Studios have delightful, darling designs, bright festive colors and intricate cut patterns. These pretty ribbons are perfect for creating a signature look for multiple holiday projects. Here are few quick and easy ideas for inspiration. What would you do with this ribbon collection, all available at Walmart.com. (Ideas and content are my own, I received compensation and product for this post.)
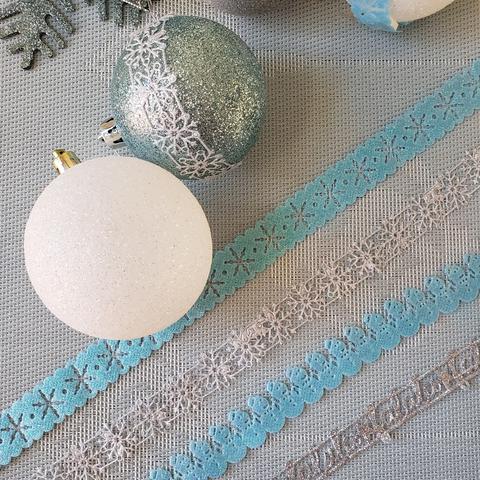
If you cannot decide between traditional red and green or enjoy a different color palette for the holidays, the Gwen Studio Holiday Die Cut Collection comes in several colors and patterns. The Snowmen Ribbon and the Snowflake Ribbon can be easily added to plain ornaments by simply using an adhesive to attach to the ornament.
Several ornaments were simply wrapped with the ribbon, cut to overlap a 1/4" and glued in place.
What is not to love about this MERRY Ribbon! Simply drape around a tiny tree. Add ribbon to a holiday tea towel. (You know the ones no one is supposed to use but just look at.) Make them extra special!
If you use a lot of gift bags the ribbons can quickly make an ordinary bag special by simply adding trim as a border. This Reindeer Ribbon in gold is one of my favorites. The Trees make a great border! Gwen Studios also has several other ribbons which complement the Holiday Die Cut collection.
One of my favourite pumpkin easy DIY projects. Hopping with Team Creative Crafts, link on Home Page. Sharing everything PUMPKIN!
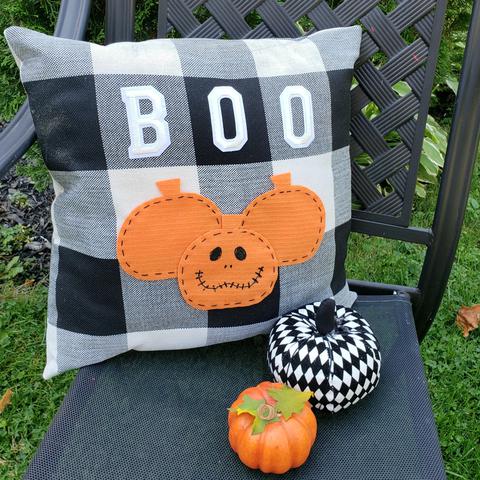
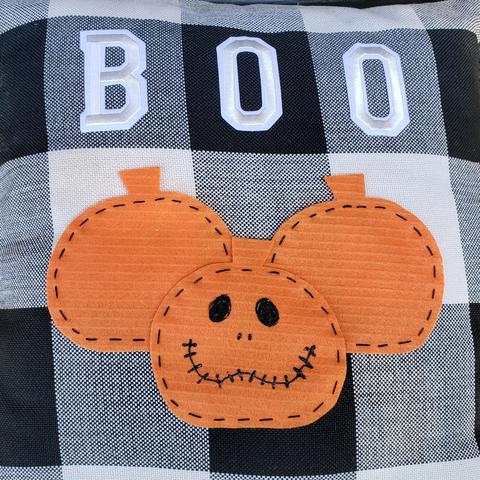
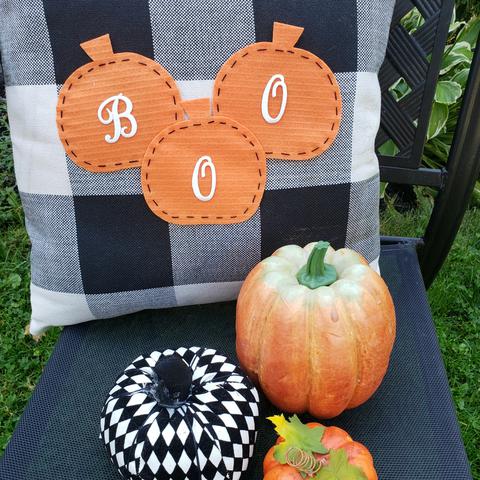
Are you like me and decorate for every season and holiday? How about these DIY Fast and Easy Pumpkin Pillows. You can decorate both sides and then just flip them over for a different season or holiday! The best part you can use pillow forms and purchased pillow covers. Just decorate with felt appliques. (This post is sponsored by Fairfield World but designs and comments are my own.)
I am a big fan of Buffalo Plaid and with a red and white house with black accents it is the perfect choice for my front porch and chairs. Inexpensive pillow covers come in a variety of patterns, these buffalo plaid ones were found on Amazon.
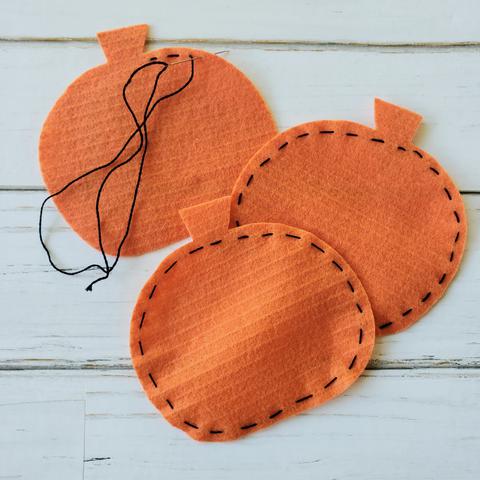
Hand sew a simple running stitch as shown around the edge of each pumpkin shape.
Step 2:
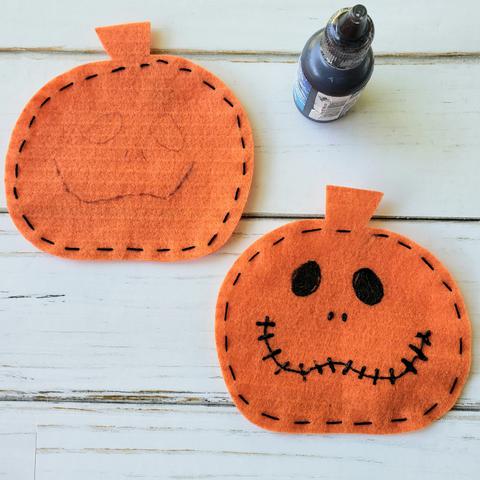
Using the photo as a guide, draw a pumpkin face with a pencil. Fill in with dimensional fabric paint.
Step 3:
Add BOO applique letters to pillow, these letters have a sticky backing and can be easily removed. Pumpkins can be adhered with hook and loop fasteners on the pillow to be removed to add another seasonal design.
By creating a couple sets of pumpkins you can vary them to add plain pumpkins for a fall look to a pilow or pillows and simply create a Halloween vibe by adding letters to the pumpkins. The piilow covers can be decorated on both sides, making it super easy to just flip over from fall to Halloween or any holiday!
These pillows are perfect for fall decor!
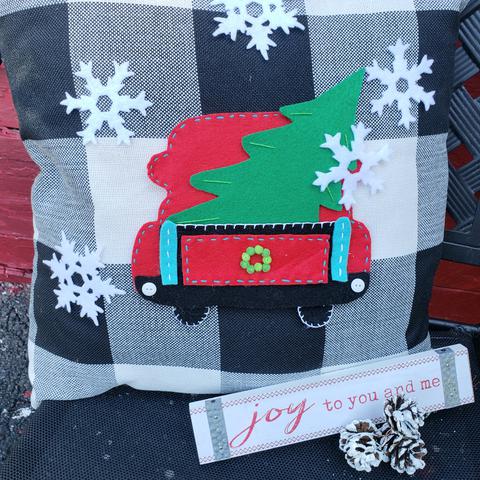
Easily add another season to the reverse side of the pillows. This set of pillow covers had four in it. Decorating for all the seasons! Find the pattern for this cute Holiday truck here.
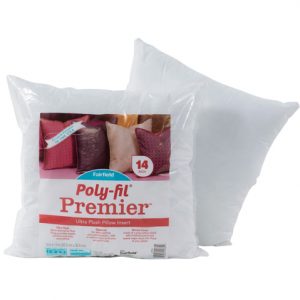
Seasonal and holiday decorating can be achieved easily with just a few touches and pillows are one of the best ways to create the feel. Being able to repurpose and item from one season into another even better! These seasonal pillows can be used all year round. The pillow inserts from Fairfield world are a high quality and durable, they will last through many, many seasons.
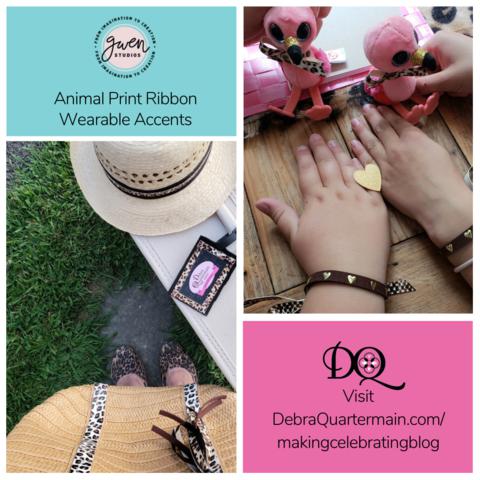
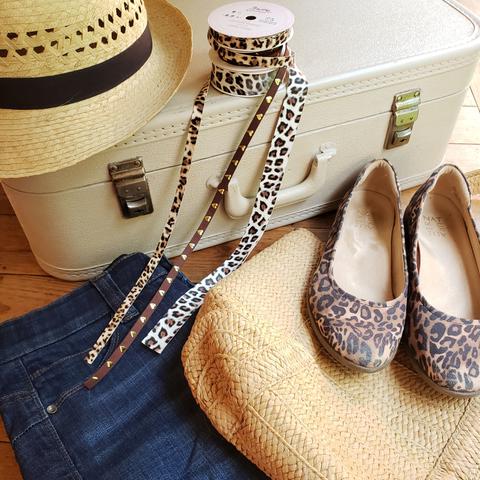
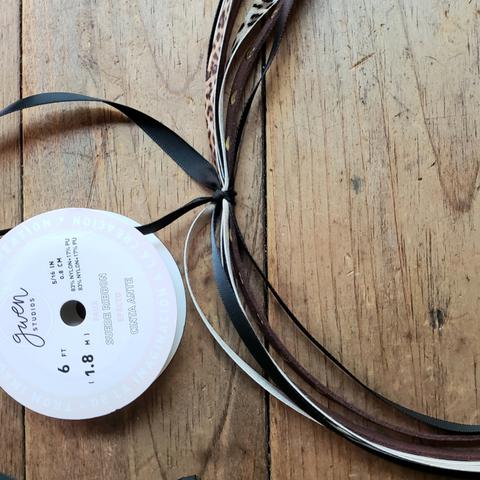
If you know me at all, animal print is a favorite accent of mine to wear. A hint of fall in the air forget the pumpkin spice I bring out my animal print flats and scarf paired up with denim and a cozy cardigan. You can only imagine my delight when I received a box from Gwen Studios with their gorgeous faux leather animal print ribbons. I was so excited to create some Animal Print Ribbon Wearable Accents for my wardrobe and put together a special Fall Friends Flamingle party for my grandlittle girls and their BFF's! The Gwen Studio Ribbons are available at Walmart. (I received product for this post but the content is my own.)
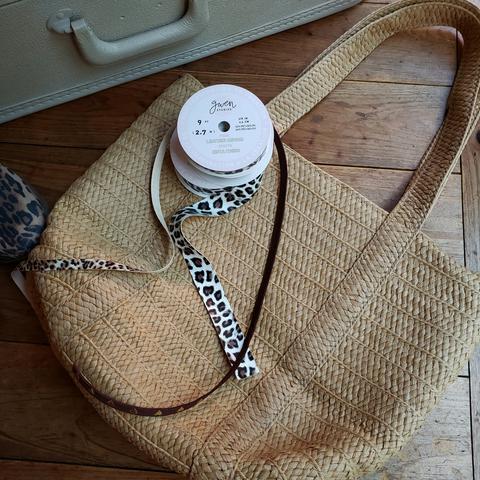
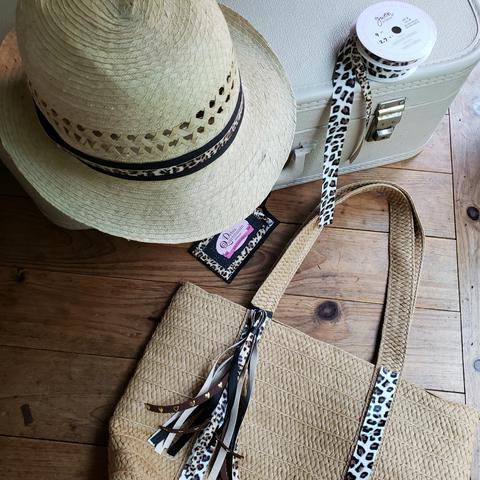
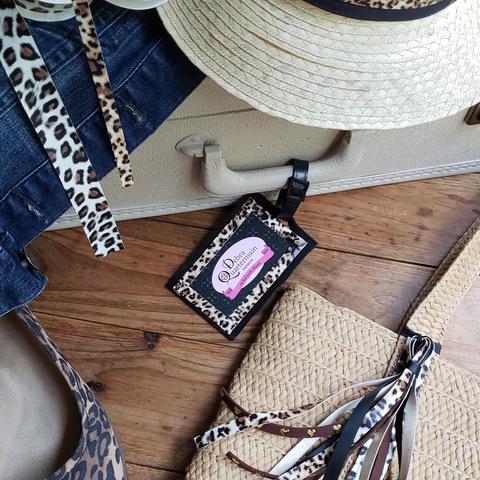
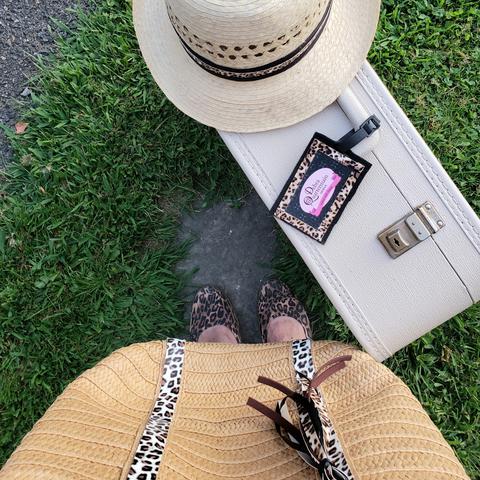
We have a little road trip planned to scenic Prince Edward Island in September. Animal print flats and my favorite jeans are ready. I have a very cute straw bag and hat to take which just have to have an accent of animal print ribbon. The Gwen Studios faux leather ribbons are available in several patterns and different widths. I used the 7/8" for my bag. The ribbon adhered easily with a quality fabric adhesive. I simply glued along the stitched strap line on either side of bag.
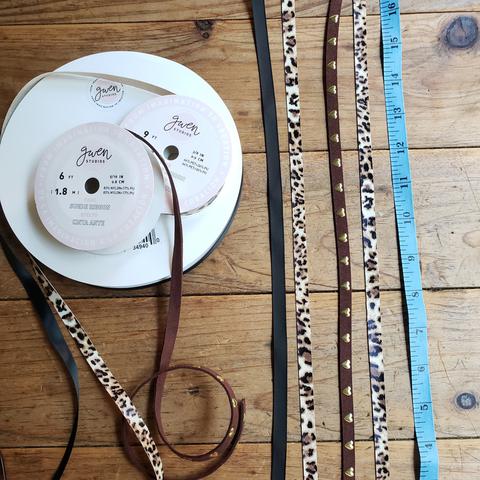
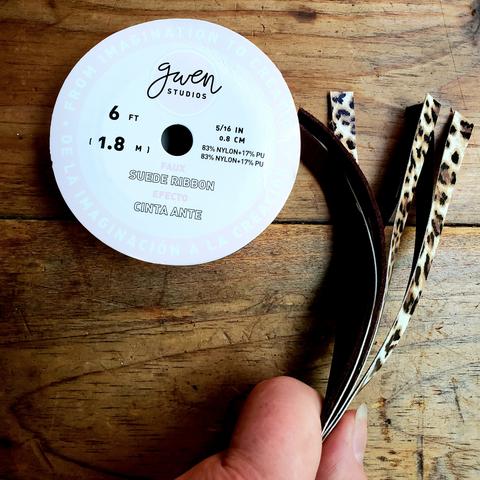
For an added decorative stylish element I made a tassel to tie on to my bag. I had also received, a suede ribbon with embossed hearts and a black grosgrain ribbon.
To make the Tassel:
1 yard each of four 3/8" Gwen Studio ribbons
1 extra yard for finishing. (I used the black grosgrain.)
1. Cut two 18" lengths of the four ribbons.
2. Alternate the ribbons and stack.
3. Tie the ribbons together tightly in the center using 18" of the extra ribbon piece.
4. Fold ribbons in half. Measure down about 2" and tie tightly to finish the tassel.
Simply tie tassel to bag. I used the fabric adhesive to glue a band around the center of my hat.
My vintage suitcase was feeling left out so my plain black luggage tag got a border of ribbon too. Simply glued on.
How cute is this look! The tassel can be untied and added to a different bag or belt.
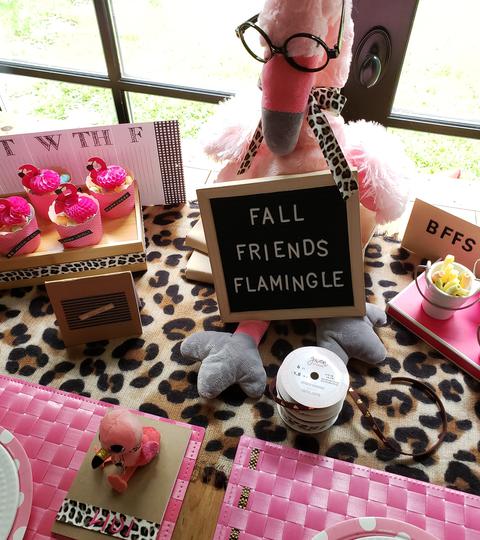
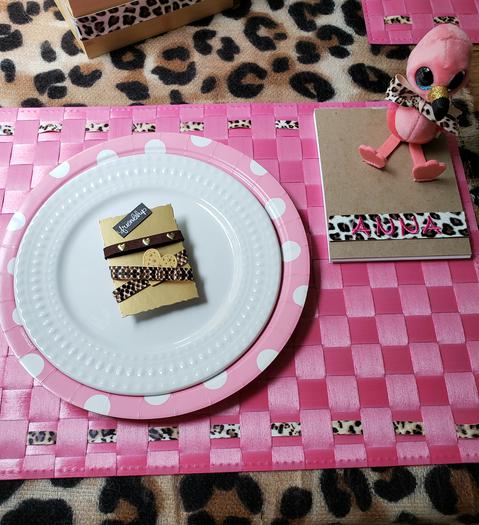
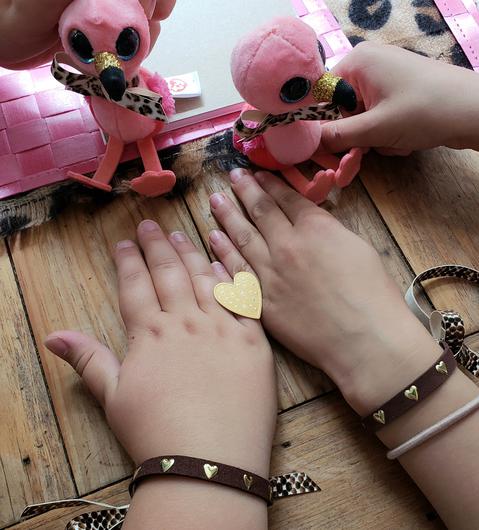
I have one grandlittle girl who is a big animal print fan. She has flats, legging and a cardigan too! She has been known to wear them all at once and can sure pull that look off! Having little celebrations and surprises is always a fun thing to do for this Mimi aka (magicmakermimi). So I had a four little flamingo stuffies and a large one, the girls have besties moving back into town. I decided to add some animal print ribbon from Gwen Studios and throw a Fall Friends Flamingle party celebrating BFF's and back to school!
Everything for the party was upcycled and in my crafty stash. I just added the Gwen Studio ribbons. The placemats had ribbon woven along the ends. Two different ribbons adhered together to tie on for Friendship bracelets. Notebooks accented with ribbon and their name in monogram pink letters. The tiny flamingo stuffies also had ribbon bows added.
My grandlittle girl and her bestie. She added the heart to the photo. They have been friends since babies and their Moms friends since they were in Junior high. They loved the party, cupcakes and giggles!
All packed and ready with my Animal Print Ribbon Wearable Accents with Gwen Studios Faux Leather Ribbons! The ribbons are available at Walmart. I hope you have been inspired to add some Animal Print Accents to a wearable or accessory for a unique on trend detail!
We are blog hopping with the Designers Craft Connection. Get ready to walk on the wild side with all kinds of Faux Leather Animal Print Ribbon inspiration with Gwen Studios!
Thank you for stopping by!
Find me on IG @debraquartermain
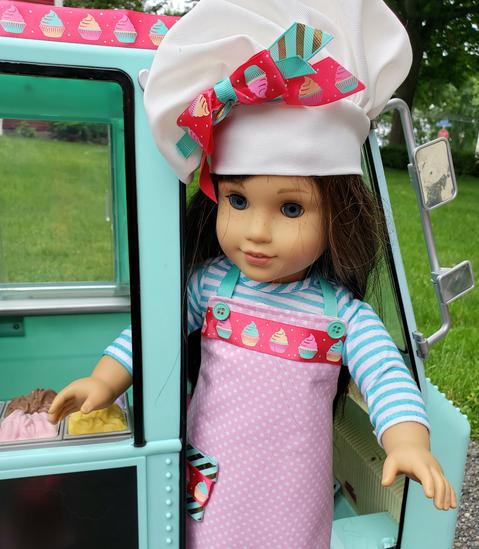
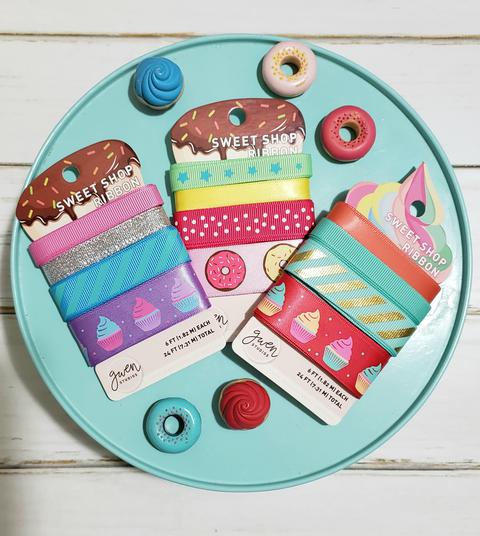
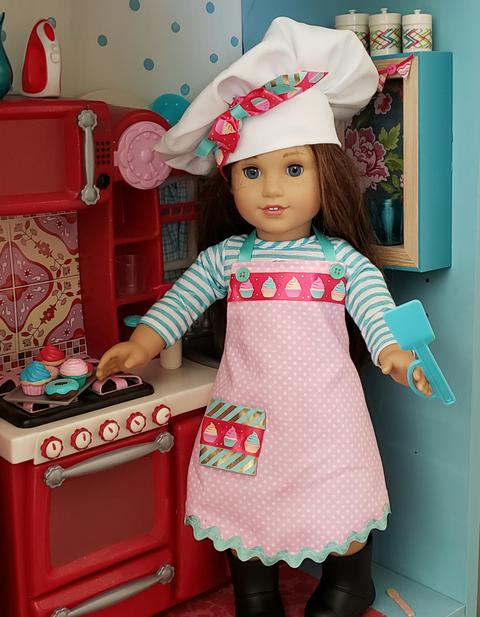
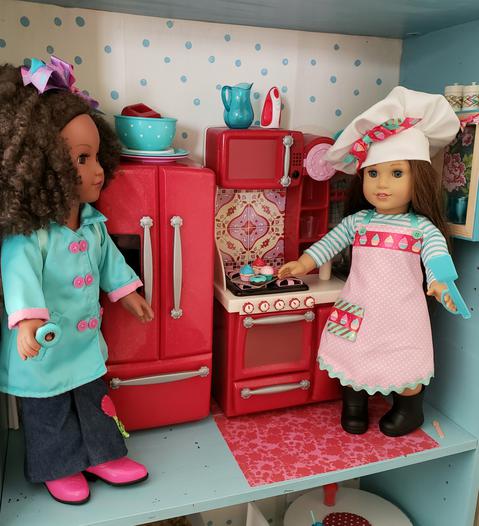
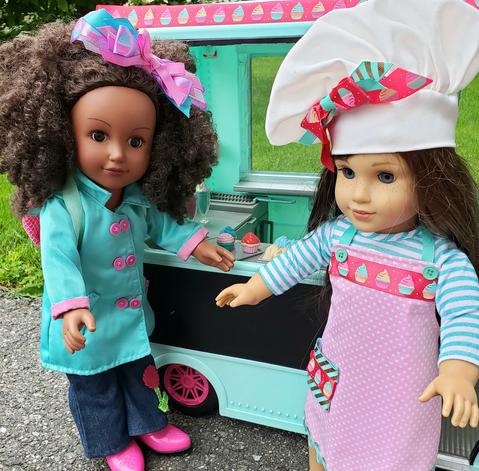
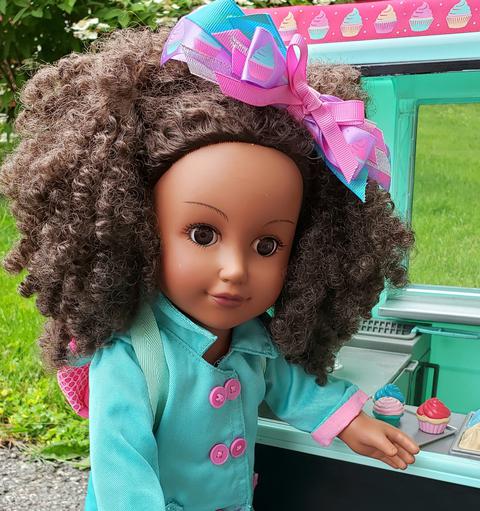
When Gwen Studios sent me some of their adorable ribbons, the Sweet Shop collection with the cutest cupcake and doughnut designs I was inspired to make some sweet treat magic of my own! I am Magic Maker Mimi to my grandlittle girls and it gives me an excuse to collect fun dolls and accessories. Two of the dolls Maggie and Chelsea have been busy baking and getting ready to for their Sweet Treat Truck venture.
With fabric adhesive, scissors and elastic the girls had to make hairbows, add details to Chelsea's apron and add a matching trim to the truck. The ribbons come with co-ordinating selections so it is really easy to make fun accessories. Just tie some simple bows and stack the ribbons or make loops, tie with elastic and glue a small bow on the top. Gwen Studios collections are available at Walmart.
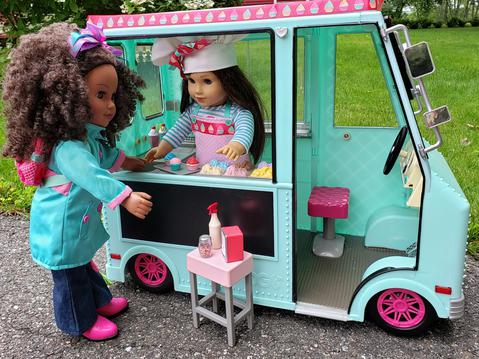
The girls are ready, treats are baked, accessories finished! The sun is shining and time for truck set up.
Maggie and Chelsea are still trying to decide on a name for their Sweet Treat business. Any ideas?
They found a perfect place to park their truck in a busy neighbourhood with a lot of foot traffic.
Napkins, extra sprinkles and hand sanitizer are all set up outside the truck. Ice cream flavors and cupcakes are ready. The girls double check everything. They are ready! I think some of their first customers will be my grandlittle girls!
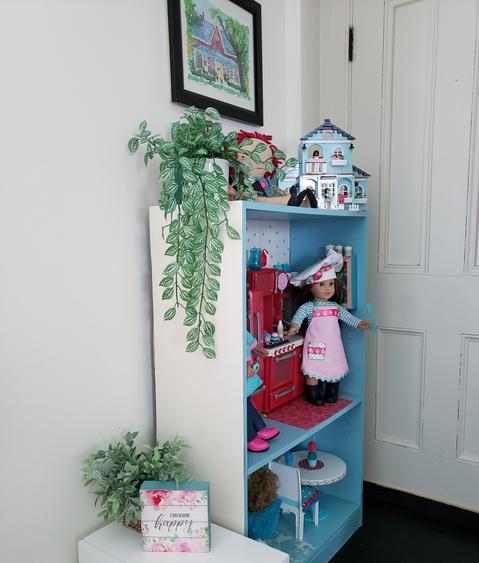
When Maggie and Chelsea are finished for the day they come back to their pretty home. Being Magic Maker Mimi is such a joy and this special little corner in the family room makes me smile everyday. Always a new adventure waiting when the grandlittle girls arrive and as Anna at 3 remarked, "Hurry Mom we have to get to Mimi's and make some magic!"
I feel there is a magic in the Gwen Studio ribbon collections, they are fresh, colorful, whimsical and oh so pretty. Make a little magic of your own!
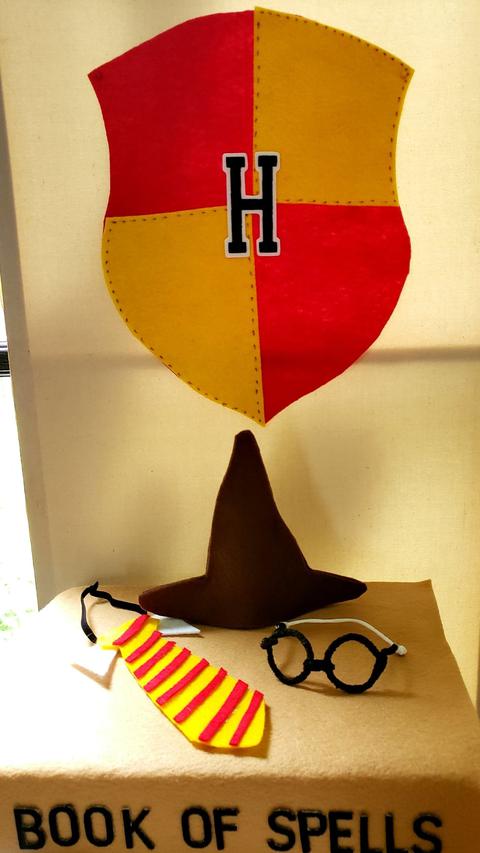
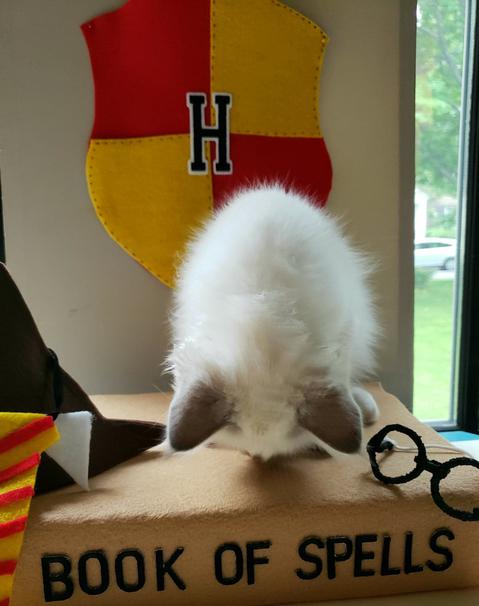
Harry Potter fans! His birthday is coming up this month! We are celebrating with Team Creative Crafts-Harry Potter Edition, link in sidebar to all of the bloggers involved! I am a huge fan and admit to watching all of the movies several times!
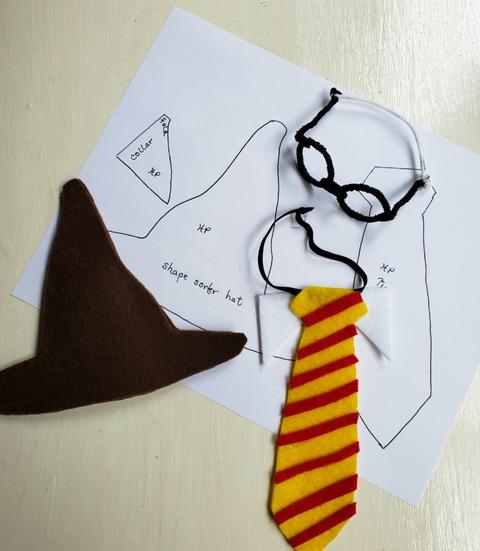
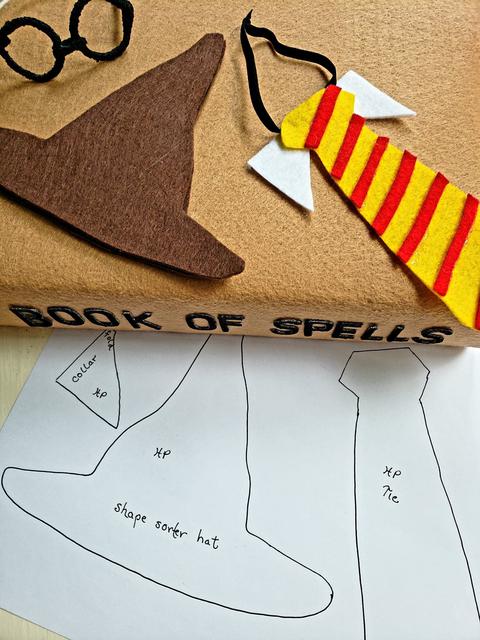
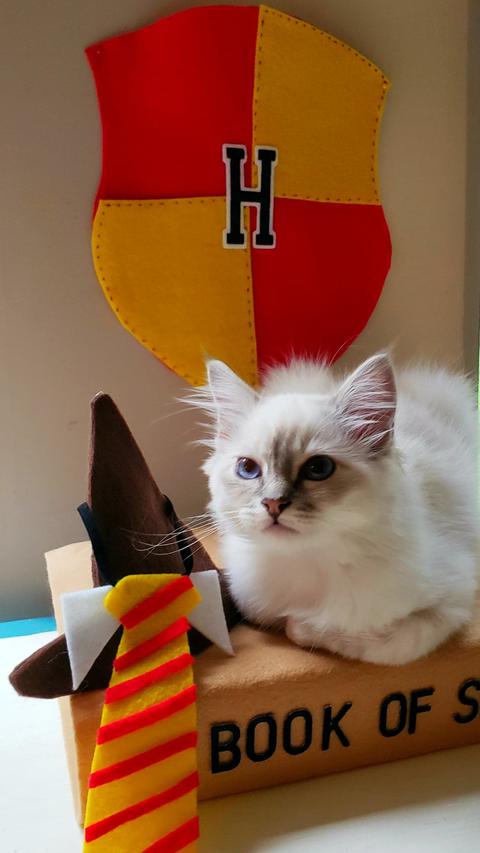
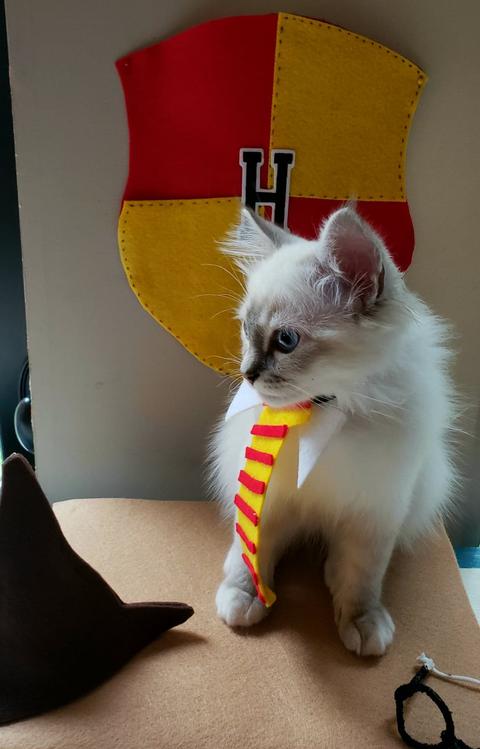
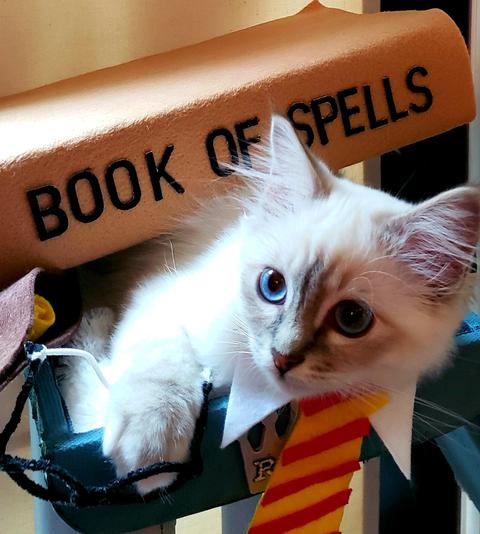
Harry was a member of the House of Gryffindor so of course cat is too! I created a setting for Rory using Kunin Felt. A crest of course, school tie, sorting hat and a Book of Spells. The glasses are made from a soft chenille stem, looked super cute on Rory for two seconds and then became a chew toy.
Let's get started!
You will need:
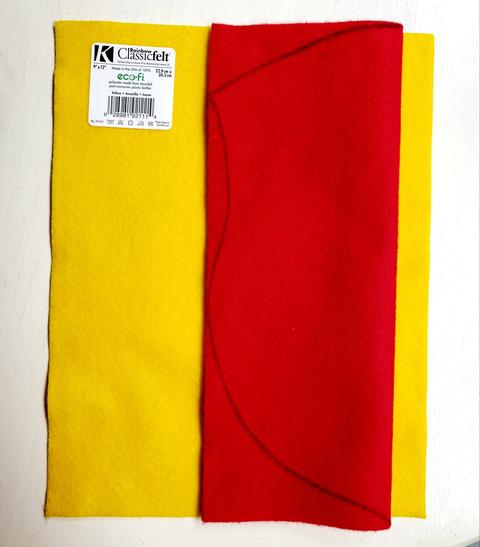
Kunin Classicfelt 9" x 12" craft cuts: 1 of each, Red, Yellow, Walnut, scrap of white
Kunin Premium Felt 12" x 18" craft cut: 1 Cashmere Tan
I did a search on Pinterest for an easy crest shape for a guide. By folding the red craft cut in half lengthwise you can trace a simple curve outline and cut it folded.
STEP 2
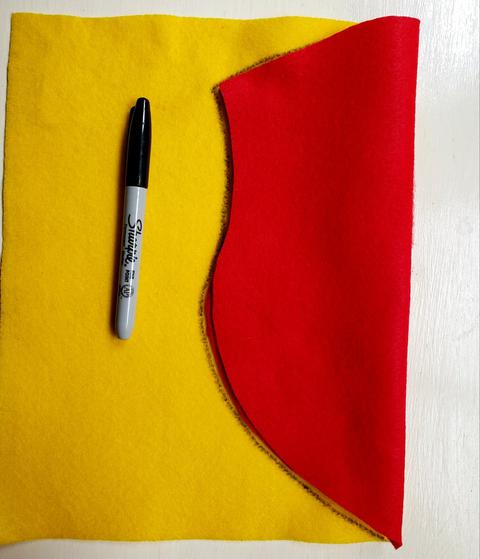
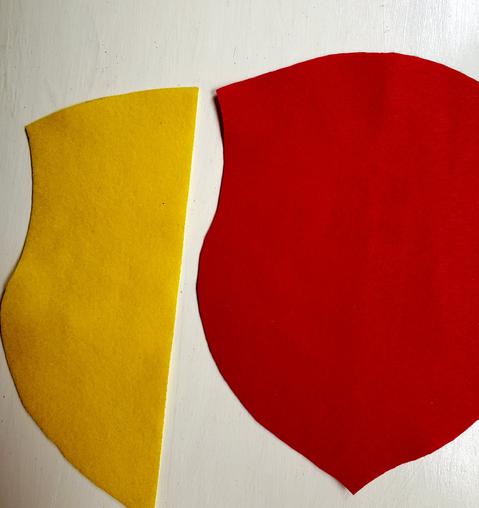
Place cut red piece still folded on yellow lining up fold with edge of felt piece. Draw around the half shape in yellow. Cut out and then cut yellow piece in half again to alternate crest piece colors. Glue in place. Use fine tip marker to create stitch lines.
STEP 3
Again searching on Pinterest there are many sorting hat and tie patterns. The sorting hat pattern from Popsugar. There is a cute felt tie pattern over at Wild and Wonderful. I drew mine out on a piece of paper so I could adjust the sizes some. The tie is a little long for Rory, the idea was to keep him posing with treats but he couldn't see the treats over the tie length. He still sat and then laid down, he likes the Book of Spells, I think it must be the soft felt or the box I used. (His kitty food came in it. ;)
STEP 4
Cut out two sorting hats from the walnut craft cut. Glue along edges leaving bottom open. Stuff with scrap felt to stand or if you have a very quiet cat, it would fit with added elastic. Our kitten was okay with the tie but a big no to the hat and glasses. Cut out one tie and a double triangle piece for a collar. Glue white triangle piece behind tie. Cut narrow strips of red fronm left over scraps. Glue to tie. Glue an elastic piece to back of tie. Measure around neck and tie so it is loose and easy to slip on and off. Rory got his off just fine by himself.
STEP 5
The Book of Spells was the easiest! Rory's kitten cans come in this cardboard case. It measures about 7" by 10". I simply wrapped the 12" by 18" craft cut around the box, and glued. It has a 1" overhang on either end. It is open at the back. Glued in place. Added the Letters to the side and a larger H to the crest.
These pieces would be suitable for dolls or to use in a birthday setting. Making larger ties to wear and creating Book of Spells Treat bags.
Rory looks very handsome as a House of Gryffindor member.
I think Rory at this point in the photo shoot was looking for spell of his own.
Check out all the crafty Harry Potter posts with Team Creative Crafts-Harry Potter Edition. There is a link in on the Home Page for the Rafflecopter Giveaway of a Harry Potter Lego Set!
Want to see more of Rory, catch him on Instagram, @reignofrory. You can follow me too @debraquartermain. 😊
Thanks for coming by!
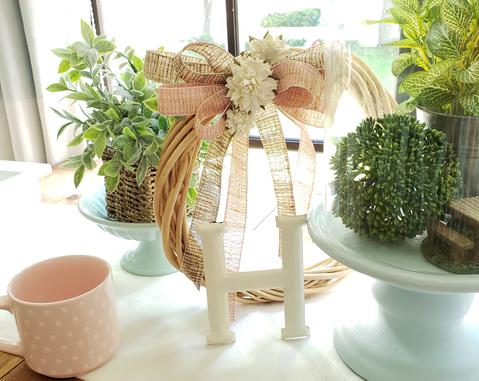
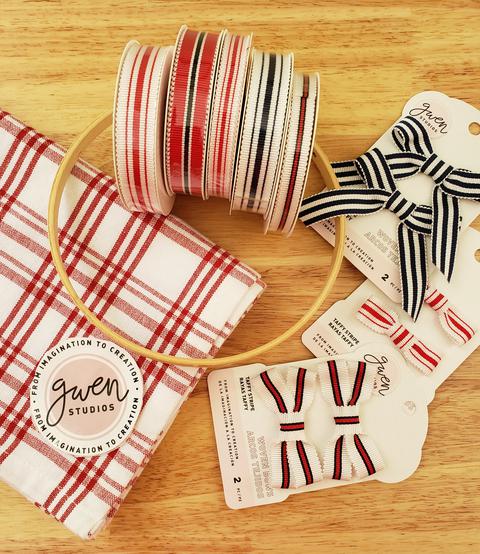
I am excited to share these beautiful ribbons from Gwen Studios! With so many to choose from I created some Easy Ribbon Wreath Decor with Gwen Studios collection. Several designers are participating in this DCC Blog Hop(Designer Crafts Connection) and have created inspiring projects. I was provided product to use but all comments and opinions are my own.
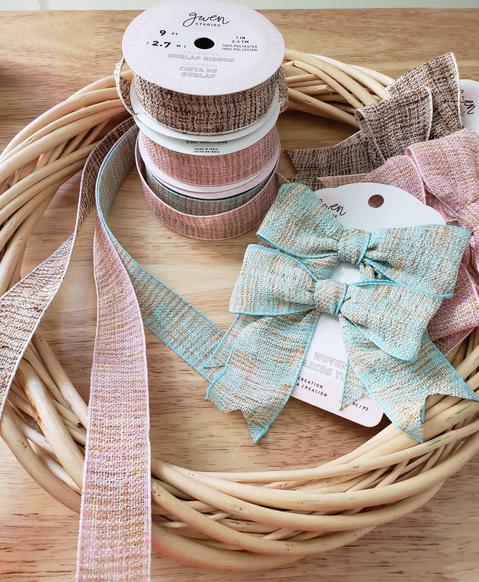
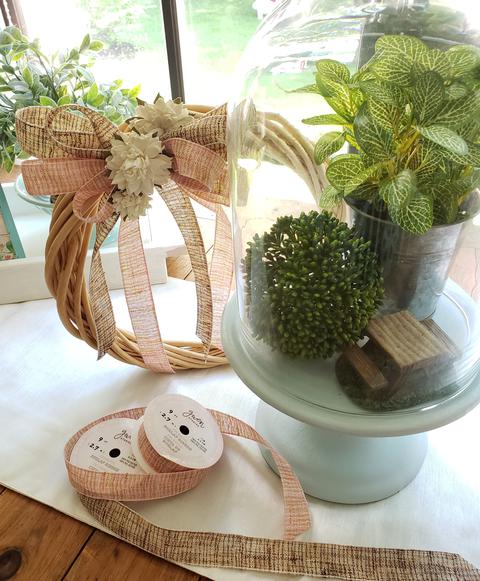
Burlap ribbon often is stiff and scratchy but Gwen Studios burlap ribbon is soft and comes in several colors. I have been wanting to add a pretty wreath to my kitchen tablescape with a soft natural look. The burlap ribbons come in a pink, mint green and natural. Gwen Studios also has premade matching bows. Quick and easy accents! Their collection is available at Walmart.
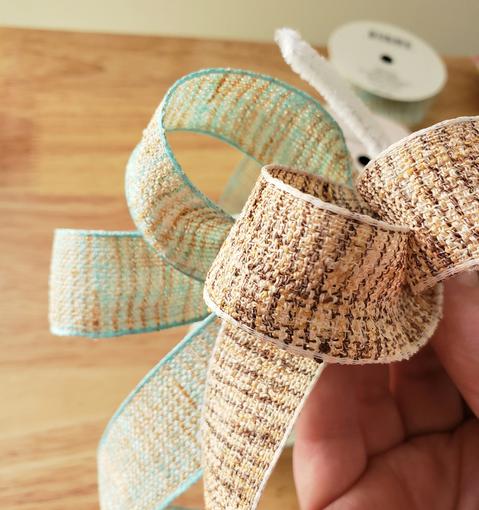
To make the Burlap Bow:
Gwen Studios Mint Green Burlap Ribbon
Gwen Studios Natural Burlap Ribbon
Gwen Studios Pink Burlap Ribbon
Gwen Studios Natural Burlap Bows
Wreath
Flowers
Chenille Stems or Wire
Hot glue
Scissors
Measuring Tape
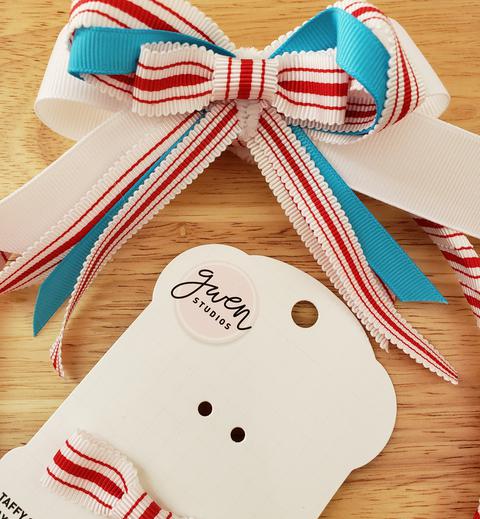
Make the Bow: Leave a length of ribbon hanging for the tail. Make a loop 2-3" and fold ribbon back and forth twice creating equal loops. Add the next ribbon to the center of the first loops repeating side to side. Wrap with chenille stem. Add a premade bow in the center to finish it off.
Add the Flowers: Glue bow to wreath and add flowers beginning with the center flower.
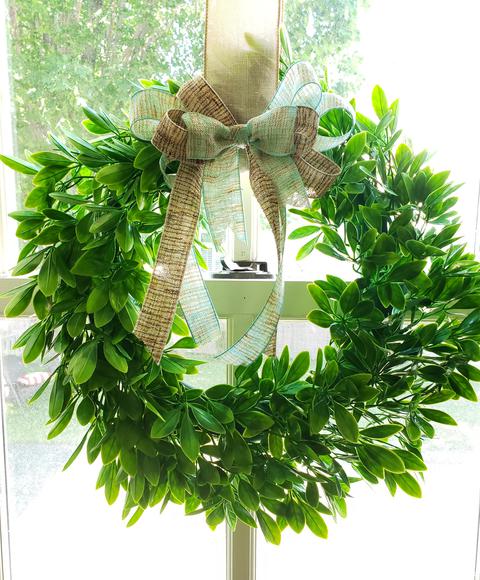
Hanging in my kitchen window is a boxwood wreath. I made another bow and it was a perfect addition!
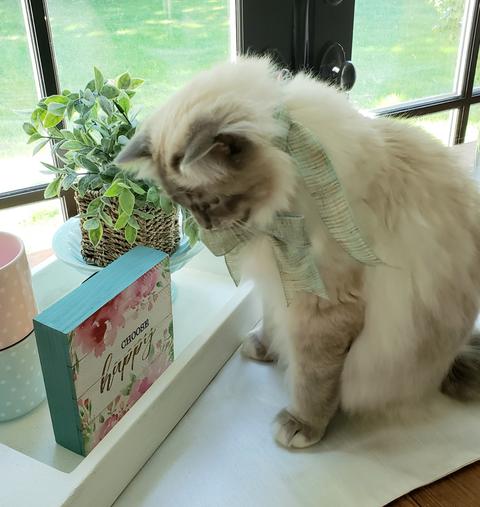
Look how cute our cat Reign of Rory is wearing a Gwen Studios bow!
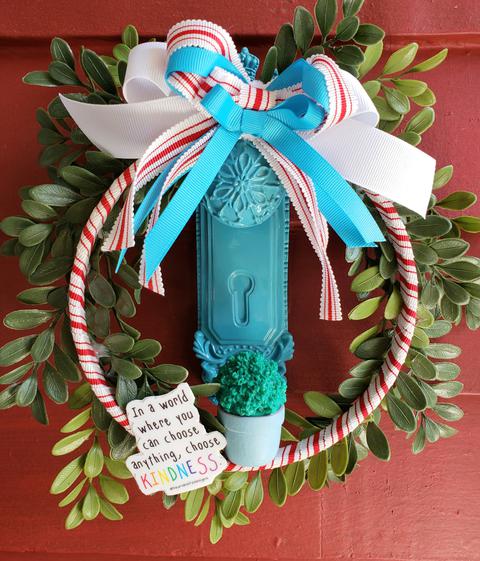
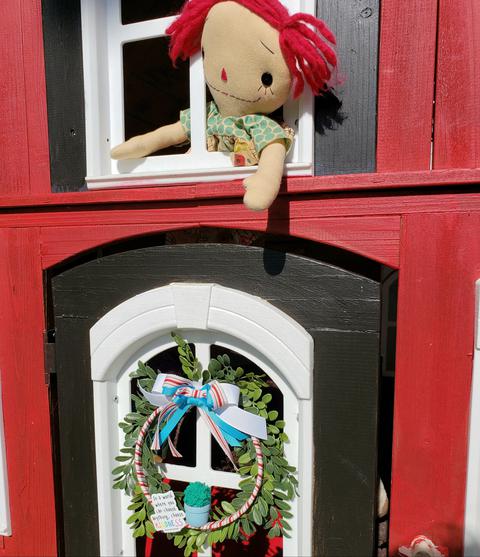
We have recently painted the house exterior and the playhouse for the grandlittles. Of course the play house front door needs a new wreath!
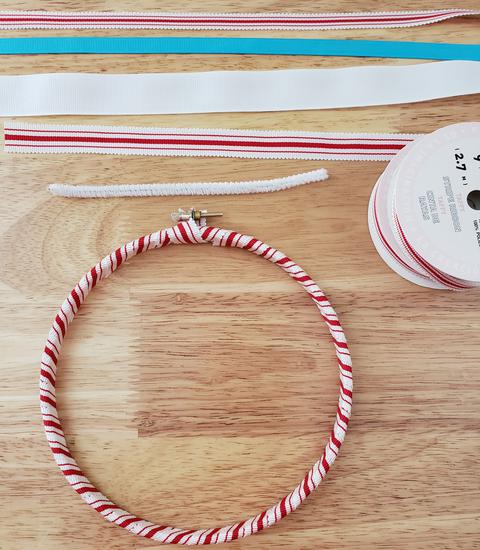
I used a simple embroidery hoop to make the playhouse wreath. Extra sprigs of boxwood were added easily by gluing from the back of the hoop.
Wrap the hoop till it is covered.
Tie separate bows and layer together. Tie with chenille stem. Glue to top of hoop.
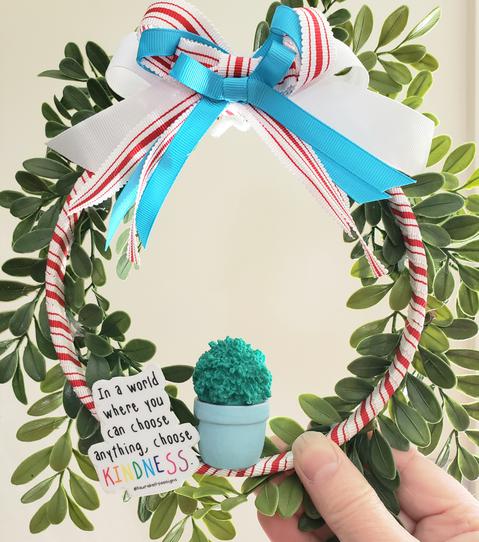
Added the Kindness message and tiny pot. How cute is that!
Here it is hanging on the front of the playhouse. Hope you have enjoyed my Easy Wreath Decor with Gwen Studios. Looking for more inspiration, Check out the other projects in the DCC connection! DCC Blog Hop
Thanks for stopping by! Want to follow me @debraquartermain on IG!
Creatively yours!
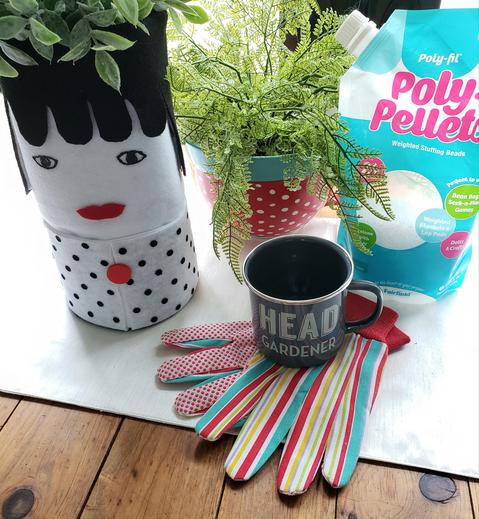
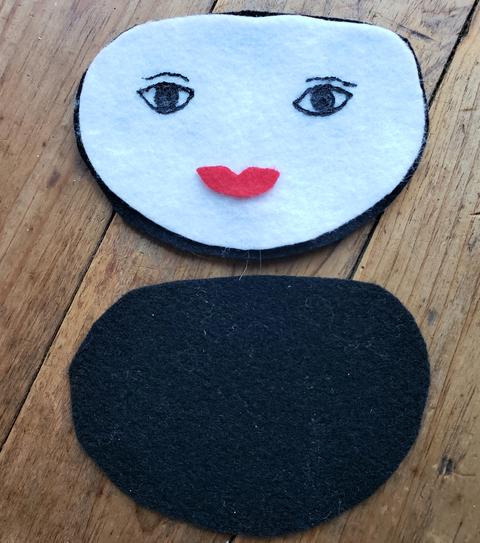
I am all about plants and gardens right now. These trendy head planters I am seeing always make me smile. I designed a Whimsical DIY Head Planter which is a fun easy no sew project. This post is sponsored by Fairfield World, the content and comments are original and my own. I used Poly-pellets to give my planter some weight and shape so it would stand with the plant in it or outside not blow over.
Materials:
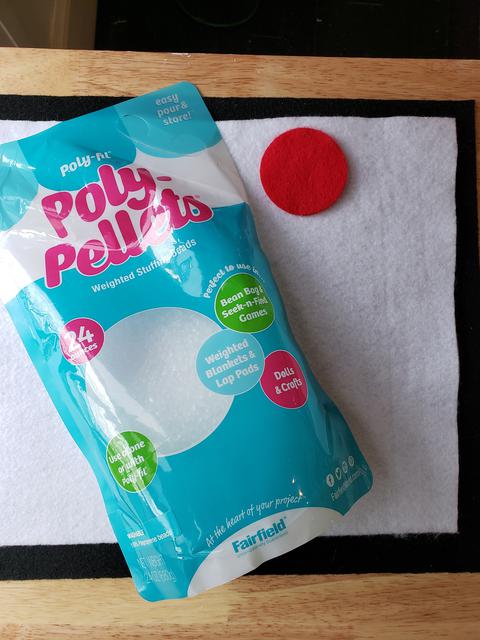
24 oz bag Fairfield World Poly-pellets
12" x 18" craft cuts Kunin Felt Premium: 1 White, 2 Black
9" x 12" craft cut of print felt or fabric
2" scrap red felt for lips
Dimensional black paint
Fabric or felt glue
Scissors, rulers, clips or pins, chalk, marker or pencil, 2" and 6" circle template
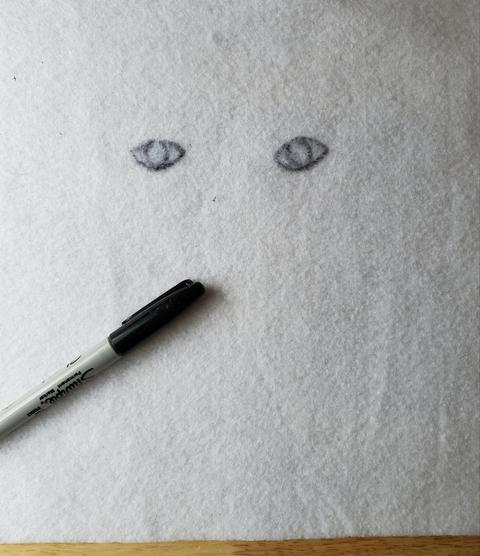
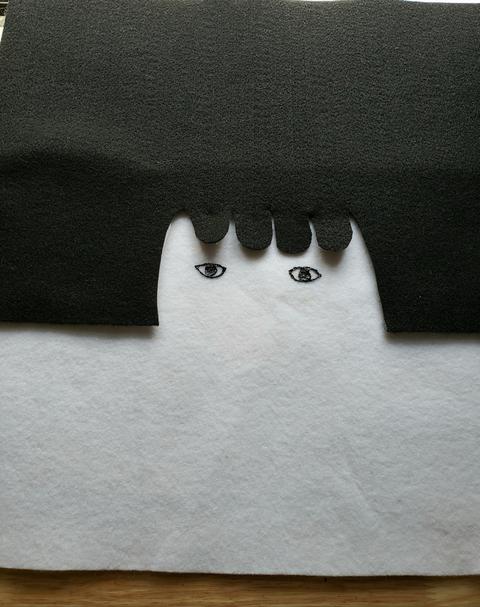
STEP 1
Find the center of the white piece lengthwise. Measure down 4" from the top for eye placement. Mine are spaced about 2" apart, 1" on either side of center line. Pencil in and then go over with dimensional paint, let dry.
STEP 2
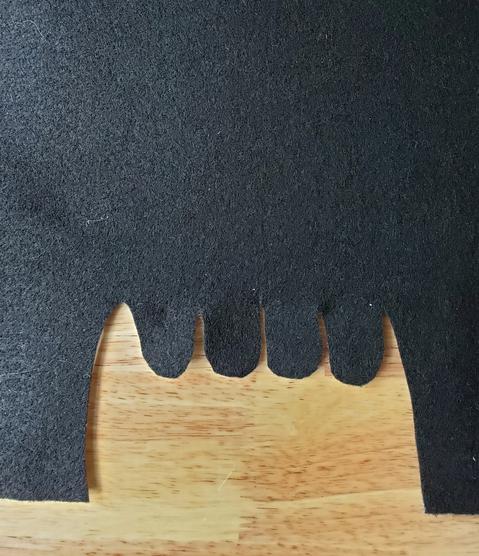
For the hair, here is where you can have a little more fun creating your "do". At the center of the black piece of felt placed as shown measure a rectangle 6" across and 5" down You can use chalk to outline it. Now ready to style some bangs! Draw with the chalk using this photo as a guide to make a hair style. Cut the bangs carefully with scissors.
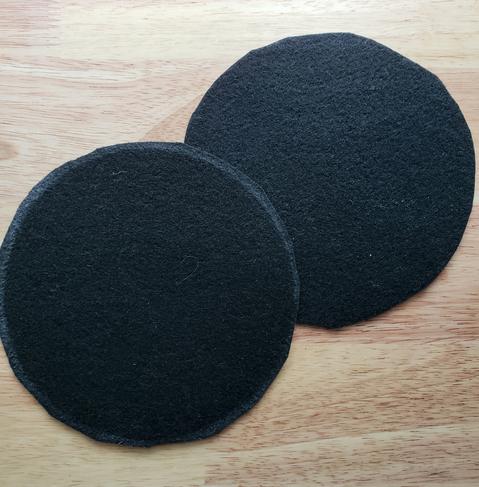
You will also need two 6" circles cut from the second piece of black felt.
STEP 3
Take the black piece and place over white aligning eyes and hair. Trim hair if it needs adjusting. Glue the two pieces together.
STEP 4
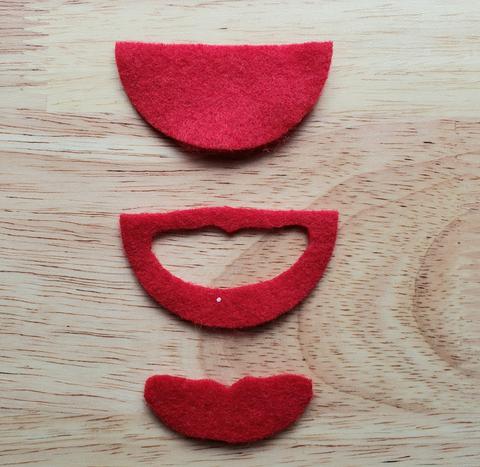
The lips. Take half a 2" circle of red felt. Fold in half again and cut a cute lip shape. Glue to face.
STEP 5
Cut the other 9'" by 12" piece of felt or fabric in half so you have two pieces 4.5" by 12". Center pieces at front and glue along white to create clothing. You could also paint a piece of felt with dots or use buttons for polka dots. Trim ends even with white felt at ends.
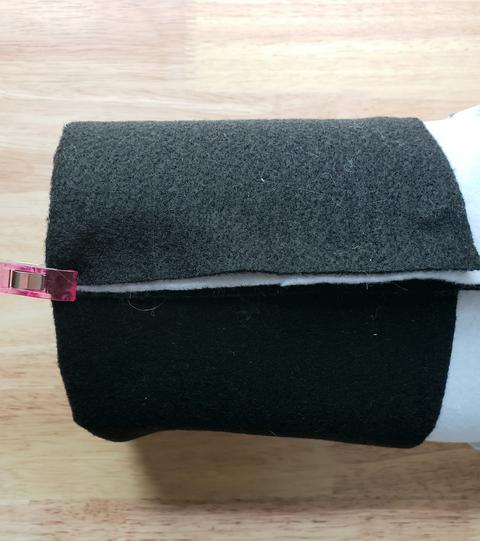
STEP 6
Fold the remaining black felt hair piece over white to the back. Glue in place. Fold the entire piece into a cylinder, overlapping ends slightly. Glue and clip in place until ompetely dry.
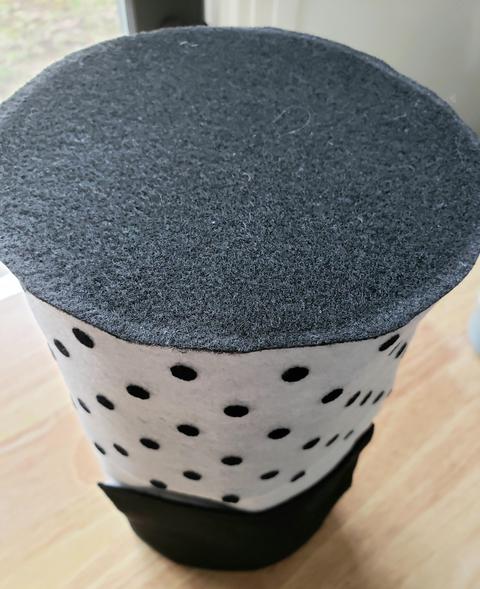
STEP 7
Glue a 6" black circle over bottom of planter. Glue in place. Trim off any excess felt carefully.
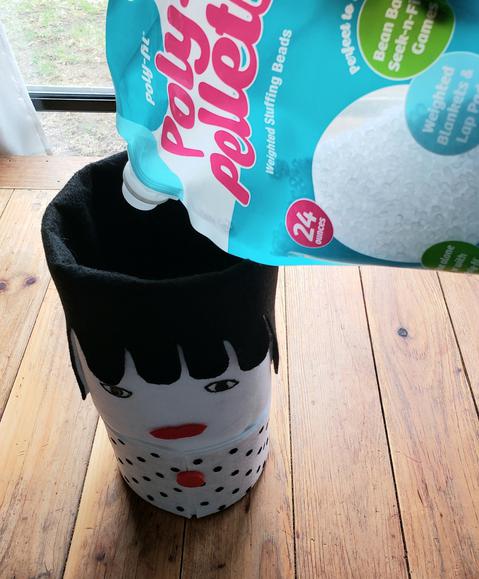
STEP 8
The 24 oz. container of poly-pellets has a handy pouring spout, so convenient. Now I poured the pellets directly into the bottom but you can also place them in plastic bag and put in bottom. I filled the planter about 4". I then placed the second felt circle on top of the pellets and glued in place. Both the poly-pellets and felt can get wet without any damage and will dry easily. Now just add your favorite plant!
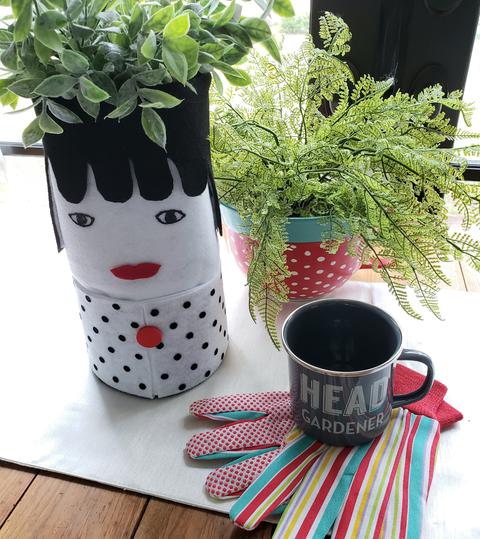
Of course when I saw the mug "Head Gardener" I just had to get it! This setting makes me smile.
I have a new potting bench area and love this Whimsical DIY Head Planter in the space. How cute is that! I need to make a family of pots.
Thank you for stopping by my creative corner! You can find me on IG @debraquartermain and Fairfield World @fairfieldworld. Debra
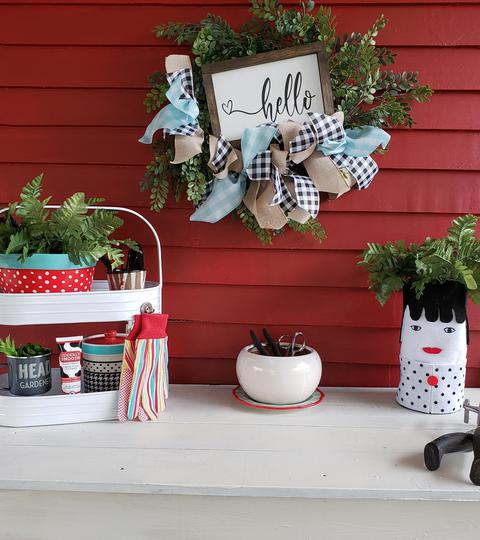
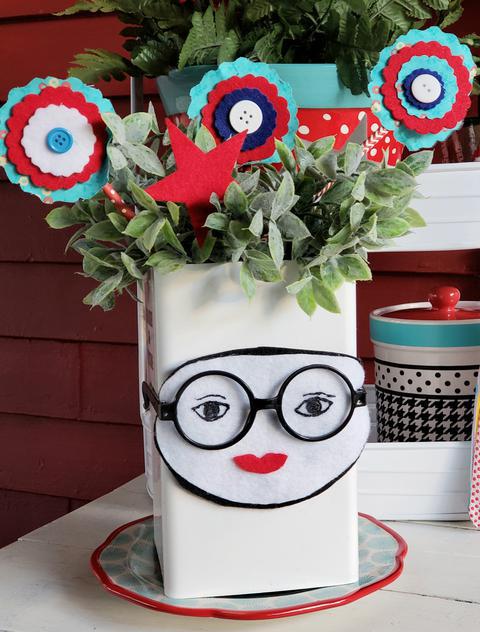
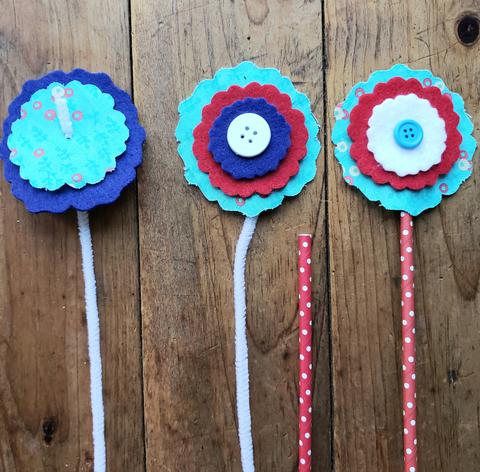
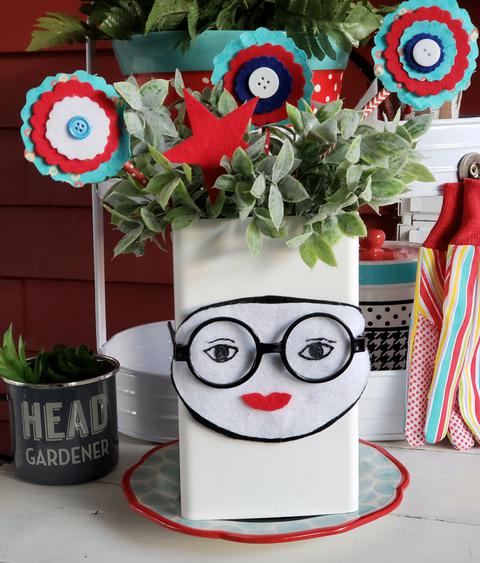
Have you noticed all the trendy face and head planter pots? They are so fun and whimsical! I used a recycled container and here is my How to Make Face Planter Pot. I give the pot a Patriotic flair with the addition of DIY felt flowers for the Team Creative Crafts Patriotic Edition. I like to use home decor items from around the house and add details to make them special for different holidays.
The base for this fun planter were a couple of plastic cubes I glued together. They came with our new arbor assembly and held little bits. I kept them to make something and a whimsical planter was perfect. I used Kunin Felt for the face as it is weather resistant. Now I have a fun addition for my new potting bench.
Let's get started!
You will need a container, the face is about 6" but can be adjusted in size. My conta8ner is the same width of 6".
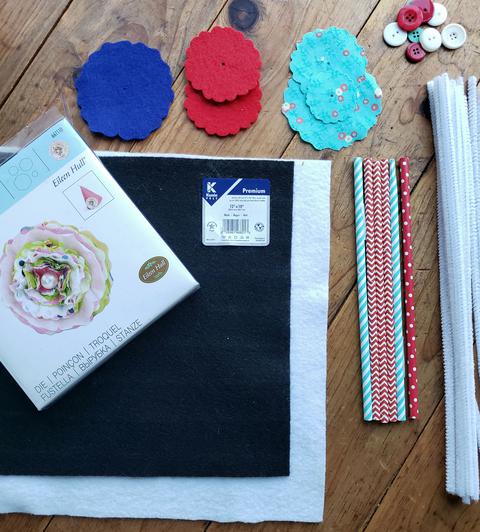
9" x 12" craft cuts of Kunin Felt: White, Black, Red, Royal Blue
Fabric Scraps
White chenille stems
Straws
Buttons
Flower Die, I used Eileen Hull's Flowe Die with Sizzix (or cut free hand flower shapes)
Fabric Glue
Dimentional paint in black
Scissors, ruler, marker, chalk, pencil, 6" and 2" circle templates
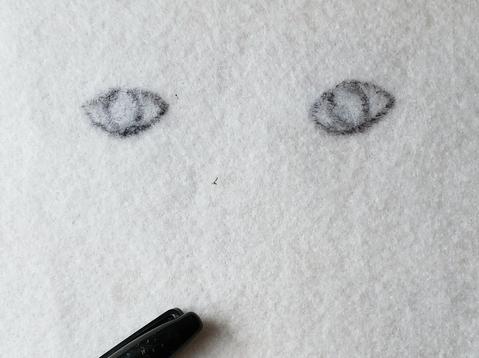
Step 1:
Cut a 6" circle from white and black felt. Trim in to oval shape. Cut the black one slightly larger than the white. Draw eyes with pencil on white. Paint and let dry. Cut 2" circle in half. Fold one half and curt a small lip shape. Glue to face. Glue white face over black back. Glue to front of container. I had these cute Harry Potter glasses that were a perfect fit!
Step 2:
Die Cut felt flower shapes from fabric scraps and red, white, blue felt. Layer flower shapes making as many as you want.
Step 3:
insert chenille stem through each flower stack, bend end. Glue button over chenille stem at center. Insert straw. Bend end over slightly. Cut off excess. Repeat for each flower.
Place greenery in your Face planter and add felt flowers. Add some felt stars if want and as many flowers as your container needs.
Want to be inspired by more creative Patriotic crafts, just click the link in the sidebar!
Thank you for enjoying my How to Make Face Planter Pot, such a fast and easy DIY!
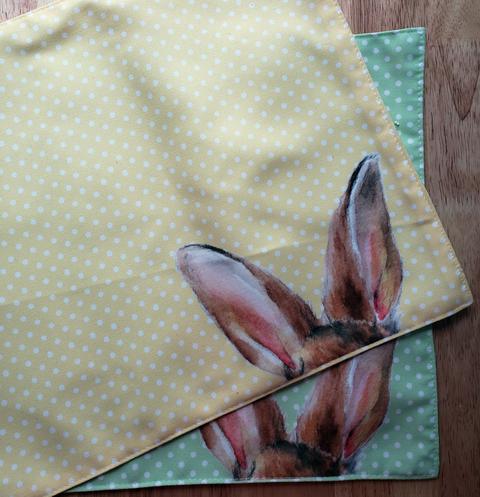
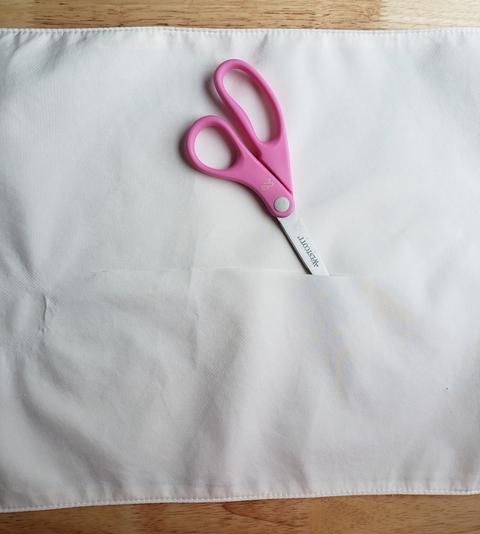
Welcome to the Creative Crafts Collaborative, Edition 9, Recycled Craft Projects! Recycling and upcycling projectshas been a big focus for me this past year. I have been creating new spring pillows from placemats, tablecloths and tea towels. These Upcycled Bunny Placemat Pillows were the perfect addition to my spring decor!
Look for placemats with a lining and are a close woven fabric like a cotton polyester blend. Recycling placemats gives a tailored pillow and is completely a no sew project.
I admit to having a thing for polka dots and bunnies!
This iis a quick and easy project! Carefully cut a slit through placemat back lining only.
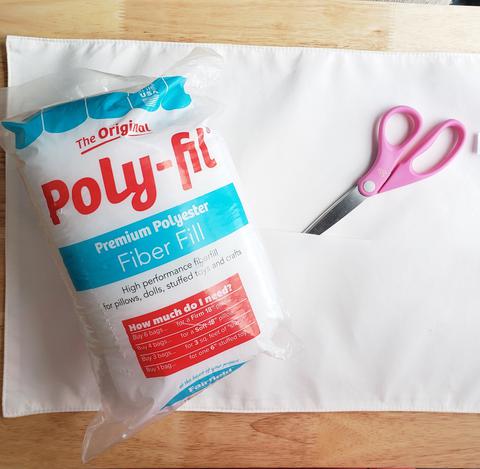
Stuff with a quality fiber fill. I use Fairfield World's Poly-fil. Push poly-fil into the four corners first.
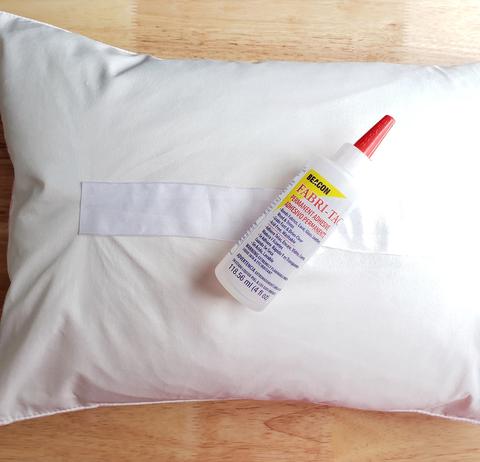
Take a piece of 2" wide ribbon an inch longer than slit. Match back of pillow. Use Fabri-tac to glue ribbon over opening. Ta da! You now have an Upcycled Placemat Pillow! How easy was that ?! Often placemats are marked down or check thrift stores to create more custom pillows.
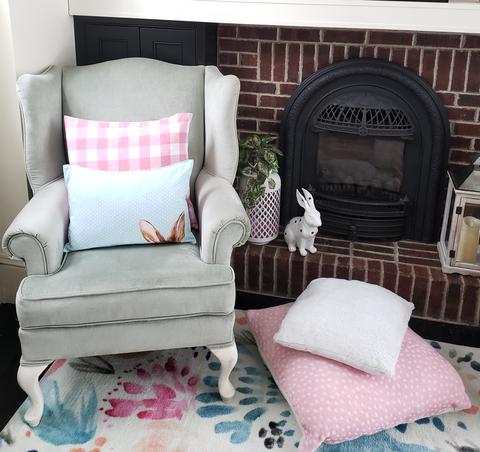
The bunny pillows were in four pretty colors so I could use them in different rooms.
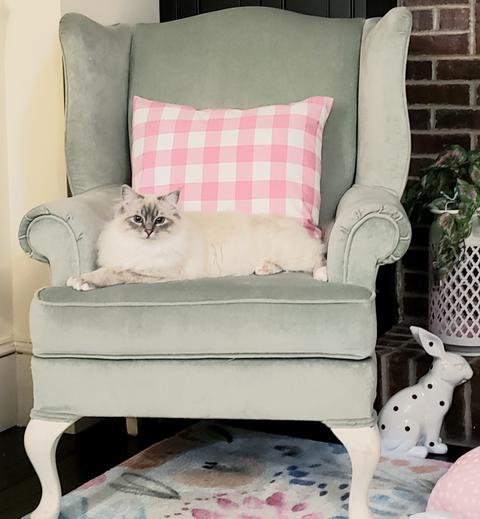
The pink check pillows were another upcycled project from a tablecloth used at a baby shower. I made them in a simple envelope style and used pillow forms from Fairfield World. The cute cat is our Birman @reignofrory on IG! He loves this chair.
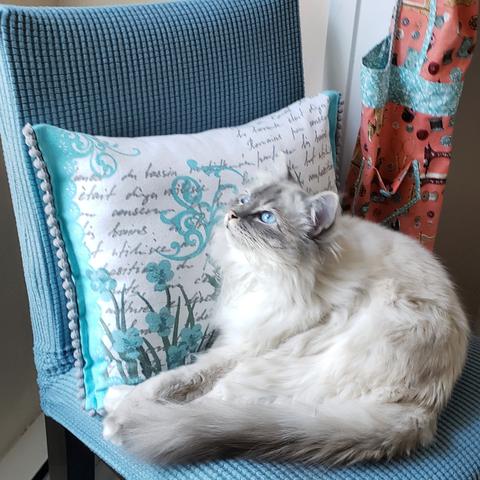
Rory also loves this stool in the laundry room which has another recycled or upcycled pillow created from the cutest tea towel! Kitchen linens come in so many pretty and fun prints and patterns, a whole world of thrifty creative and trendy home decor projects! When you want to change them just gently pull off ribbon and unstuff!
The Creative Crafts Collaborative, Edition 9 Recycled Creative Crafts has an awesome Give Away sponsored by Fairfield World, a $100 Gift Card from JoAnn and 10 pounds of Poly-fil!
The Give Away is happening over on IG. Find me @debraquartermain.
Thank you for taking the time to visit my blog and hope you are inspired! Debra
Magical Mimi to Grandlittles, I love to create, decorate & celebrate. Sharing joy and inspiration from our 200 year old home, Quartermain House B&B on the east coast of Canada.


 I
I