#
Debra Quartermain Design
Latest Posts
Categories

 the CEO! Creative Eternal Optimist! Blog 
Tuesday, March 27 2012

Talented designer friend Eileen Hull is hosting a spring linky party with a great giveaway! My project from my archives features the Sizzix Scoreboard TM Teacup Die  by Eileen Hull. Several designers are using more of Eileen's dies to create fabulous fun projects! Hop around and enjoy, be inspired!

My design incorporates my love of fabric and needle felting, my inspiration the Alice in Wonderland movie.

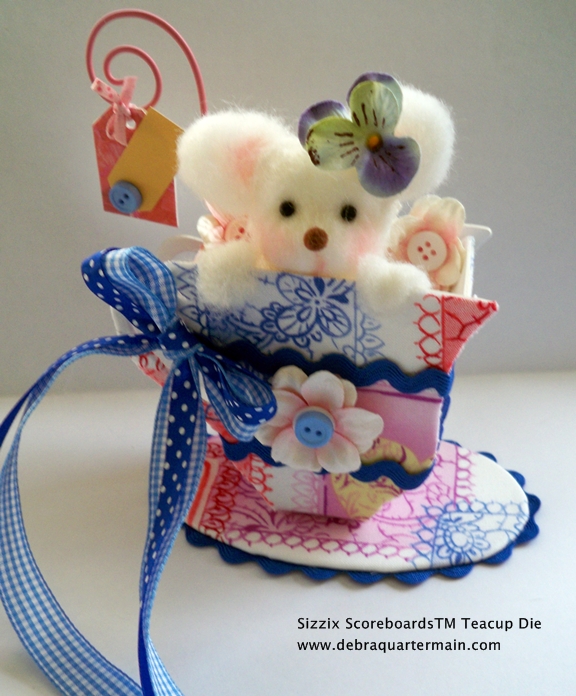
Materials: Teacup die, 12" x 18" piece of print fabric, HeatnBond Iron-on Adhesive, 1 1/2", 2" balls STYROFOAM TM, Natural Wool Wisps by National Nonwovens, 1/2 yd each of 1/2" blue check ribbon, 1/4" blue dot ribbon, 8" of 1/8" pink polka dot ribbon, 1 yd blue rickrack, 3 button flowers, 1 pansy flower from Prima, 2 blue buttons, yellow & pink paper scraps, pink wire, 2 black quilt pins, brown pompom, blush, needle felt tool, foam pad, sharp scissors, iron & board, mini iron, pencil, toothpick, Beacon's Fabri-Tac and Zip Dry glues.

How to:
1. Fuse HeatnBond to fabric piece following manufacturer's instructions. Place teacup die pieces on wrong side of fused fabric leaving 1/2"-2" space around each piece. Fuse pieces. Cut carefully around each piece leaving a 1/4" border, clip around curves. (For handle omit border) Use mini iron to fuse 1/4" border over edges. Flip saucer and two cup pieces, fuse fabric to back of pieces. Cut along edge of cup pieces.
2. Score and assemble cup together. Glue. Glue rickrack around edge of the saucer.


3. Use fingers to indent eye sockets for mouse on 1 1/2" ball. Cover ball with wool and needle felt. Cover second ball with wool, needle felt. Insert second ball into cup and glue.


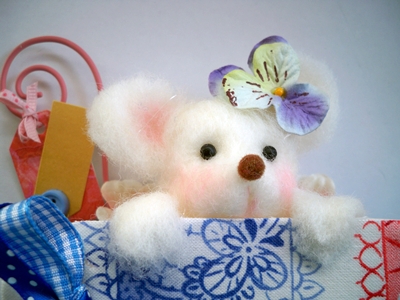
4. Needle felt a 4" square of wool on foam pad. Cut out two 1" ovals for ears, two 1/2" by 1 1/2" for paws rounding ends. Blush ear centers, cheeks. Insert eyes and glue on nose. Needle felt under nose for mouth center, blush. Needle felt ears to top of head.
5. Wrap and glue rickrack around cup. Glue flower to center front adding blue button. Tie ribbons together and glue to handle.
6. Insert toothpick into mouse head and insert into ball in cup pushing together. Glue paws over edge of cup. Glue pansy to ear. Glue flowers behind mouse.
7. Cover die tag with pink paper. Cut smaller tag 1/2" by 1" from yellow. Glue to pink tag. Glue blue button in place on tag. Tie to pink tail wire. (Tail was a dollar store find, a photo holder, I cut off wires) Insert tail into mouse foam body in tea cup.

Enjoy the Spring Linky party and be inspired to create some fresh spring accents!

Posted by: Debra Quartermain, CEO! AT 12:58 pm   |  Permalink   |  18 Comments  |  Email
Comments:
Posted by JGoode on 04/14/2010 - 01:25 PM
Love it! So very cute and a fun playful take on the color challange to boot - way to go! Needle felting is on my top things I want to learn list, how fun!
Posted by Debra Quartermain on 04/14/2010 - 01:30 PM
Oh Jen! I can just see your needle felting! It would be adorable!
Posted by eileenhull on 04/14/2010 - 02:15 PM
Debra, your teacup is so cute with the little mousie in there. I can so see the Alice in Wonderland influence here. Thanks for joining us!
Posted by Michelle Cummings on 04/14/2010 - 02:21 PM
oooh I love your little mousey and how his tail is curled to hold the tea bag! so clever! If you like Alice in Wonderland...come by my blog...i just hosted a amazing charm swap around this theme! http://faeriedustdreams-michelle.blogspot.com/
Posted by Angel Plank on 04/14/2010 - 05:46 PM
Both the teacup and the mouse are adorable! I love it.
Posted by Ann Butler on 04/14/2010 - 07:34 PM
How adorable....
Posted by Madeline Arendt on 04/14/2010 - 10:03 PM
Just love all that you do Debra!
Posted by connie williams on 04/15/2010 - 01:00 AM
how adorable- looks like a mini easter basket!
Posted by Laura Bray on 04/16/2010 - 07:55 PM
I love the rick rack around the base. So sweet.
Posted by Charity Donaldson on 04/18/2010 - 09:10 AM
AMAZING!!! Love that you put a doormouse in your teacup!! And have a very happy unbirthday!!
Posted by Brenda Pinnick on 04/18/2010 - 02:30 PM
Debra, as always, your creations are beyond adorable! Your sweetness shows through in all you do. hugs and love, Brenda
Posted by Debra Quartermain on 04/18/2010 - 05:53 PM
Thank you for all the sweet comments! The die was very fun to work with!
Posted by Cindy Coleman on 04/19/2010 - 11:51 PM
This would bring a smile to anyone's face, just looking at this delightful teacup, with the bear.
Posted by Teresa Godines #6857 on 03/27/2012 - 03:48 PM
Oh my... This is too cute.
Posted by Monika Wright on 03/27/2012 - 10:52 PM
so many fun and whimsical elements incorporated into your fun project!
Posted by bea on 03/28/2012 - 03:41 AM
so cute - wouldn't anyone just love to receive this
Posted by Debra Quartermain on 03/28/2012 - 09:37 AM
Thank you Monika and bea for the kind comments!
Posted by Paulette S on 03/28/2012 - 07:05 PM
Isn't the teacup die so much fun! Love your felted mouse, it's just precious. I'm sad to say , this is the only Eileen Hull die I have and knew I had to have it when I first laid eyes on it. I use it a lot.

Post comment
Name
 *
Email Address

Message
(max 750 characters)
*
* Required Fields
Note: All comments are subject to approval. Your comment will not appear until it has been approved.

Debra Quartermain Design

 Magical Mimi to Grandlittles, I love to create, decorate & celebrate. Sharing  joy and inspiration from our 200 year old home, Quartermain House B&B on the east coast of Canada.

" "
Facebook
LinkedIn
Add to favorites
Twitter
    Sign Guest Book  View Guest Book 

    Debra Quartermain Design
    Fredericton, NB
    Canada
    Web Design Debra Quartermain
    Illustration Deborah Peyton
    Content copyright Debra Quartermain
    Email: debraq53@gmail.com

    Design Your Own Website, Today!
    iBuilt Design Software
    Give it a try for Free